If you’re looking for very general information about telemedicine visits, please read Telemedicine Visits at MSK.
In this resource, we give how-to instructions about how to get ready for and join your MSK telemedicine visit.
You can read the whole resource. Or, if there’s a topic that you need help with, you can just read about that topic. Click on the links below to read or print information on that topic. To learn about another topic, click on “Back to top.” That will take you back to the list of topics.
List of topics
- The link to join your visit: how and when we send the link. Quick tip: You don’t need to download anything. The link just opens in a web browser.
- How to ask for an interpreter and how to read the appointment page in Spanish, Russian, or Simplified Chinese.
- How to sign your consent form before your visit starts.
- How to test your audio, camera, microphone, and Internet settings. Quick tip: This is a video visit with a camera and audio. It’s not a phone call.
- How to test your device after your visit starts.
- How to invite family, friends, and caregivers to the telemedicine visit.
- Information about joining the visit: when to join and what devices you can use. Quick tip: You will have a more personal experience if you login through MyMSK. For example, you can see any forms that you must complete.
- How to use the buttons on your screen during your telemedicine visit.
- Troubleshooting tips: What to do if your care team can’t see or hear you.
- Frequently Asked Questions.
The link to join your visit: How and when MSK sends you a link
The link will open in a web browser. You do not need to download anything.
There are 3 ways we will send you a link to join your telemedicine visit.
- MyMSK: From your MyMSK account, you can join your visit from the Appointments tab.
Go to the section Joining through MyMSK
- Text: If you signed up to get text messages from MSK, we will text you the link.
Go to the section Joining through Text Message
- Email: If you don’t see the email in your inbox, check your junk or spam folders.
Go to the section Joining through Email
Here’s when you can expect to get the link.
- We will send it 3 days before your telemedicine visit. We will send it again 2 hours before your visit.
- If your telemedicine visit is in less than 3 days, we will send the link after you schedule the appointment. We will send it again 2 hours before your visit.
- We will email a link to anyone you invite to join your telemedicine visit.
How to ask for an interpreter
|
The telemedicine appointment page is available in Spanish, Russian, and Simplified Chinese. On the top right of your screen, select the language symbol to choose one of the available options to translate the page. |

|
If you would like an interpreter to join your call, ask an office coordinator or care coordinator.
How to sign your consent form before your visit starts
Before your telemedicine visit, you must sign a consent form. It explains what you can expect from your telemedicine visit. You must sign this form on your own. Your caregiver will not be able to sign the form for you.
If you’re joining your telemedicine visit from MyMSK:
If you have not signed a telehealth consent, you will see a message: “Please sign your Telehealth consent form.”
-
Select “Sign Now (See Figure 1).”

Figure 1. The screen to sign your consent form
If you’re joining your telemedicine visit from the email or text we sent to you:
- If you use your MyMSK username and password to sign in, you will see “Please sign your Telehealth consent form.”
- If you use your date of birth to sign in, you will not see that message.
If you have trouble signing the consent, please contact your healthcare provider’s office.
How to test your audio, camera, microphone, and internet settings before your telemedicine visit
You don’t need to download software. The telemedicine visit will open in a web browser. We recommend using the latest version of Google Chrome, Microsoft Edge, or Safari. You also can use Firefox if you’re using a computer for your telemedicine visit, not a mobile device.
Test your device before your visit:
- Click on the link for your appointment. You can use the link we sent in your email, in MyMSK, or by text.
- Log in to your telemedicine visit.
- Test your internet, camera, sound, and speaker. This lets you make sure your care team can see and hear you during your telemedicine visit (see Figure 2).
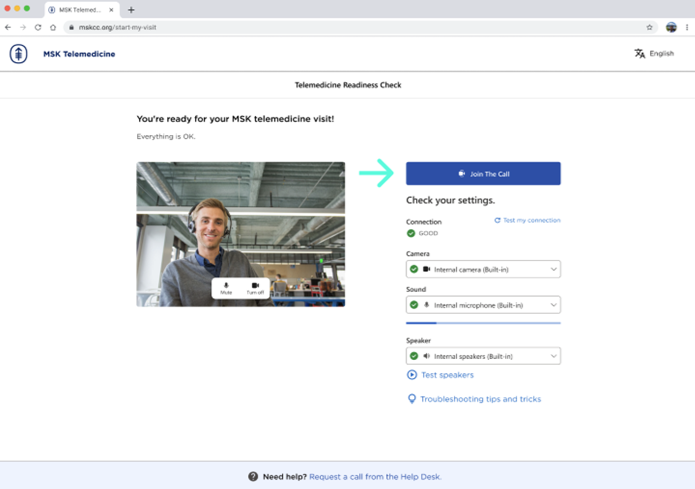
Figure 2. The Join The Call button, after you have tested your device.
How to test while you’re waiting for your care team
Look for the “Test Devices” button. It’s in the visit information section, under the “Get ready for your visit tab” (see Figure 3). This is also where you can find our step-by-step Telemedicine Visit Tutorial.
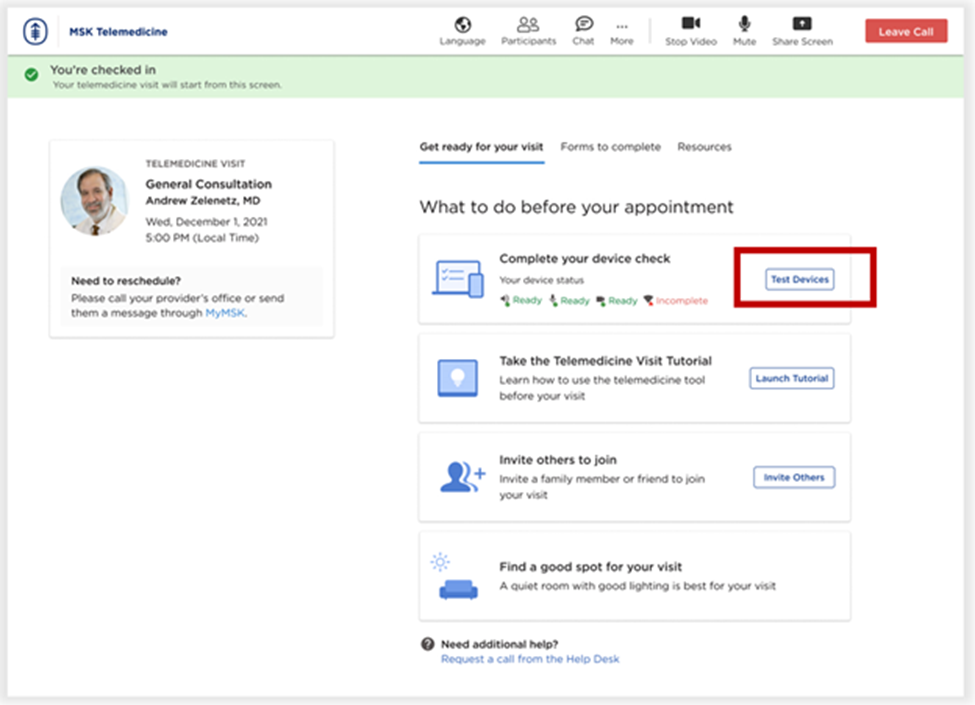
Figure 3. Select the “Test Devices” button. It lets you test your device while you wait for a care team member to join
How to test your device after your appointment starts
- You will be in the virtual room. Select the 3 dots (more) at the top of the screen (see Figure 4). Click “Device Settings.”
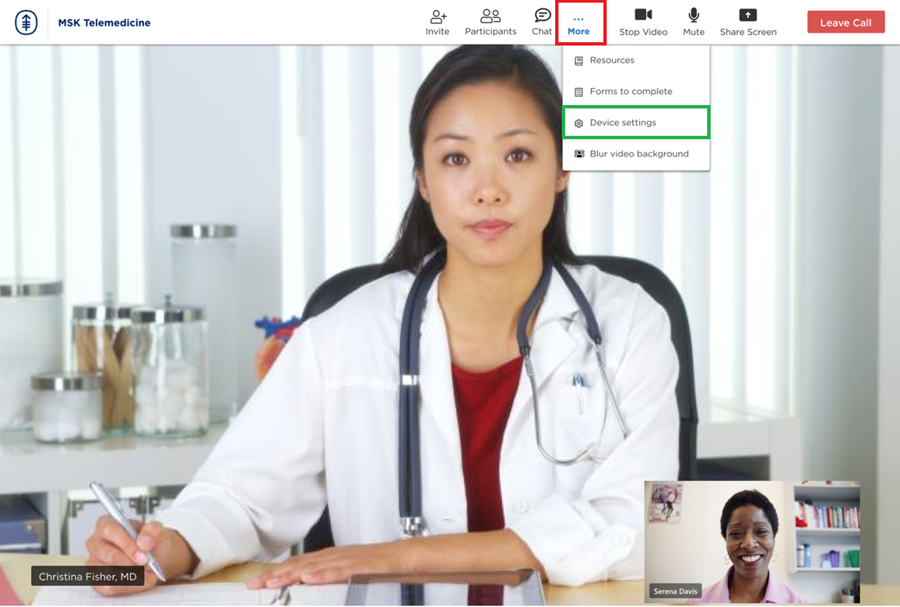
Figure 4. A sample of a screen after the care team joins the telemedicine visit
- Make sure your video and microphone are turned on. If they’re off, the camera and microphone symbols will be crossed out (see Figure 5). Look for them at the top of your screen. Select the camera or microphone symbols to turn them back on.
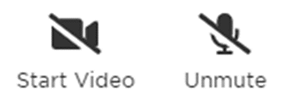
Figure 5. The crossed-out video and microphone symbols. You will see them at the bottom of your screen
- If Step 2 does not work, check your device settings to see if access to your camera or microphone is blocked. See the section Troubleshooting Tips for help.
- You can blur your video background if you want to. Select the 3 dots at the top of your screen (more). Select “Blur video background” (see Figure 6).

Figure 6. The green highlight shows the “Blur video background” option
How to add a family member, friend, or caregiver
You can invite family members, friends, and caregivers to join your visit. Here’s how:
- By asking a member of your care team to invite them.
- By sharing with them the appointment link we sent you.
- From the virtual room before your telemedicine visit starts. Select the “Invite Others” button.
- Through MyMSK.
How to invite people through MyMSK
- Select your appointment from the MyMSK homepage.
- Select “Invite Others” (see Figure 7).
- Enter their name and their relationship to you, such as “friend” or “sibling.”
- Enter their email address.
- If someone does not have email or a device with a camera, they can still join your telemedicine visit. They can join by phone using the audio dial-in information in the email we sent you. This information is also in the virtual room.
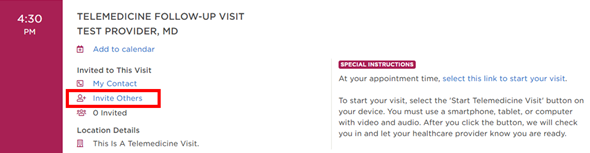
Figure 7. Select “Invite Others”
Patients: Joining Your Telemedicine Visit
When can I join my telemedicine visit?
The telemedicine virtual room opens 15 minutes before your appointment time. You can join then to start your visit.
What happens in the virtual room?
When you join, we will check you in. Your healthcare provider will know you are in the room. Wait for them to join. You will see confirmation that you’re checked in (see Figure 8).
While you wait: Do’s and Don’ts
Do use this time to test your audio and video settings. For information, see the section “Test your device after your appointment starts.”
Don’t accept a call on your mobile device. If you do, your audio and video for your visit can turn off temporarily. We cannot see or hear you unless you turn your microphone and video back on.
What devices can I use?
You can join on any smartphone, tablet, or computer that has Internet access and a camera, speaker, and microphone.
Need help? Please call 800-248-0593 and choose option 1 to reach our Help Desk. They are open Monday through Friday from to (Eastern time).
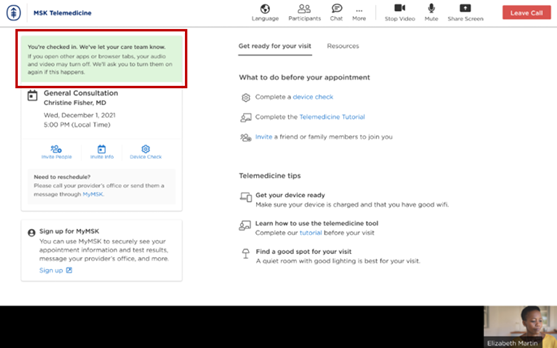
Figure 8. Your check-in confirmation in the virtual room
Joining through MyMSK
To join your telemedicine visit using MyMSK, follow these steps:
-
Login to your MyMSK account by going to my.mskcc.org or opening the MyMSK app.
- If you plan to use your MyMSK app for your telemedicine visit, make sure you have the latest version of the app downloaded on your smartphone or tablet.
- If you don’t have a MyMSK account, visit my.mskcc.org, call 646-227-2593, or call your healthcare provider’s office for an enrollment ID. For more information, watch our video How to Enroll in MyMSK: Memorial Sloan Kettering’s Patient Portal.
- If your caregiver manages your MyMSK account for you, ask them for your login information or have them help you.
- On your homepage under Appointments, find the telemedicine visit you’re joining. Select “Start Telemedicine Visit” (see Figure 9).
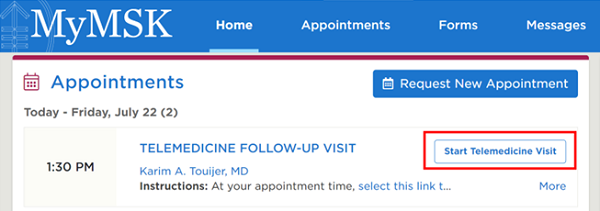
Figure 9. Select “Start Telemedicine Visit”
- A screen will come up asking for access to your camera and microphone. Select “Allow” to let your healthcare provider see and hear you (see Figure 10).
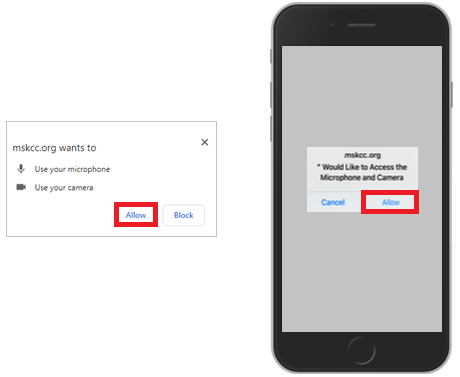
Figure 10. Select “Allow”
Joining through text message
- If you get text messages from MSK, we’ll send you a text message with a link from MSK Telemedicine 3 days before your telemedicine visit. We’ll send the link again on the day of your visit. When it’s time for your visit to start, tap the link in your text message.
- A screen will open in your web browser. Tap “I am the patient.” Tap “Use MyMSK Login” and enter your MyMSK login (username and password). You can also enter your date of birth to join (see Figure 11).
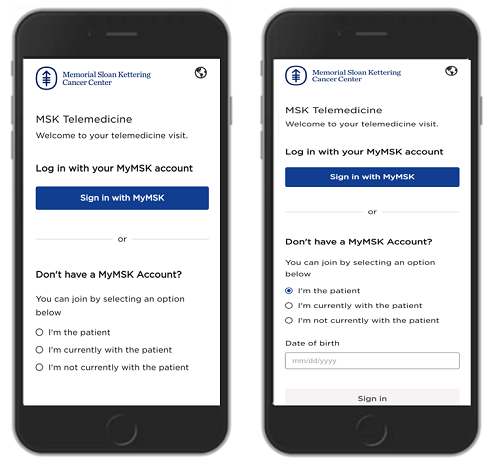
Figure 11. The login screens. Select who is logging in. Log in with your MyMSK login or your date of birth.
When you join with your MyMSK login, you will be able to see any forms or questionnaires that you must complete.
Caregivers: If a caregiver is physically with you, they can help you log in. They can select “I am with the patient.” Then, they can enter your date of birth or their MyMSK proxy account information.
- You may see a pop-up asking to allow MSK Telemedicine to access your camera and microphone. Select “Allow.”
Joining through email
- If you get emails from MSK, we’ll send you an email with a link from MSK Telemedicine 3 days before your telemedicine visit. We’ll send it again on the day of your visit. When it’s time for your telemedicine visit to start, select the link in your email.
- A screen will open in your web browser. Select “I am the patient” and enter your date of birth. Select “Continue.” You can also join by entering your MyMSK login (username and password).
- You may see a pop-up asking to allow MSK Telemedicine to access your camera and microphone. Select “Allow.”
Invited guests: Joining the visit
Invited friends and family will get the link and dial-in information by email. We’ll send them this information 3 days before your telemedicine visit. We’ll send it again on the day of your visit.
If you invite them within 3 days of your visit, they will get an email soon after you add them. We will also send a reminder on the day of the visit.
When it’s time for your telemedicine visit to start:
- Your invited guest selects the link in the email.
- A screen will open in their web browser. They select “I’m not currently with the patient” (see Figure 12). Then, they enter their name, relationship to you, and their email address.
- They select “Continue” to join.
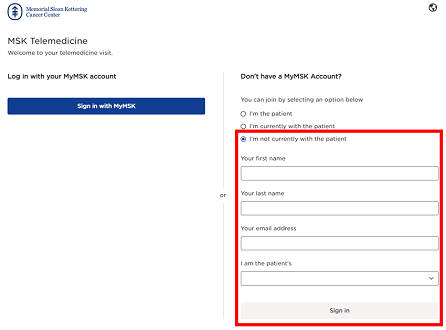
Figure 12. The “I’m not currently with the patient” button
If your guest is physically with you and they are helping you sign in on their device:
- They select “I’m currently with the patient.”
- They enter your date of birth or their MyMSK proxy account information to join.
- You may see a pop-up asking to allow MSK Telemedicine to access your camera and microphone. Select “Allow.”
Understanding the Buttons
This explains how to use the buttons on your screen during your visit (see Figure 13).
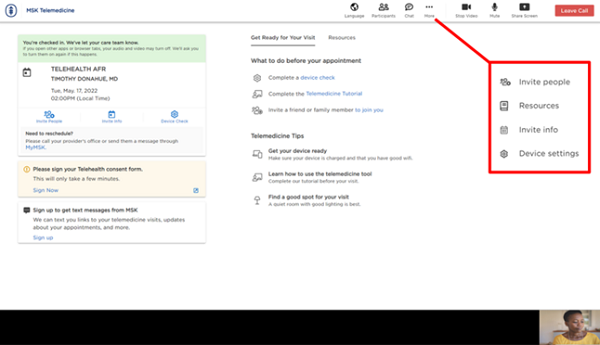
Figure 13. The buttons you may need during your visit
- The invite people button lets you invite friends or family members to the visit.
- The invite info button lets you copy the link and information to call into the telemedicine visit.
- The check devices button lets you test your microphone, speaker, camera, and network (Internet) settings.
- The Telemedicine Tutorial button guides you through a tutorial of the features in the virtual room.
- The language button lets you translate the page into Spanish, Russian, or Simplified Chinese.
- The participants button shows who is at the visit, and who is invited to the visit.
- The chat button opens or hides the chat box. The chat box is where you can send messages to people in the visit.
- The more button (with 3 dots) has: Invite People, Resources Invite Info, and Device Settings.
- The stop/start video button turns your video off or on.
- The mute/unmute button mutes and unmutes your microphone. When you’re muted, your healthcare provider can’t hear you.
- The share screen button shares your screen with your healthcare provider. You can use this to show them a picture or document.
- The resources button has helpful links to MSK resources.
- The leave visit lets you exit the visit. You can rejoin if no one from the MSK team ends the call.
Troubleshooting Tips: What to do if your care team can’t see or hear you
Follow the instructions on your screen that tell you what to do if your microphone or camera are not working.
Check your camera and microphone settings on your browser. Make sure you let your browser access your camera and microphone. Use these links to check your settings:
- Click here for Google Chrome
- Click here for Safari
- Click here for Microsoft Edge
- Click here for Firefox (computer version)
Close all other applications that can be using your microphone and camera. This includes using your smartphone for a phone or video call instead of for your telemedicine visit.
Use a different browser, such as Google Chrome, Microsoft Edge, or Safari. You also can use Firefox if you’re using a computer for your telemedicine visit, not a mobile device.
Use a different device.
Update your phone software or your browser to the latest software version.
Update your iPhone or iPad to the latest software version. Click here to learn how to update iPhone or iPad software.
Still need help? Please call 800-248-0593 and press 1 to reach the Telemedicine Help Desk. You can call them Monday through Friday from 9 a.m. to 5 p.m. (Eastern time). If you’re using your smartphone for your visit, use a different phone to call the Help Desk, if possible.
Telemedicine Visits: FAQs
My appointment time or date changed. Will the “Add to calendar” invitation on MyMSK update by itself?
No. You must make a new calendar invitation with the new appointment information.
Can I talk with my family and friends in the virtual room before my telemedicine visit starts?
You can talk with them while you’re waiting, starting 15 minutes before your scheduled appointment. Anyone who joins the virtual room with their camera and video on can see and talk with one another. If someone called using audio dial-in, they can hear and speak with others in the virtual room. You can also use the chat feature to chat with anyone who joined on a smartphone, tablet, or computer.
Can I leave my telemedicine visit and rejoin later?
Yes, you can join or rejoin until the end of your appointment time.
If I leave and rejoin, can I see my earlier chat history?
No. You can only see chat messages sent while you’re in the virtual room. If you leave and rejoin, your chat history will be cleared.
What does a telemedicine visit cost?
If you have questions about billing, please see Help With Your Financial Questions at MSK.
I do not live in New York or New Jersey. What if my healthcare provider is not licensed in my state?
Please contact your healthcare provider’s office to get more information.
Why do we need a camera? Why can’t I just use my phone to talk with my healthcare provider?
A telemedicine visit is like an office visit. It is not the same as a simple phone call. If you’re having trouble with your camera or audio, call 800-248-0593 and press 1 to reach the Telemedicine Help Desk. They will help you with this technology.
How do I get ready for a telemedicine visit that is an exam, including what to wear?
- Help: Try to have someone with you to help you during the exam, if you can.
- Lighting: Be in a room with good lighting but avoid having a window behind you.
- Seating: Sit in a simple chair, such as a dining room chair, if you can.
- Camera: Set up your camera at eye level or a little higher. Prop up your smartphone, so both your hands are free.
- Equipment: Try to use laptop with a large screen and camera, if you have one.
- Clothing: Try to wear something that shows more of your body, including your neck. Examples are a tank top and shorts. Have a robe or blanket to keep you warm while you wait for your exam to start.