This information will help you get ready for your biliary (BIH-lee-AYR-ee) drainage catheter placement procedure at MSK. It also explains how to care for your catheter at home.
About your biliary system
Bile is a fluid made by your liver. It helps you digest (break down) food. Bile flows from your liver through your bile ducts and into your small intestine.
Your bile duct can be narrowed or blocked by scar tissue or a tumor. When this happens, bile can no longer flow into the first part of your small intestine, called the duodenum (DOO-ah-DEE-num). When your bile duct is narrowed or blocked, it causes bile to build up in your liver (see Figure 1).
The buildup of bile in your liver can cause:
- Infection
- Nausea (feeling like you’re going to throw up)
- Vomiting (throwing up)
- Fever
- Itching
- Jaundice (when your skin and the whites of your eyes look yellow)
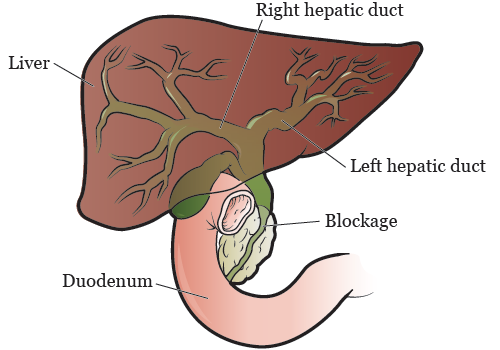
Figure 1. Narrow or blocked flow of bile
About your biliary drainage catheter
If your bile duct is blocked, your doctor may recommend you have a biliary drainage catheter placed. This is a thin, flexible tube that drains bile from your liver.
There are 3 different ways bile can be drained from your liver. Your doctor will talk with you about these before your procedure.
-
An internal-external biliary drainage catheter goes through your skin and into your bile ducts. It will be placed across the blockage (see Figure 2).
After this procedure, one end of the catheter will sit inside your small intestine. The other end of the catheter will come out of your body. It will be attached to a drainage bag that collects the bile that’s drained from your liver.
An internal-external biliary drainage catheter lets bile flow in 2 directions. The bile can flow into your small intestine (called internal drainage) or out to your drainage bag (called external drainage).
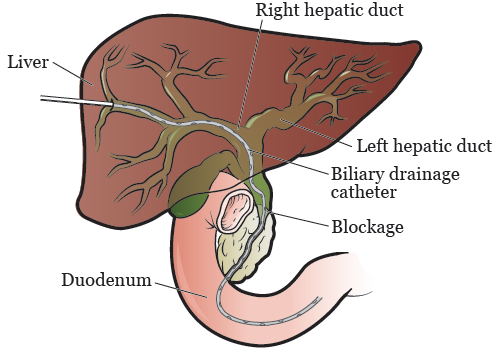
Figure 2. Internal-external biliary drainage catheter
-
An external biliary drainage catheter goes through your skin and into your bile ducts. It will be placed above the blockage (see Figure 3).
After this procedure, you will have a catheter coming out of your body. The catheter will be attached to a drainage bag that collects the bile that’s drained from your liver.

Figure 3. External biliary drainage catheter
-
Biliary stenting uses a stent (thin, metal tube) to hold the blocked bile duct open. Opening the blocked bile duct with a stent lets the bile drain from your liver.
After this procedure, you may have a small catheter coming out of your body. When your doctor sees that your stent is working well, they will take out the catheter.
Your biliary drainage catheter or biliary stent will be placed by an interventional radiologist (also called an IR doctor). An IR doctor is a doctor with special training in doing image-guided procedures.
If you had a biliary drainage catheter placed, it will be attached to a bag to collect the drainage. Your IR doctor will tell you how much drainage you should expect to have.
What to do before you get your biliary drainage catheter
Ask about your medicines
You may need to stop taking some of your medicines before your procedure. Talk with your healthcare provider about which medicines are safe for you to stop taking. We’ve included some common examples below.
Blood thinners
Blood thinners are medicines that affect the way your blood clots. If you take blood thinners, ask the healthcare provider performing your procedure what to do. They may recommend you stop taking the medicine. This will depend on the type of procedure you’re having and the reason you’re taking blood thinners.
Examples of common blood thinners are listed below. There are others, so be sure your care team knows all the medicine you take. Do not stop taking your blood thinner without talking with a member of your care team.
|
|
Read How To Check if a Medicine or Supplement Has Aspirin, Other NSAIDs, Vitamin E, or Fish Oil. It has information about medicines you must avoid before your procedure.
Medicines for diabetes
Before your procedure, talk with the healthcare provider who prescribes your insulin or other medicine for diabetes. They may need to change the dose of the medicine you take for diabetes. Ask them what you should do the morning of your procedure.
Your care team will check your blood sugar levels during your procedure.
Diuretics (water pills)
A diuretic is a medicine that makes you urinate (pee) more often. Hydrochlorothiazide (Microzide®) and furosemide (Lasix®) are common diuretics.
If you take any diuretics, ask the healthcare provider doing your procedure what to do. You may need to stop taking them the day of your procedure.
If you have had an allergic reaction to contrast dye in the past, tell your IR doctor. This is the doctor who is doing your biliary drainage catheter placement procedure. You may need to take medicine before your procedure to help with the allergy.
Take devices off your skin
You may wear certain devices on your skin. Before your scan or procedure, device makers recommend you take off your:
- Continuous glucose monitor (CGM)
- Insulin pump
Talk with your healthcare provider about scheduling your appointment closer to the date you need to change your device. Make sure you have an extra device with you to put on after your scan or procedure.
You may not be sure how to manage your glucose while your device is off. If so, before your appointment, talk with the healthcare provider who manages your diabetes care.
Arrange for someone to take you home
You must have a responsible care partner take you home after your procedure. A responsible care partner is someone who can help you get home safely. They should be able to contact your care team if they have any concerns. Make sure to plan this before the day of your procedure.
If you don’t have a responsible care partner to take you home, call one of the agencies below. They’ll send someone to go home with you. There’s a charge for this service, and you’ll need to provide transportation. It’s OK to use a taxi or car service, but you still need a responsible care partner with you.
| Agencies in New York | Agencies in New Jersey |
| VNS Health: 888-735-8913 | Caring People: 877-227-4649 |
| Caring People: 877-227-4649 |
Tell us if you’re sick
If you get sick (including having a fever, cold, sore throat, or flu) before your procedure, call your IR doctor. You can reach them Monday through Friday from to
After , during the weekend, and on holidays, call 212-639-2000. Ask for the Interventional Radiology fellow on call.
Note the time of your appointment
A staff member will call you 2 business days before your procedure. If your procedure is scheduled for a Monday, they’ll call you on the Thursday before. They’ll tell you what time to get to the hospital for your procedure. They will also remind you where to go.
If you don’t get a call by noon (12 p.m.) on the business day before your procedure, call 646-677-7001. If you need to cancel your procedure for any reason, call the healthcare provider who scheduled it for you.
What to do the day before you get your biliary drainage catheter
Instructions for eating and drinking: 8 hours before your arrival time
|
What to do the day you get your biliary drainage catheter
Instructions for drinking: 2 hours before your arrival time
| Stop drinking 2 hours before your arrival time. This includes water. |
Things to remember
- Follow your healthcare provider’s instructions for taking your medicines the morning of your procedure. It’s OK to take them with a few small sips of water.
- Do not put on body cream, lotion, or petroleum jelly (Vaseline®). You can use deodorant and facial moisturizers. Do not wear eye makeup.
- Do not wear any metal objects. Take off all jewelry, including body piercings. The tools used during your procedure can cause burns if they touch metal.
- Leave valuable items at home.
- If you wear contact lenses, wear your eyeglasses instead, if you can. If you do not have eyeglasses, bring a case for your contacts.
- Wear something comfortable and loose-fitting.
- When it’s time for your procedure, you must remove any hearing aids, dentures, prosthetic devices, wigs, and religious articles.
What to bring
- A list of all the medicines you take at home, including prescription and over-the-counter medicines, patches, and creams.
- Medicines for breathing problems (such as your inhaler), medicines for chest pain, or both.
- Your cell phone and charger.
- Only the money you may want for small purchases, such as a newspaper.
- A case for your personal items, if you have any. Eyeglasses or contacts, hearing aids, dentures, prosthetic devices, wigs, and religious articles are examples of personal items.
- Your Health Care Proxy form and other advance directives, if you filled them out.
- Your breathing device for sleep apnea (such as your CPAP machine), if you use one. If you cannot bring it, we will give you one to use while you’re in the hospital.
What to expect when you arrive
Many doctors, nurses, and other staff members will ask you to say and spell your name and date of birth. This is for your safety. People with the same or similar names may be having procedures on the same day.
Once you’re brought to the presurgical area, you’ll get a hospital gown and nonskid socks to wear. You’ll be asked to remove your eyeglasses or contacts, hearing aids, dentures, prosthetic devices, wigs, or religious articles, if you have any.
Meet with a nurse
You’ll meet with a nurse before your procedure. Tell them the dose of any medicines you took after midnight (12 a.m.) and the time you took them. Make sure to include prescription and over-the-counter medicines, patches, and creams.
Your nurse will place an intravenous (IV) line into a vein in your arm or hand, unless you already have:
- A central venous catheter (CVC) or any other type of CVC.
- A peripherally inserted central catheter (PICC).
- An implanted port (also called a mediport or Port-A-Cath).
You will get anesthesia (medicine to make you sleepy) during your procedure. It will be given through the IV line, CVC, PICC line, or implanted port. You may also get fluids through the IV line, CVC, PICC line, or implanted port before your procedure.
Meet with an anesthesiologist
You will also meet with an anesthesiologist (A-nes-THEE-zee-AH-loh-jist). An anesthesiologist is a doctor with special training in anesthesia. They will give you anesthesia during your procedure. They will also:
- Review your medical history with you.
- Ask if you’ve had any problems with anesthesia in the past. This includes nausea (feeling like you’re going to throw up) or pain.
- Talk with you about your comfort and safety during your procedure.
- Talk with you about the kind of anesthesia you’ll get.
- Answer questions you have about anesthesia.
Meet with a doctor
Before your procedure, you will meet the IR doctor who will place the biliary drainage catheter. They will explain the procedure to you and answer your questions. You will be asked to sign a consent form, which says you agree to the procedure and understand the risks.
In the procedure room
A member of your care team will help you onto the procedure table and into the right position. They will give you sedation through your IV line, CVC, PICC line, or implanted port. The sedation will make you sleepy and relaxed.
Next, they will clean your abdomen (belly) with an antiseptic solution, which kills germs and bacteria. Then, they will give you a local anesthetic to numb the area where they will place the biliary drainage catheter. You will get the anesthetic as an injection (shot).
Once the local anesthetic and sedation are working, your IR doctor will start the procedure. They will use fluoroscopy (real time X-rays) or ultrasound to help place the catheter. An ultrasound is an imaging scan that uses sound waves to make pictures of the inside of your body.
Your doctor may also give you an injection of contrast dye. The dye makes it easier to see the area where the catheter will be placed.
After they place your catheter, your IR doctor will place a silicone disk around the catheter (see Figure 4). This disk helps secure the catheter to your skin using an adhesive (sticky) dressing. You may also have a suture (stitch) to help hold the catheter in place.
After you get your biliary drainage catheter
After your procedure, a member of your care team will bring you to the Post-Anesthesia Care Unit (PACU). A nurse will check on you and take care of you while you wake up from the sedative.
They will monitor (keep track of) your body temperature, pulse, blood pressure, and oxygen levels. They will also monitor your catheter site for any bleeding. You will need to stay in bed until the sedative wears off. Most people stay in the PACU for at least 1 hour.
You may have some pain after your procedure. If you do, ask your nurse for medicine to help ease your pain.
Most people who have a new biliary drainage catheter placed stay in the hospital overnight. If you do not need to stay overnight, you will leave the hospital the same day as your procedure.
Your nurse will review your discharge instructions with you and your caregiver before you leave the hospital. They will also give you supplies to care for your catheter. They should give you enough supplies to last for 2 weeks. Read the “How to order your biliary drainage catheter supplies” section for information about getting more supplies.
About your biliary drainage catheter
There will be a black ink mark on your catheter above the silicone disk (see Figure 4). Your nurse will show it to you.
This mark should always be the same distance from the top of the disk. If it changes, this means the catheter has moved. You must call your IR doctor’s office so someone there can check it.
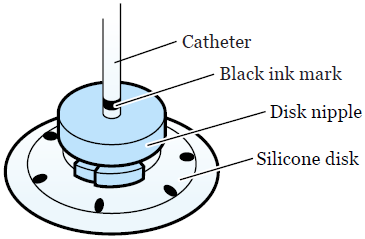
Figure 4. Black ink mark above the disk
The external (outside) end of your catheter will be attached to a 3-way stopcock (see Figure 5). It’s called a 3-way stopcock because it has 3 points of attachment (called ports). It also has a tap that can be turned to control the direction of fluid passing through the catheter.
The drainage bag will be connected to the port opposite to your catheter. The center port has a protective cover on it, which you can use to inject fluids. The cover is called a needleless connector.
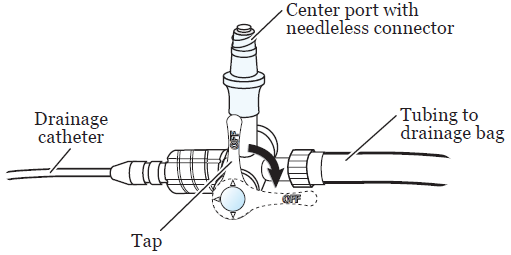
Figure 5. 3-way stopcock
You will have a drainage bag attached to your catheter. You will see bile (yellow-green fluid) flowing into the bag. The bile may look bloody for 1 to 2 days after your procedure. In time, it will turn a golden yellow or greenish color, depending on where the catheter is inside your body.
The drainage bag can be attached to the waistband of your clothing with a safety pin. Or, it can be secured to your leg with Velcro® straps. The bottom of the bag has a twist cap (drainage port), which you will use to drain the bag.
CathGrip® is a device that helps hold your catheter in place. It will not let your catheter come out of your body in case you pull on it by mistake. The CathGrip will help stop your catheter and tubing from pulling, stretching, or kinking (bending or twisting).
Caring for your biliary drainage catheter
Your nurse will teach you how to care for your catheter. Use this resource at home to remind you of what you learned.
Your care team can work with you to arrange for a visiting nurse to come to your home, if needed. This nurse will be from a visiting nurse service, not from MSK. They will help you care for your catheter until you or your caregiver feel OK doing it yourself.
Every day you will:
- Check your catheter.
- Flush your catheter with normal saline.
- Empty drainage from the drainage bag.
- Write down the amount of drainage you had.
You must change your dressing and drainage bag once a week. You also must change your dressing if it gets loose, wet, or dirty. If your dressing gets wet and you leave it on, your skin may become irritated and sore.
You may need someone to help you change your dressing and drainage system. You will be able to check your catheter and flush it with normal saline yourself.
The amount of fluid draining from your catheter may not always be the same. If you drain more than 500 milliliters (mL) in 1 day, talk with your IR doctor.
They will tell you what to drink to replace the fluid and salts that you’re losing in the drainage. As always, it’s important to stay hydrated (get enough liquids) and eat a balanced diet.
How to check your biliary drainage catheter
You must check your catheter every day. You can do this using a handheld mirror, a full-length mirror, or both.
- Find the black ink mark to make sure it’s in the correct position (see Figure 4). It should always be the same distance from the top of the disk. If the distance changes, this means the catheter has moved. Call your IR doctor’s office so someone there can check it.
- Check the dressing to make sure it’s secure. Change the dressing if it’s wet, dirty, loose, or is pulling away from your skin.
- Look at the skin around your catheter when you’re changing the dressing. Check to see that it’s in good condition. There should be no redness, areas of broken skin, or rash. There should be no fluid leaking around your catheter.
- Look at the bile in the drainage bag. It should be flowing freely into the bag. There should be no change in the way it looks. If there is less bile or the bile color changes, you may not be drinking enough liquids. Try to drink 8 (8-ounce) cups of liquids every day.
- Check the catheter and drainage bag for kinks (bends or twists) in the tubing. If there is a kink, straighten it out. Call your IR doctor’s office if you cannot straighten it.
If you see a problem, finish your catheter care first, and then call your IR doctor’s office.
How to flush your biliary drainage catheter
Here is a video that shows how to flush your biliary drainage catheter.
You must flush your catheter with normal saline 2 times every day. Your IR doctor will tell you if you should use 3 mL, 5 mL, or 10 mL of saline.
-
Set up your supplies on a clean, flat surface. You will need:
- 1 (10 mL) prefilled normal saline syringe
- 1 alcohol wipe
- Trash can
-
Wash your hands well with soap and water or use an alcohol-based hand sanitizer.
- If you’re washing your hands with soap and water, wet your hands with warm water and apply soap. Rub your hands together for 20 seconds, then rinse. Dry your hands with a paper towel. Use that same towel to turn off the faucet.
- If you’re using an alcohol-based hand sanitizer, be sure to cover all parts of your hands with it. Rub your hands together until they are dry.
- Take the normal saline syringe out of the wrapper. Take the cap off by twisting it and pulling it off. With the cap off, push the air out of the syringe. Do this by holding the syringe open-side up and pushing the plunger slowly until the normal saline is at the top. If your doctor told you to flush with less than 10 mL, squirt the extra saline out. Put the syringe on the table. Do not let the tip of the syringe touch anything.
- Sit or lie down in a comfortable position. Turn the stopcock so the tap points toward the drainage bag (see Figure 5).
- Clean the needleless connector on the stopcock with the alcohol wipe. Scrub it well for 15 seconds, then let it dry for 15 seconds. Throw out the wipe in the trash can.
- Place the syringe onto the needleless connector. Hold the connector while you push and turn the syringe clockwise (to the right) to lock it into position.
-
Flush your catheter rapidly to push out anything that can clog your catheter. Do this by pushing the plunger forward until you have added all the normal saline into your catheter. Never pull the plunger backward. Always push it forward.
-
If any of the following happens while flushing your catheter, do not put in any more saline. Stop pushing the plunger and call your IR doctor’s office if you:
- Feel pain.
- Have trouble pushing in the saline.
- See fluid leaking around your catheter.
-
If any of the following happens while flushing your catheter, do not put in any more saline. Stop pushing the plunger and call your IR doctor’s office if you:
- When the syringe is empty, turn it counterclockwise (to the left) while holding the needleless connector. Remove the syringe and throw it out in the trash can.
- Turn the stopcock back so the tap points toward the needleless connector (see Figure 5). You will probably see fluid drain into the bag.
How to empty your drainage bag
You must empty and measure your drainage at least 2 times every day. You can empty and measure it more often if needed.
-
Set up your supplies on a clean, flat surface. You will need:
- The measuring container you got in the hospital. If your measuring container has a cover, take it off.
- Non-sterile gloves.
- Dry gauze or 1 alcohol wipe.
- Drainage log and pen.
- Trash can.
-
Wash your hands well with soap and water or use an alcohol-based hand sanitizer.
- If you’re washing your hands with soap and water, wet your hands with warm water and apply soap. Rub your hands together for 20 seconds, then rinse. Dry your hands with a paper towel. Use that same towel to turn off the faucet.
- If you’re using an alcohol-based hand sanitizer, be sure to cover all parts of your hands with it. Rub your hands together until they are dry.
- Put on the non-sterile gloves.
- Hold the drainage bag with 1 hand. Flip the bag so the cap is pointing up. Use your other hand to twist the cap counterclockwise (to the left) to open the bag.
- Carefully flip the bag back down and let the fluid empty into the measuring container. Do not let the cap touch the sides of the container.
- When the bag is empty, flip the bag back up. Twist the cap clockwise (to the right) to close it.
- If any drainage gets on the cap, make sure to clean it. You can wipe the cap with dry gauze or clean it with an alcohol wipe. Throw out the gauze or wipe in the trash can.
- Measure the amount of fluid in the container. Then flush the fluid down the toilet.
- Wash the measuring container with soap and water. Let it air dry.
- Take off your gloves and throw them out in the trash can. Then, follow step 2 above to clean your hands again.
- Write down the amount of drainage that was in the measuring container in your drainage log. You can find the log in the print version of this resource. Make sure to subtract (minus) the amount of your saline flush (3 mL, 5 mL, or 10 mL) from the daily totals.
How to change your Uresil® dressing
The Uresil dressing system helps keep your catheter from moving out of your bile ducts. The disk is attached to your catheter. The dressing covers the disk, which keeps the catheter in place.
You will need to change your Uresil dressing once a week. Change your dressing if it gets wet, dirty, loose, or is pulling away from your skin.
Here is a video that shows how to change your Uresil dressing.
Although you may need someone to help you change your dressing, you can gather the supplies yourself.
-
Set up your supplies on a clean, flat surface. You will need:
- 1 Uresil adhesive dressing
- 3M™ No Sting Barrier Film
- Adhesive remover wipes
- Alcohol wipes
- Gauze
- Mild soap and a cup of water
- 2 pairs of non-sterile gloves
- 1 (2 inch x 2 inch) Telfa™
- Scissors
- CathGrip changing kit, if you’re changing the CathGrip
- Trash can
-
Clean your scissors with an alcohol wipe. If your Telfa is bigger than 2 inches by 2 inches, you must cut it to that size. Then, cut a slit in that piece (see Figure 6) and set it to the side.
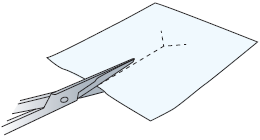
Figure 6. Cutting slit in Telfa
- Sit or lie down in a comfortable position. At this point, you may need someone to help you. Have the person doing the dressing change follow the instructions below.
-
Wash your hands well with soap and water or use an alcohol-based hand sanitizer.
- If you’re washing your hands with soap and water, wet your hands with warm water and apply soap. Rub your hands together for 20 seconds, then rinse. Dry your hands with a paper towel. Use that same towel to turn off the faucet.
- If you’re using an alcohol-based hand sanitizer, be sure to cover all parts of your hands with it. Rub your hands together until they are dry.
- Put on a pair of non-sterile gloves.
-
Remove the safety pin or Velcro strap holding the drainage bag in place. Make sure the drainage bag is resting somewhere that it cannot fall. Then, release the catheter from the straps on the CathGrip.
- If you’re changing the CathGrip, wipe adhesive remover around the edge of the CathGrip. This removes it from the skin. Throw out the adhesive remover wipe and old CathGrip in the trash can.
-
Hold the silicone disk in place using 1 finger to prevent pulling on the catheter. Find the slit in the Uresil dressing. From this spot, hold the disk while slowly and gently peeling back the adhesive away from the skin.
If the skin around the catheter is sensitive, wipe adhesive remover around the edge of the dressing. This will help reduce discomfort while you’re removing the dressing. Throw out the adhesive remover wipe and old Uresil dressing in the trash can. - Take off your gloves and throw them out in the trash can. Then, follow step 4 above to clean your hands again. When you’re done, put on a new pair of non-sterile gloves.
- Take a gauze pad and moisten it with soap and water. Use the gauze pad to clean the skin around and under the silicone disk. Using the same gauze pad, clean the top and bottom sides of the disk itself. Always hold 1 side of the disk firmly while cleaning the other side.
- Rinse and dry the skin and the silicone disk with new gauze pads.
- Wipe the top side of the silicone disk with an alcohol wipe to remove any leftover soap. Do not wipe the skin with the alcohol wipe. This may cause the skin to become dry and irritated.
- Look at the disk nipple. The black ink mark should be just above the disk nipple (see Figure 4). If it moved, finish changing the dressing, and then call your IR doctor’s office.
-
Check the catheter insertion site under the silicone disk. This is the area where the catheter goes into the body. Always hold 1 side of the disk firmly while tilting up the other side to look under the disk. If you see any of these things, finish changing the dressing, and then call your IR doctor’s office:
- Redness.
- Swelling.
- Drainage that smells bad.
- Fluid leaking.
- New tissue growing around the catheter insertion site. This is harmless, but it can be removed by your IR doctor if it’s painful.
- Put the 3M™ No Sting Barrier Film on the skin around and under the silicone disk. Put some more on the top of the disk where you will place the dressing. This protects the skin and helps the adhesive stick better. Make sure you hold the disk in place with 1 hand when you put the barrier film under the disk.
-
Take the Telfa you already cut. Slide it under the silicone disk, around the catheter (see Figure 7). The slit in the Telfa should point down toward the person’s feet. The Telfa will prevent moisture from building up under the disk.
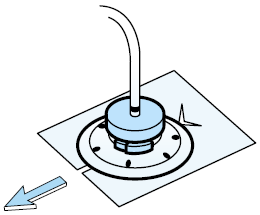
Figure 7. Sliding the Telfa under the disk, around the catheter
-
Pick up the Uresil dressing. Open the slit and place it around the catheter (see Figure 8). Line the slit up with the slit in the Telfa. Make sure the dressing is adhesive (sticky) side down, shiny side up. Place the dressing over the flat part of the disk, but under the disk’s nipple. The slit in the dressing should point down toward the person’s feet.
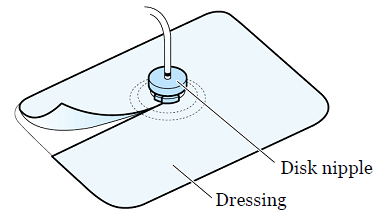
Figure 8. Uresil dressing
- The Uresil dressing has 3 pieces of backing paper. To remove the backing paper, start at the corner of the biggest piece. Slowly peel the backing paper away as you press the adhesive to the skin. Smooth it down so it sticks to the skin. This will get easier with practice. If the dressing is not sticking the right way, take off the dressing and the Telfa. Start again at step 15.
- Remove the other 2 pieces of backing paper, 1 at a time. Press the adhesive to the skin and smooth it down so it sticks to the skin. Overlap the slit edges of the dressing to make the dressing more secure.
-
If you’re also changing the drainage bag or CathGrip, follow the instructions in the “How to change the stopcock and drainage system” section below. If you’re only changing the dressing right now, secure the drainage bag with the Velcro strap or with a safety pin. Then, reattach the catheter to the CathGrip. To do this:
- Place the catheter on the device straps, so it lies along the middle of the CathGrip.
- There are 2 straps on the CathGrip: 1 with holes and 1 with jagged edges. The strap with the holes has 2 openings. Insert the strap with the jagged edges into the lower opening of the other strap.
-
Pull to secure the catheter in the CathGrip (see Figure 9). Do not pull too tight.
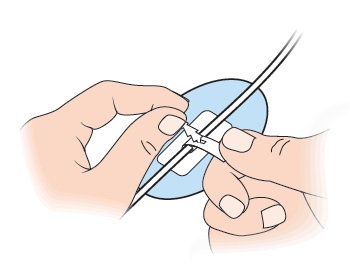
Figure 9. Securing the catheter in the CathGrip
- Make sure there is no pull or tension on the catheter. There should be a gentle bowing (curving) of the catheter. If the catheter is being stretched or pulled tight, change the position of the catheter in the CathGrip.
- Take off your gloves and throw them out in the trash can. Then, follow step 4 above to clean your hands again.
- Use a marker to write today’s date on the Uresil dressing. This will help you remember when you last changed the dressing. It will also help you know when you need to change it again.
How to change the stopcock and drainage equipment
You will need to change your stopcock and drainage system once a week.
Here is a video that shows how to change the stopcock and drainage system on your biliary drainage catheter. Follow the same instructions to change the stopcock and drainage system on your drainage catheter with a Uresil disk.
-
Set up your supplies on a clean, flat surface. You will need:
- Non-sterile gloves
- 1 needleless connector
- 1 sterile 3-way stopcock
- 1 drainage bag
- Safety pin or Velcro strap
- Gauze
- Adhesive remover wipe
- CathGrip changing kit, if you’re changing the CathGrip
- Trash can
- Empty the drainage bag and write down the amount of drainage in your drainage log. You can find the log in the print version of this resource. Follow the instructions in the “How to empty your drainage bag” section above.
-
Wash your hands well with soap and water or use an alcohol-based hand sanitizer.
- If you’re washing your hands with soap and water, wet your hands with warm water and apply soap. Rub your hands together for 20 seconds, then rinse. Dry your hands with a paper towel. Use that same towel to turn off the faucet.
- If you’re using an alcohol-based hand sanitizer, be sure to cover all parts of your hands with it. Rub your hands together until they are dry.
- Open the packages with the needleless connector, 3-way stopcock, and drainage bag. Put the package with the drainage bag to the side.
- After you have opened the packages, follow step 3 above to clean your hands again.
- Remove the protective cover from the base of the needleless connector and throw it out in the trash can. Attach the needleless connector to the center port of the stopcock (see Figure 5). Put the stopcock down.
- Take the drainage bag out of its package. Connect the tubing from the drainage bag to the stopcock using a twisting motion. Twist the cap at the bottom of the bag clockwise (to the right) to close it. This cap is called the drainage port. Closing the drainage port prevents leaking.
- Place the assembled drainage bag back in its package. This will keep it clean until you’re ready to connect it to the catheter.
- Follow step 3 above to clean your hands again. Then, put on the non-sterile gloves.
-
Remove the safety pin or Velcro strap holding the drainage bag in place. Make sure the drainage bag is resting somewhere that it cannot fall. Be sure the new drainage bag is within your reach. Then, release the catheter from the straps on the CathGrip.
- If you’re changing the CathGrip, wipe adhesive remover around the edge of the CathGrip. This removes it from the skin. Throw out the adhesive remover wipe and old CathGrip in the trash can.
- Take a gauze pad and place it under the needleless connector. While holding the gauze, twist off the old stopcock and drainage system from the catheter. Throw them out in the trash can.
- Quickly attach the new stopcock and drainage system. Make sure the “OFF” tap of the stopcock points toward the needleless connector (see Figure 5).
- If you’re changing the CathGrip, choose a site to place the new CathGrip. The CathGrip and drainage bag tubing should be positioned lower than the catheter insertion site. This will help it drain. Make sure it’s lower both when you are standing and laying down. When the catheter is attached, there should be no pull or tension on the catheter. There should be a gentle bowing (curving) of the catheter.
- Check the site where the CathGrip will be placed. Make sure you choose an area that is not red or irritated. Trim any long hairs at the site with scissors or a hair trimmer. Avoid using a razor, which can cut your skin and make it bleed.
- Open the CathGrip package.
- Clean the site with the alcohol wipe from the CathGrip changing kit. This removes oils and products, such as lotion or soap, from your skin. Let the alcohol fully dry before moving to the next step.
- Wipe the site with the Skin Prep from the CathGrip changing kit. This protects your skin and helps the CathGrip stick to your skin. Let the Skin Prep fully dry before moving to the next step.
-
The CathGrip has 2 pieces of backing paper. You will remove each piece of backing paper 1 at a time. Start in the middle and slowly peel the paper away from 1 side of the CathGrip (see Figure 10). As you peel away the paper, press the adhesive to your skin. Smooth it down so it sticks to your skin. Repeat with the other side.
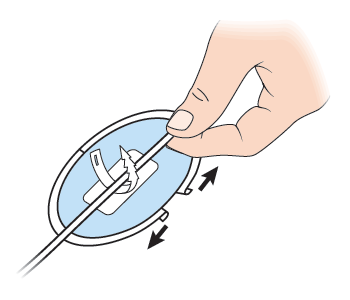
Figure 10. Removing the backing paper of the CathGrip
- Gently press the CathGrip to your skin for 5 seconds. This will seal it to your skin.
-
Reattach the catheter to the CathGrip. To do this:
- Place the catheter on the device straps, so it lies along the middle of the CathGrip.
- There are 2 straps on the CathGrip: 1 with holes and 1 with jagged edges. The strap with the holes has 2 openings. Insert the strap with the jagged edges into the lower opening of the other strap.
- Pull to secure the catheter in the CathGrip (see Figure 9). Do not pull too tight.
- Make sure there is no pull or tension on the catheter. There should be a gentle bowing of the catheter. If the catheter is being stretched or pulled tight, change the position of the catheter in the CathGrip.
-
Secure the drainage bag with the Velcro strap or with a safety pin. If you’re using a safety pin, attach the bag to the waistband of your clothing. If you’re using a Velcro strap, attach the bag to your leg. Place the bag below the level of the catheter. This lets the catheter drain by gravity, which pulls the drainage in a downward direction (see Figure 11).
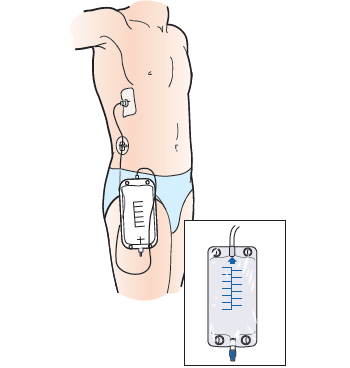
Figure 11. Drainage bag below the catheter
- Check to see that the fluid is draining into the new tubing.
- Take off your gloves and throw them out in the trash can. Then, follow step 3 above to clean your hands again.
How to shower with your biliary drainage catheter
You can take showers. Do not take baths while you have your catheter.
Before you shower, remove the belt or elastic band holding your drainage bag. Empty the drainage bag. Then, tape the drainage bag to your body near the catheter. If you want, you can use a Velcro strap to attach the bag to your waist or calf instead.
Never get the dressing over your catheter wet. Before you shower, cover your dressing with a one-time-use waterproof cover, such as AquaGuard®. You can buy waterproof covers online. If you do not have waterproof covers, tape plastic wrap or a gallon-sized bag over your dressing to keep it dry.
To put on the waterproof cover:
- Peel off the top and side strips.
- Place the top edge above your dressing. Do not let the tape on the waterproof cover touch your dressing. It can lift your dressing when you take off the waterproof cover after showering. Smooth the cover down over your dressing.
- Peel off the bottom strip. Make sure the bottom edge of the waterproof cover is below your dressing. Tuck your catheter into the waterproof cover so it’s fully covered.
- Smooth the bottom edge of the waterproof cover down.
When you shower, keep your dressing dry. Using a handheld showerhead can help direct the water away from the dressing.
Do not shower for longer than 15 minutes. Use warm water, not hot water. This will help keep the waterproof cover from coming off.
After your shower, take off the waterproof cover right away. Make sure your dressing is clean and dry. If it’s dirty or wet, change it. Wet dressings are a common cause of skin problems.
Doing activities while you have your biliary drainage catheter
- You can go to work and exercise with your catheter in place. Avoid movements that involve stretching from side to side. Avoid movements where you keep bending. Moving this way can dislodge (move) your catheter.
- Your catheter must not be submerged (kept under water). Do not swim, take a bath, or use a hot tub. Talk with your IR doctor if you have a vacation planned. They will help you make a plan to care for your catheter while you’re away.
- Always keep the tubing secured to your body with a CathGrip. Make sure there is no pull or tension on the catheter. There should be a gentle bowing of the catheter. If the catheter is being stretched or pulled tight, change the position of the catheter in the CathGrip.
- When you’re getting dressed, make sure you do not tug on your catheter. Do not let the tubing become kinked by clothing, such as pantyhose or a belt.
- Try not to lie on your catheter when you sleep. This will keep your catheter from kinking.
Routine changing of your biliary drainage catheter
Biliary drainage catheters most often are changed every 8 to 12 weeks (2 to 3 months). Your IR doctor may tell you to come in more or less often. You can make you own appointment for a routine catheter change. Call your IR doctor’s office at least 3 weeks ahead of time to make an appointment.
Special instructions for internal-external biliary drainage catheters
If you have an internal-external biliary drainage catheter, your IR doctor may want you to do a capping trial. They will cap your catheter during the trial. Capping your catheter helps your bile travel down the catheter into your body. If you pass the trial, you no longer will need a drainage bag (see Figure 13).
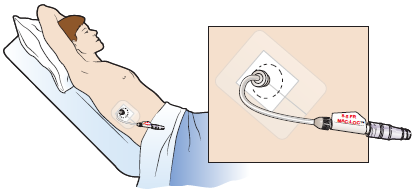
Figure 13. Capped biliary drainage catheter
Your catheter may be capped in the hospital before you go home. Most likely, you will need to cap your catheter yourself after you have been home for a few days.
Read How to Cap Your Biliary Drainage Catheter for instructions on how to cap your catheter.
When to call your healthcare provider
Call your IR doctor if you have any of these:
- You have a fever of 100.4 °F (38 °C) or higher.
- There is no drainage from your catheter, or the amount of drainage is much less than usual.
- The drainage looks bloody.
- There is leakage around the catheter insertion site.
- You cannot flush your catheter, or it leaks when it’s flushed.
- The location of the black ink mark has changed.
- There is no drainage from your catheter when the 3-way stopcock is in the upright position.
- The 3-way stopcock has broken or opened.
- There is a kink in the tubing that you cannot straighten out, causing a blockage.
- You have symptoms of blockage, such as pain or leakage from your catheter.
- You have pain, tenderness, or swelling at the catheter insertion site.
- The skin around the catheter insertion site looks red, irritated, or different from the way it normally looks.
- You have nausea (feeling like you’re going to throw up).
- You have new jaundice or jaundice that’s getting worse.
- You have any questions or concerns about your catheter.
Contact information
If you have any questions or concerns, call your IR doctor’s office. You can reach a staff member Monday through Friday, from to If it’s after , during the weekend, or on a holiday, call 212-639-2000. Ask to talk with the Interventional Radiology fellow on call.
How to order your biliary drainage catheter supplies
When you go home, your care team will give you enough supplies to last for 2 weeks. When you need more supplies, you can order them through your visiting nurse service. If you’re not able to order supplies through your visiting nurse service, call your IR doctor’s office. Here is a list of the items you need:
| Item | Supplied |
|---|---|
| 3-way stopcock | 1 each |
| Adhesive remover | 1 box |
| Alcohol wipes | 1 box |
| CathGrip | 1 each |
| Drainage discharge kit (4-week supply) | 1 kit |
| Needleless connector | 1 each |
| Non-sterile gloves | 1 box |
| Plain gauze | 1 package |
| Skin Prep | 1 box |
| Telfa | 1 each |
| Uresil adhesive dressing | 1 box |
| Uresil drainage bag | 1 each |
Prefilled syringes
You will need a prescription for prefilled normal saline syringes. You can get the prescription from the IR clinic.
If your local pharmacy does not have the syringes, you can get them from the outpatient pharmacy at Memorial Hospital. It’s open Monday through Friday, from to To reach the pharmacy, call 646-888-0730.
MSK also has retail pharmacies in other locations. Visit www.msk.org/locations/visiting-us/retail-pharmacy to find an MSK retail pharmacy near you.