This information will help you know what to expect during the procedure to place your PleurX drainage catheter at Memorial Sloan Kettering (MSK). It will also help you learn how to care for your PleurX catheter at home.
About Your Pleural Space
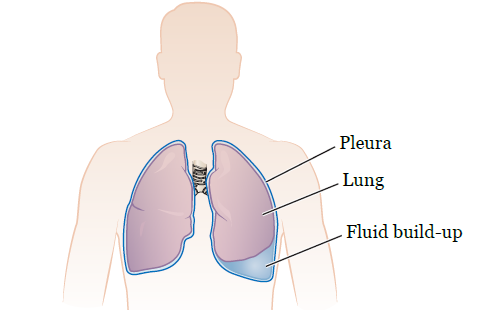
Your lungs are surrounded by 2 layers of tissue called the pleura. The space between the layers is called the pleural space (see Figure 1).
Figure 1. Your lungs and pleural space
It’s normal to have some fluid in your pleural space. This fluid helps your lungs move smoothly when you breathe. Sometimes, too much fluid builds up in the pleural space around one or both of your lungs. This makes it hard for your lungs to expand all the way and can make you feel short of breath.
About Your PleurX Drainage Catheter
A PleurX drainage catheter is a thin, flexible tube that’s placed in your chest to drain fluid from your pleural space. This can make it easier for you to breathe. A PleurX catheter has 3 main parts:
A catheter. One end of the catheter will stay in your pleural space. The other end will stay outside your body. The end that’s in your pleural space has many holes so the pleural fluid can easily enter.
A 1-way valve. The valve is on the end of the catheter outside your body. It lets pleural fluid out but doesn’t let air in.
A valve cap. This protects the valve and keeps it clean.
If you have fluid around one lung, your doctor will place a PleurX catheter on that side of your chest. If you have fluid around both lungs, your doctor will choose the best side for the catheter.
About Your PleurX Placement Procedure
Your PleurX drainage catheter will be placed by an interventional radiologist, an interventional pulmonologist, or a thoracic surgeon. An interventional radiologist is a doctor who specializes in image-guided procedures. An interventional pulmonologist is a doctor who specializes in procedures to treat diseases in the lungs and chest.
Your PleurX drainage catheter will be placed by:
Interventional Radiology. Your nurse will give you the resource Instructions for Interventional Radiology Procedures(www.mskcc.org/pe/instructions_ir_procedures). Follow those instructions to get ready for your procedure.
Thoracic Surgery. Your nurse will give you the resource Getting Ready for Surgery(www.mskcc.org/pe/getting_ready_surgery). Follow those instructions to get ready for your procedure.
Your doctor will explain the procedure and give you time to ask questions. Once you’re ready, you’ll sign a consent form.
Sometimes, PleurX drainage catheters are placed urgently when you’re sick. In other cases, the placement procedure is planned and scheduled ahead of time.
Take devices off your skin
You may wear certain devices on your skin. Before your scan or procedure, device makers recommend you take off your:
Continuous glucose monitor (CGM)
Insulin pump
Talk with your healthcare provider about scheduling your appointment closer to the date you need to change your device. Make sure you have an extra device with you to put on after your scan or procedure.
You may not be sure how to manage your glucose while your device is off. If so, before your appointment, talk with the healthcare provider who manages your diabetes care.
Where to go
Your procedure will take place at one of these locations:
Endoscopy Suite at Memorial Hospital (MSK’s main hospital)
1275 York Avenue (between East 67th and East 68th Streets)
New York, NY 10065
Take the B elevator to the 2nd floor. Turn right and enter the Endoscopy/Surgical Day Hospital Suite through the glass doors.
MSK Monmouth
480 Red Hill Road
Middletown, NJ 07748
What to expect during your PleurX placement procedure
If you don’t already have an intravenous (IV) line, a nurse will place one in a vein in your hand or arm before your procedure.
A staff member will bring you into the procedure room when it’s time for your procedure. You’ll get medication through your IV to make you feel drowsy. You’ll also get an injection (shot) of a local anesthetic (medication to numb an area of your body) near where your catheter will be inserted.
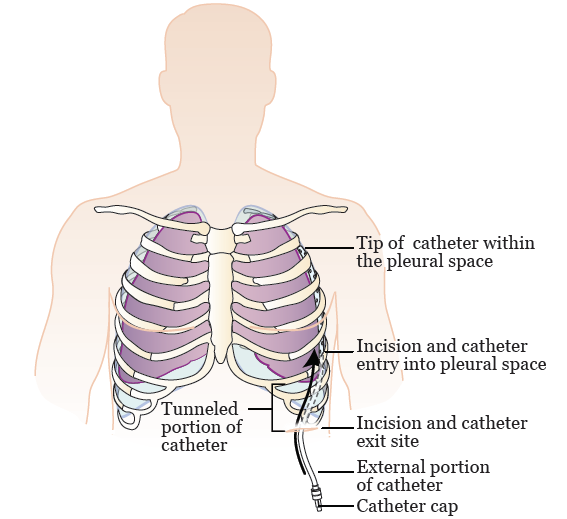
Once the area is numb, your doctor will make 2 small incisions (surgical cuts). One will go through your skin into your pleural space. The other will be a few inches away and will only go through your skin. Your doctor will also make a tunnel under your skin between the 2 incisions.
Figure 2. PleurX drainage catheter placement
After they make the incisions and tunnel, your doctor will insert your catheter under your skin, through the tunnel, and into your pleural space (see Figure 2). Tunneling the catheter under your skin makes it more comfortable and helps it stay in place.
Once your catheter is in place, your doctor will use stitches (sutures) to close the incision into your pleural space. They’ll put a dressing (bandage) over the catheter exit site (the place where the catheter leaves your body).
Usually, the end of your PleurX catheter is covered with a valve cap after your procedure. It’s possible that it will be connected to a collection unit so more fluid can be drained. This will only happen if you’re staying in the hospital after your procedure.
The procedure to place a PleurX drainage catheter usually takes about 45 minutes to 1½ hours.
After your procedure
After your procedure, you’ll be brought to the Post-Anesthesia Recovery Unit (PACU). You’ll need to stay in bed until you’re fully awake. Once you’re fully awake, you’ll go back to your hospital room or be discharged from the hospital.
Tell your nurse if you have trouble breathing, pain or discomfort that’s getting worse, or any symptoms that concern you.
Caring for Your PleurX Drainage Catheter
To care for your PleurX drainage catheter, you will:
Inspect your catheter every day.
Drain the fluid from your pleural space every day or as directed by your healthcare provider.
Change your dressing regularly, at least once a week.
Your healthcare provider will tell you exactly how often to change your dressing. Follow their instructions.
Always change your dressing as soon as possible if it’s loose, wet, or dirty.
Try to plan ahead and change your dressing when you’re draining your pleural space. That way, you’ll only need to open 1 drainage kit.
Your nurse will teach you how to do these things before your procedure. It’s best if your caregiver learns with you so they can help you.
After your procedure, a home care nurse may visit you to help you care for your catheter. Their main job is to help you and your caregiver get comfortable caring for your PleurX catheter on your own. You can use the information in this resource to help you remember what to do.
Inspecting your catheter
Inspect your PleurX catheter every day. You can use a handheld mirror or have your caregiver help you.
Check the dressing over your catheter exit site. If it’s wet, dirty, loose, or has started to lift from your skin, change it. Follow the instructions in the section “Changing your PleurX dressing.”
Check for kinks (bends) in your catheter. If it’s kinked, straighten it.
Check if your catheter is damaged, cut, or broken. If it is:
Pinch the catheter closed between your fingers.
Open a drainage kit and take out the blue emergency slide clamp. Push it onto the catheter until the catheter is pinched closed. If you don’t have a slide clamp, bend the catheter and tape it in this position.
Call your doctor’s office.
Draining your pleural space
Follow your doctor’s instructions for how often to drain your PleurX catheter. Most people need to drain it every day. Don’t change your drainage schedule without talking with your doctor first.
Drainage amount
Your doctor will tell you how much drainage to expect and what the drainage should look like. Don’t drain more than 1,000 milliliters (mL) unless your doctor tells you to. Your goal should be to drain your PleurX catheter on a regular schedule, not to drain a certain amount of fluid.
If you drain 200 mL or less for 3 days in a row, call your doctor’s office to tell them. They may tell you to start draining your catheter less often. If you find that you’re draining less and less fluid over time, your doctor may recommend that your PleurX catheter be removed.
Drainage log
Every time you drain your PleurX catheter, write down:
The date and time
The amount of fluid drained
The color of the fluid
Any symptoms you have (such as discomfort)
This will help your doctor develop a drainage schedule that’s right for you. It will also help you notice differences in your drainage. You can use the drainage log at the end of this resource, or you can make your own.
Bring your drainage log to your appointments. Have it nearby if you need to call your doctor’s office about your PleurX catheter.
How to drain your PleurX catheter
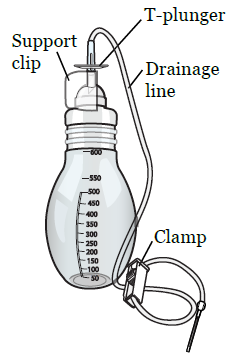
Figure 3. Vacuum bottle
To drain the fluid from your pleural space, you’ll attach your PleurX catheter to a vacuum bottle (see Figure 3). The vacuum will pull the fluid from your pleural space into the bottle. It’s best to have your caregiver help you, especially at first.
If you have pain when you drain your PleurX catheter, take pain medication 30 minutes before you drain it. Follow your healthcare provider’s instructions.
Gather your supplies
Before you start, set up your supplies on a clean, open surface. You’ll need:
A PleurX drainage kit. Don’t use a different brand drainage kit without talking with your healthcare team first. The kit includes:
1 vacuum bottle (500 mL or 1,000 mL)
1 PleurX Procedure Pack. The pack includes:
1 self-adhesive dressing
1 pair of medical gloves
3 alcohol wipes
1 valve replacement cap
4 (4-inch) square gauze pads
1 foam catheter pad
1 emergency clamp
Only use the emergency clamp if your PleurX catheter is broken or leaking.
An extra pair of medical gloves (if you’re also changing your dressing)
Extra alcohol wipes
A trash can
Your drainage log
A pen
Clean your hands
Clean your hands with soap and warm water or an alcohol-based hand sanitizer. If your caregiver is helping you, they should clean their hands too.
If you’re washing your hands with soap and water, wet your hands and apply soap. Rub your hands together for 20 seconds, then rinse. Dry your hands with a paper towel and use that same towel to turn off the faucet.
If you’re using an alcohol-based hand sanitizer, be sure to cover your hands with it. Then, rub your hands together until they’re dry.
If you’re also changing your dressing, take it off
If you’re also changing your PleurX dressing, take it off before you get your supplies ready. To do this:
Put on a pair of medical gloves.
Hold your catheter in place with your non-dominant hand (the hand you don’t write with). Using your other hand, gently remove the clear dressing over your catheter and the foam pad underneath your catheter. Throw them away.
Take off the gloves and throw them away.
Clean your hands.
Get your supplies ready
Once your hands are clean, get your supplies ready. If your caregiver is helping you, they should do this part for you.
Open the PleurX drainage kit and remove the PleurX Procedure Pack pouch.
Open the Procedure Pack pouch. Set the self-adhesive dressing aside.
Spread open the blue wrapping in the PleurX Procedure Pack so you can see the supplies inside. If you’re both draining your catheter and changing your dressing, you’ll use all the supplies. If you’re only draining your catheter, you’ll only use the alcohol wipes and valve replacement cap.
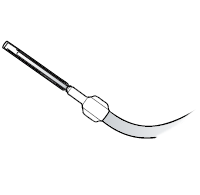
Take out the vacuum bottle and look at the end of the drainage line. Make sure the hard plastic access tip is covered with a soft plastic sleeve (see Figure 4). The sleeve keeps the access tip clean while you’re setting up.
Be careful not to touch the access tip. Don’t let the tip touch anything besides the blue wrap.
If the plastic sleeve is missing, start over with a new drainage kit.
Figure 4. Plastic sleeve
Set the bottle near the blue wrap. Take off the paper holding the drainage line in a coil. Throw the paper away. Place the access tip on the blue wrap.
Put on the gloves in the PleurX Procedure pack. Be careful not to touch anything else in the pack.
Tear open the 3 alcohol pads, but don’t remove the pads from their pouches. Place them on the blue wrap.
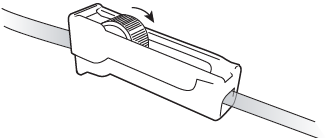
Close the roller clamp on the drainage line by rolling the wheel towards the drainage bottle (see Figure 5). Make sure it’s completely closed.Figure 5. Tighten the clamp to close it
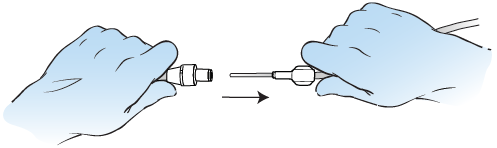
Remove the soft plastic cover from the access tip by twisting it and pulling gently. Throw away the cover. Set the access tip back on the blue wrap.
Clean your PleurX valve and connect the drainage line
If your caregiver is helping you, hold your catheter away from your body while they clean the valve and connect the drainage line for you. If you’re draining your PleurX catheter yourself, use your non-dominant hand (the hand you don’t write with) to hold your catheter away from your body. Use your other hand to clean the valve and connect the drainage line.
Pick up the end of your catheter and hold it away from your body.
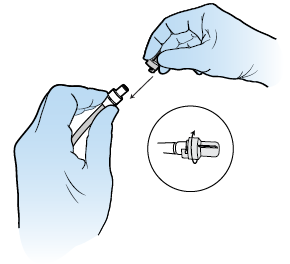
Twist off the valve cap and throw it away (see Figure 6). Keep holding your catheter away from your body. Make sure the valve doesn’t touch anything.Figure 6. Take off the valve cap
Use an alcohol wipe to clean the valve well for 15 seconds. Then, throw the wipe away. Keep holding your catheter away from your body. Make sure the valve doesn’t touch anything.
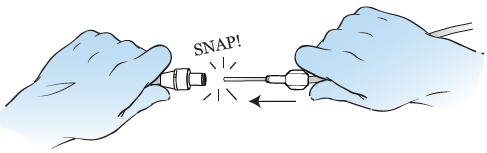
Push the access tip of the drainage line into the clean catheter valve. You’ll hear and feel a snap when the tip and valve are locked together (see Figure 7). Never put anything other than the access tip into the catheter.Figure 7. Connect the drainage line
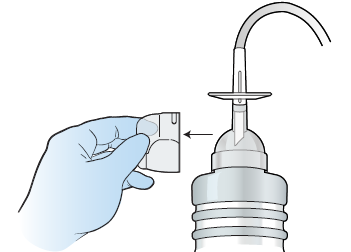
Remove the support clip beneath the T-plunger by holding the flat part and pulling outward (see Figure 8). Throw the clip away. Don’t press the T-plunger down yet.Figure 8. Remove the support clip
Hold the drainage bottle with one hand. Push down on the T-plunger to puncture the seal and activate the vacuum in the bottle (see Figure 9).Figure 9. Activate the vacuum bottle
Drain the pleural fluid
You may want to do the following part yourself, even if your caregiver is helping you. This lets you adjust the flow of fluid if you feel discomfort.
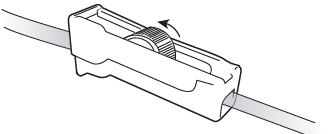
Slowly roll the wheel on the roller clamp away from the bottle (see Figure 10). Fluid from your pleural space should start flowing into the drainage line.Figure 10. Release the clamp
When fluid starts to flow into the drainage line, you can partially close the roller clamp to slow the flow of fluid by rolling the wheel on the roller clamp toward the bottle.
As you drain the fluid, the flow will start to slow down. This happens either because your pleural space is completely drained or because the bottle has lost its suction. This is normal. You may also notice more foam or bubbles as the flow gets slower.
If you feel pain or start to cough, slow down the flow of fluid. If you still have pain, stop draining. Call your doctor’s office after you disconnect and empty the drainage bottle.
When the flow stops or the bottle is filled, close the roller clamp by rolling the wheel towards the bottle as far as it will go.
If your doctor told you to drain more than 500 mL, you’re using a 500 mL bottle, and the bottle is full or has lost its suction, you’ll need to connect another bottle and finish draining. Get the drainage bottle ready the same way you did before:
Open another drainage kit.
Check to make sure the drainage line’s hard plastic access tip is covered by a soft plastic cover.
Remove and throw out the paper holding the drainage line in a coil.
Completely close the roller clamp by rolling the wheel towards the bottle.
Remove the support clip beneath the T-plunger.
Disconnect the drainage bottle
If your caregiver is helping you, hold your catheter away from your body while they disconnect the bottle for you. If you’re draining your PleurX catheter yourself, use your non-dominant hand to hold your catheter away from your body. Use your other hand to disconnect the drainage bottle.
Check that the roller clamp is completely closed.
Pick up the end of your catheter and hold it away from your body.
Pull the access tip of the drainage line out of the valve in a firm, smooth motion (see Figure 11). Set the access tip down. Keep holding your catheter away from your body. Make sure the valve doesn’t touch anything.Figure 11. Disconnect the drainage line
If you’re connecting a second drainage bottle, clean the catheter valve with an alcohol pad and connect the drainage line to your catheter the same way you did before. Follow steps 13 to 21.
Once you’re all done draining and have disconnected the drainage line, use an alcohol wipe to clean the valve well for 15 seconds. Then, throw away the wipe. Keep holding your catheter away from your body. Make sure the valve doesn’t touch anything.
Pick up the replacement valve cap. Don’t touch the inside. Place the new cap over the clean catheter valve and twist the cap clockwise (to the right) until it snaps into its locked position (see Figure 12).Figure 12. Lock the replacement valve cap
If you touch the inside of the valve cap, throw it away. Keep holding your catheter away from your body. Open another drainage kit and PleurX Procedure Pack and use a new valve replacement cap.
You’re now done draining your PleurX catheter. If you’re also changing your PleurX dressing, keep your gloves on. Follow steps 5 to 15 in the section “How to change your PleurX dressing.”
Empty the drainage and throw away the drainage bottle(s)
Make sure the clamp on the vacuum drainage bottle is tightly closed.
Remove the top part of the bottle by pushing up on the rounded end of the bottle opener.
Remove the bottle opener from the drainage line by squeezing the flexible cap and pulling the bottle opener off. Use the pointed end of the bottle opener to widen the foil opening in the drainage bottle. This will make it easier to empty the bottle.
Empty the drainage into the toilet.
Place the drainage bottle and tubing in a plastic bag. Seal the bag tightly. Throw it away with your household garbage.
Remember to fill out your drainage log. If the drainage amount, color, or thickness is different from the last time you drained your catheter, call your doctor’s office.
Managing problems with draining your catheter
If no fluid drains from your chest into the vacuum bottle:
Make sure the T-plunger at the top of the vacuum bottle is pushed all the way down.
Make sure the drainage line is securely connected to the PleurX catheter valve.
Make sure the roller clamp on the drainage line is open.
Make sure there aren’t any kinks in your catheter.
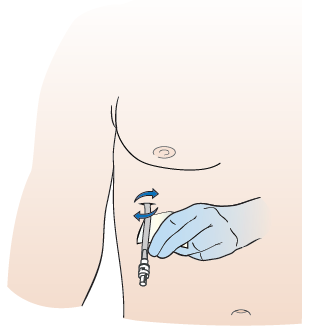
Check if your PleurX catheter is clogged. If it is, roll it between your fingers. This will help loosen anything that’s blocking the drainage flow.
If these steps don’t work, repeat the drainage procedure with a new PleurX drainage kit. If fluid still isn’t draining, you may not have enough fluid in your pleural space to drain. Call your doctor if fluid isn’t draining.
How to change your PleurX dressing
It’s best to have someone help you change your dressing. In these instructions, the word “you” refers to the person changing the dressing.
Gather your supplies
Before you start, set up your supplies on a clean, open surface. If you just drained your PleurX catheter, use the supplies from that drainage kit. Otherwise, open a new PleurX drainage kit and PleurX Procedure Pack. You’ll need:
1 alcohol pad
4 (4-inch) square gauze pads
1 foam catheter pad
1 self-adhesive dressing with 3 layers:
The printed liner. This covers the adhesive (sticky) side of the dressing.
The clear wound dressing. This is what will stay over your catheter exit site once you’re done.
The paper center panel and frame. These make it easier to handle the dressing while you’re putting it on.
2 pairs of medical gloves (if you haven’t already taken off your dressing)
A trash can
Clean your hands
If you’re not already wearing gloves from draining your catheter, clean your hands with soap and warm water or an alcohol-based hand sanitizer. If your caregiver is helping you, they should clean their hands too.
If you’re washing your hands with soap and water, wet your hands, apply soap, rub your hands together well for 20 seconds, then rinse. Dry your hands with a disposable towel and use that same towel to turn off the faucet.
If you’re using an alcohol-based hand sanitizer, be sure to cover your hands with it, then rub them together until they’re dry.
Take off your dressing
Put on a pair of medical gloves, if needed.
Hold the catheter in place with your non-dominant hand (the hand you don’t write with). Using your other hand, gently remove the clear dressing and gauze over the catheter and the foam pad underneath the catheter. Throw them away.
Take off your gloves and clean your hands.
Put on a new pair of medical gloves.
Clean the skin around your catheter
Use an alcohol pad to clean the skin around the catheter (see Figure 13).Figure 13. Clean around the catheter
Examine the skin around the PleurX catheter. There should be no redness, areas of broken skin, rash, or leaking fluid. If there is, call your healthcare provider after you change the dressing.
Let the skin around the catheter air dry for 30 seconds.
Put on a new dressing
Once the skin is dry, place the new foam pad under the catheter (see Figure 14). Your healthcare provider will tell you how to position your catheter on top of the foam pad. Follow their instructions.Figure 14. Place catheter pad
Place the new gauze pad over the catheter and foam pad.
If your caregiver is helping you change your dressing, it’s helpful if you hold the gauze in place while they do the next steps.
Take off the medical gloves.
Peel the printed liner from the self-adhesive dressing to expose the sticky surface. Throw the printed liner away.
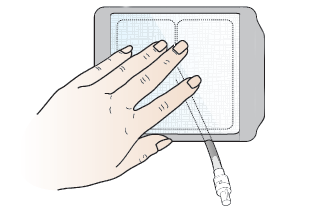
Center the self-adhesive dressing over the gauze pads and press it down against your skin. Make sure you don’t stretch the dressing when you put it on. Your healthcare provider will tell you if the tip of your PleurX catheter should be underneath or outside the dressing (see Figure 15). Follow their instructions.Figure 15. End of catheter outside dressing
Slowly peel off the paper center panel and frame. Smooth and press the dressing down onto the skin to make sure it’s completely secure. Throw the paper center panel and frame away.
Clean your hands.
You’re now done changing your PleurX dressing. If you also drained your PleurX catheter, empty the drainage and throw away the drainage bottle(s). Follow steps 24 to 18 in the section “How to drain your PleurX catheter.”
Showering with your PleurX catheter
You can shower with your PleurX catheter in place using a one-time-use waterproof cover that goes over your dressing (such as Aquaguard®). You can buy waterproof covers online or from MSK. If you want to buy it from MSK, ask your nurse. It’s also helpful to use a hand-held shower to direct the water away from your dressing.
Each time you shower, cover your dressing completely with a new waterproof cover to keep it from getting wet. To put on the waterproof cover:
Peel off the top and side strips.
Place the top edge above your dressing. Don’t let the tape on the waterproof cover touch your dressing. It can lift your dressing when you remove the waterproof cover after showering. Smooth the cover down over your dressing.
Peel off the bottom strip. Make sure the bottom edge of the waterproof cover is below your dressing and the end of your PleurX catheter is tucked into the waterproof cover and completely covered. Smooth the bottom edge down.
Don’t shower for longer than 15 minutes. Use warm water, not hot water. This will help keep the waterproof cover from coming off.
After your shower, dry the waterproof cover before you take it off. If your dressing gets wet, change it. If a wet dressing is left against your skin, it can make your skin irritated and sore.
Ordering New Supplies
When you’re discharged from the hospital, your nurse will give you enough supplies to last for 2 weeks. If you have a visiting nurse, the visiting nurse service may order your supplies for you after that.
If you’re ordering supplies yourself, your nurse will give you information about which supplies you’ll need. To order, call Edgepark Medical at 888-394-5375 and ask to speak with the PleurX specialist. You can also go online to www.edgepark.com.
When to Call Your Healthcare Provider
Call your healthcare provider if:
You have a fever of 101 °F (38 °C) or higher
The drainage changes color or thickness
The drainage is cloudy or smells bad
The amount of drainage changes
You have pain when you drain the catheter
You have pain after you drain your catheter
You have redness, swelling, drainage, or pain in the area around your catheter
Your catheter is damaged, cut, broken, or falls out
Liquid is leaking from your valve or catheter
You have any concerns about your catheter
Contact information for Interventional Radiology
If your PleurX drainage catheter was placed by an interventional radiologist and you have any questions or concerns, call the interventional radiologist’s office. You can reach a staff member Monday through Friday from to After , during the weekend, and on holidays, call 212-639-2000 and ask for the fellow on call for Interventional Radiology.
Contact information for Interventional Pulmonology
If your PleurX drainage catheter was placed by an interventional pulmonologist and you have any questions or concerns, call Interventional Pulmonology at 212-639-LUNG (212-639-5864). You can reach a staff member Monday through Friday from to After , during the weekend, and on holidays, call 212-639-2000 and ask for the fellow on call for the Pulmonary Service.
Contact information for Thoracic Surgery
If your PleurX drainage catheter was placed by a thoracic surgeon and you have any questions or concerns, call the thoracic surgeon’s office. You can reach a staff member Monday through Friday from to After , during the weekend, and on holidays, call 212-639-2000 and ask for the fellow on call for the Thoracic Surgery Service.
PleurX Drainage Log
Use your drainage log every time you drain your PleurX catheter. Bring it to your appointments. Have it nearby if you need to call your doctor’s office about your PleurX catheter.