This information will explain how to give an injection (shot) of blood thinning medication. For the rest of this resource, the words “you,” “your,” and “yourself” refer to you or your child.
You will get prefilled syringes with the blood thinning medication already in them. You will use a small, short needle to inject the medication into the fat right under your skin.
Your prefilled syringe may come with a needle already attached, or you may need to attach it yourself. If your syringe does not come with the needle attached, follow the instructions for attaching it in the “How to Prepare the Injection” section.
You will practice preparing and giving the injection with your nurse.
How to Prepare the Injection
-
Prepare a clean area to set up your supplies, such as a clean table or surface. Don’t use the bathroom as a work area. Line the area with clean, dry paper towels.
- Check for the correct name and dosage of medication on the prefilled syringe.
- If you’re giving the injection to a child, you may need to remove some of the medication from the prefilled syringe. Your child’s nurse will review this with you before you go home.
- Gather your supplies. You will need:
- A prefilled syringe and a 27-gauge 1/2-inch needle or a prefilled syringe with the needle attached.
- 2 alcohol pads.
- A disposable sharps container to safely throw the syringe and needle away. You can use an empty laundry detergent bottle with a screw-on cap. Write “Home Sharps-Not for Recycling” on the container.
- A 2 x 2 gauze pad or cotton ball.
- A bandage.
- Clean your hands:
- If you’re using soap and water, wet your hands and put soap on them. Rub your hands together for at least 20 seconds, then rinse. Dry them with a paper towel and use that same towel to turn off the faucet.
- If you’re using an alcohol-based hand sanitizer, use it on all parts of your hands, including between your fingers. Rub your hands together until they’re dry.
- Check to see if the syringe has a built-in needle. If it does not, follow the steps in the next section to put a needle on the syringe.
How to Attach the Needle
- Open the package with the fresh needle, but don’t take out the needle yet. Put the open package on a clean table.
- Remove the black cap on the tip of the syringe. Do not let anything, including your fingers, touch the tip of the syringe once the cap is off. If anything touches the tip of the syringe, you must throw it away.
- Remove the needle from its package. Don’t remove the protective cap from the needle. Do not let anything, including your fingers, touch the needle. If anything touches the needle, you must throw it away in the sharps container.
- Twist the needle onto the base of the syringe by turning it clockwise (to the right).
How to Give the Injection
- Check to make sure that the syringe has the correct amount of medication.
- Choose an injection site from the areas shown in Figure 1. Keep track of which site you used last and give the injection at a different site each time. Do not use an area that is less than 2 inches (about 5 centimeters) from a scar, cut or wound.

Figure 1. Choosing an injection site - Take off or fold back any clothing that covers the injection site.
- Apply an ice pack or ice cubes in a plastic bag (such as a Ziploc®) to the injection site for 2 to 5 minutes. This will numb the area and reduce bruising.
- Use an alcohol pad to clean the area where you’re going to give the injection. Let it air dry. Don’t fan or blow on the area.
- Pick up the syringe with the hand you write with. Using your other hand, take the cap off the needle. Do not let anything touch the needle, including your fingers.
- If anything touches the needle, throw it away in the sharps container. Read the instructions in the section “What to Do if Anything Touches the Needle.”
- Hold the syringe like you would hold a dart (in between your pointer finger, middle finger, and thumb).
- Do not worry if you see air bubbles in the syringe. You don’t need to remove them.
- Using your other hand, gently pinch a 1 to 2 inch (2 ½ to 5 centimeters) fold of skin near the injection site. Keep the syringe in your other hand.
- Insert the whole needle into the skin in one quick motion at a 90-degree (straight up and down) angle (see Figures 2 and 3). Do not put your finger on the plunger yet.
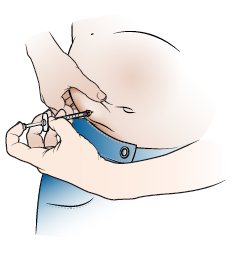
Figure 2. Giving the injection 
Figure 3. Inserting the needle - Stop pinching your skin. Use your thumb to slowly push the plunger all the way down until all the medication is injected (See Figure 4).
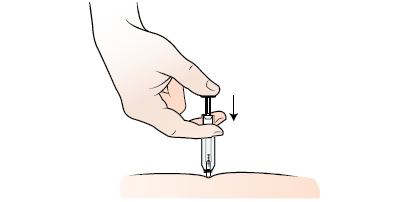
Figure 4. Push the plunger all the way down - When the syringe is empty, pull it straight out of your skin. Do not put the needle cover back on the syringe. Be careful not to poke yourself with the needle.
- Lovenox:If you gave yourself an injection of enoxaparin (Lovenox®) or heparin, don’t press down on the injection site. Put a bandage over the injection site, if needed.
- Other medications: If you gave yourself an injection of any other medication, place a cotton ball or gauze over the injection site. Press down on the site for a few seconds, but don’t rub the site. Put a bandage over the injection site, if needed.
- Cover the needle with the needle guard.
- Lovenox: If you gave yourself an injection of Lovenox, press the plunger down firmly. The needle guard should slide into place on its own.
- Other medications: If you injected any other medication, hold the clear plastic finger grips on the side of the syringe with one hand. Hold the needle guard with your other hand (see Figure 5). Slide the needle guard over the needle until the needle is completely covered (see Figure 6). You will hear the needle guard click into place.
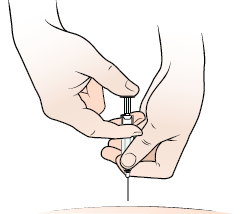
Figure 5. Hold the needle guard 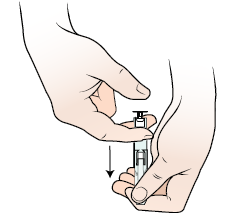
Figure 6. Slide the needle guard
- Place the syringe into the sharps container. Do not use a prefilled syringe more than once.
What to Do if Anything Touches the Needle
If you’re using a syringe with a built-in needle, put it into your sharps container. Start the process again with a new prefilled syringe.
- If you need to throw away a syringe with a built-in needle, you must replace the medication. Call your healthcare provider for a prescription.
- If the needle and syringe were not attached, change the needle using the following steps:
- Remove the old needle from the syringe by twisting the base of the needle counter-clockwise (to the left, see Figure 7).
- If you have trouble twisting it, carefully recap the needle. Then twist it again.
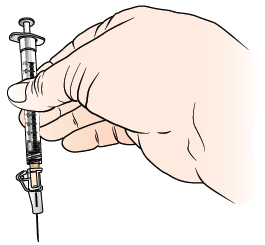
Figure 7. Twisting the base of the needle - After you remove the needle, place it in your sharps container. Do not let anything touch the base of the syringe.
- Take the new capped needle out of the package. Attach it to the syringe by twisting it clockwise (to the right).
How to Store Your Medical Sharps
- Use an empty plastic container with a screw-on cap, such as a laundry detergent bottle.
- Pick a container strong enough that needles can’t poke through the sides.
- Pick a container that is not breakable.
- Don’t store your sharps in:
- Glass or soda bottles.
- Milk jugs.
- Aluminum or coffee cans.
- Paper or plastic bags.
- Clearly label the container “Home Sharps – Not for Recycling.” Keep it away from children and pets.
- Put the sharps in the container as soon as you’re done using them. Place them point-first into the container.
- Don’t overfill the container. When it’s more than half full, stop using it. Wrap the cap with strong tape. This will create a more secure seal and prevent it from leaking.
- Keep the container separate from trash that will be recycled.
How to Safely Throw Away Your Medical Sharps
- If you live in New York City, you can place the sealed container with your regular trash for collection. Don’t put it with your recyclable trash.
- If you live in a different county of New York or in another state, check with your local health department for instructions.
- You can also bring the sealed container to:
- Your healthcare provider at your next clinic visit.
- Any hospital or nursing home in New York State.
- Your local pharmacy.
For more information, read How to Store and Get Rid of Your Home Medical Sharps (www.mskcc.org/pe/store_get_rid_sharps).