This information describes what a Tenckhoff catheter is. It explains how to get ready to have your Tenckhoff catheter placed at MSK. It also explains how to care for your Tenckhoff catheter.
What is a Tenckhoff catheter?
A Tenckhoff catheter is a thin, flexible tube that’s placed in the lower part of your abdomen (belly). You’ll use it to drain the liquid that has built up in your abdomen. This buildup of liquid is called ascites (ah-SYE-teez). Your Tenckhoff catheter can help ease the pressure and discomfort from your ascites.
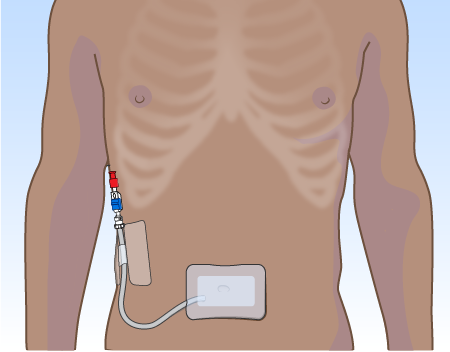
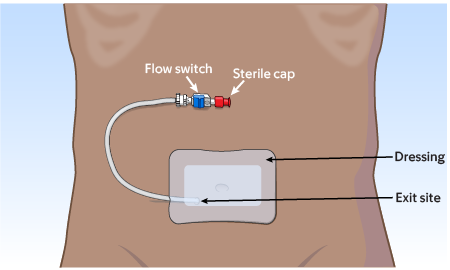
One part of your Tenckhoff catheter will stay inside your abdomen. The other part will be outside your body. The place where it leaves your body is called the exit site. You’ll have a dressing (bandage) over the catheter exit site (see Figure 1).
The part of the catheter outside your body will have an on/off switch, called a flow switch (see Figure 1). This controls the flow of liquid through the catheter. It will also have a small red sterile cap on the end (see Figure 2). This keeps the end of the catheter clean to help prevent an infection.
Your nurse will teach you how to change the dressing and use your catheter to drain your ascites. They’ll also teach you the signs and symptoms you need to report to your care team. Talk with your care team if you have questions.
What to do before you get your Tenckhoff catheter
An interventional radiologist (also called an IR doctor) will place your Tenckhoff catheter. An IR doctor is a doctor who is a specialist in image-guided procedures.
Ask about your medications
You may need to stop taking some of your medications before your procedure. Talk with your healthcare provider about which medications you take. Ask them if you need to stop taking any before your procedure.
Medications for diabetes
Before your procedure, talk with the healthcare provider who prescribes your insulin or other medications for diabetes. They may need to change the dose of medications you take for diabetes. Ask them what you should do the morning of your procedure.
Your care team will check your blood sugar levels during your procedure.
Diuretics (water pills)
A diuretic is a medication that makes you urinate (pee) more often. Hydrochlorothiazide (Microzide®) and furosemide (Lasix®) are common diuretics.
If you take any diuretics, ask the IR doctor doing your procedure what to do. You may need to stop taking them the day of your procedure.
Weight loss medicines
If you take medicine for weight loss (such as a GLP-1 medicine), talk with the healthcare provider who scheduled your procedure. Ask them what to do before your procedure. You may need to stop taking it, follow different eating and drinking instructions before your procedure, or both. Follow your healthcare provider’s instructions.
We’ve listed some examples of medicines that cause weight loss below. There are others, so be sure your care team knows all the medicines you take. Some of these are meant to be used to help manage diabetes but are sometimes prescribed just for weight loss.
|
|
Take devices off your skin
You may wear certain devices on your skin. Before your scan or procedure, some device makers recommend you take off your:
- Continuous glucose monitor (CGM)
- Insulin pump
Talk with your healthcare provider about scheduling your appointment closer to the date you need to change your device. Make sure you have an extra device with you to put on after your scan or procedure.
You may not be sure how to manage your glucose while your device is off. If so, before your appointment, talk with the healthcare provider who manages your diabetes care.
Arrange for someone to take you home
You must have a responsible care partner take you home after your procedure. A responsible care partner is someone who can help you get home safely. They should be able to contact your care team if they have any concerns. Make sure to plan this before the day of your procedure.
If you don’t have a responsible care partner to take you home, call one of the agencies below. They’ll send someone to go home with you. There’s a charge for this service, and you’ll need to provide transportation. It’s OK to use a taxi or car service, but you still need a responsible care partner with you.
| Agencies in New York | Agencies in New Jersey |
| VNS Health: 888-735-8913 | Caring People: 877-227-4649 |
| Caring People: 877-227-4649 |
Tell us if you’re sick
If you get sick (including having a fever, cold, sore throat, or flu) before your procedure, call your IR doctor. You can reach them Monday through Friday from to
After , during the weekend, and on holidays, call 212-639-2000. Ask for the Interventional Radiology fellow on call.
Note the time of your appointment
A staff member will call you 2 business days before your procedure. If your procedure is scheduled for a Monday, they’ll call you on the Thursday before. They’ll tell you what time to get to the hospital for your procedure. They will also remind you where to go.
If you don’t get a call by noon (12 p.m.) on the business day before your procedure, call 646-677-7001. If you need to cancel your procedure for any reason, call the healthcare provider who scheduled it for you.
What to do the day before you get your Tenckhoff catheter
Instructions for eating
Stop eating at midnight (12 a.m.) the night before your surgery. This includes hard candy and gum.
Your healthcare provider may have given you different instructions for when to stop eating. If so, follow their instructions. Some people need to fast (not eat) for longer before their surgery.
What to do the day you get your Tenckhoff catheter
Instructions for drinking
Between midnight (12 a.m.) and 2 hours before your arrival time, only drink the liquids on the list below. Do not eat or drink anything else. Stop drinking 2 hours before your arrival time.
- Water.
- Clear apple juice, clear grape juice, or clear cranberry juice.
- Gatorade or Powerade.
-
Black coffee or plain tea. It’s OK to add sugar. Do not add anything else.
- Do not add any amount of any type of milk or creamer. This includes plant-based milks and creamers.
- Do not add honey.
- Do not add flavored syrup.
If you have diabetes, pay attention to the amount of sugar in your drinks. It will be easier to control your blood sugar levels if you include sugar-free, low-sugar, or no added sugar versions of these drinks.
It’s helpful to stay hydrated before surgery, so drink if you are thirsty. Do not drink more than you need. You will get intravenous (IV) fluids during your surgery.
Stop drinking 2 hours before your arrival time. This includes water.
Your healthcare provider may have given you different instructions for when to stop drinking. If so, follow their instructions.
Things to remember
- Follow your healthcare provider’s instructions for taking your medications the morning of your procedure. It’s OK to take them with a few small sips of water.
- Do not use oils, cream, or petroleum jelly (Vaseline®). You can use deodorant and light moisturizers. Do not wear eye makeup.
- Take off any jewelry, including body piercings.
- Leave all valuable items, such as credit cards and jewelry, at home.
- If you wear contact lenses, wear your glasses instead, if you can. If you don’t have glasses, bring a case for your contacts.
- Wear loose, comfortable clothing.
What to bring
- A list of the medications you take at home.
- Medications for breathing problems (such as your inhaler), medications for chest pain, or both.
- A case for your glasses or contacts.
- Your Health Care Proxy form and other advance directives, if you have filled one out.
- Your breathing device for sleep apnea (such as your CPAP machine), if you use one. If you can’t bring it, we will give you one to use while you’re in the hospital.
What to expect when you arrive
Many doctors, nurses, and other staff members will ask you to state and spell your name and date of birth. This is for your safety. People with the same or similar names may be having procedures on the same day.
You’ll get a hospital gown, robe, and nonskid socks to wear. If you have a central venous catheter (CVC), peripherally inserted central catheter (PICC), or implanted port (mediport), a nurse will access it. If you don’t, a nurse will place an intravenous (IV) line in a vein in your arm or hand.
In the procedure room
A member of your care team will help you onto the procedure table. Once you’re in the right position, they’ll give you 2 medications:
- A sedative to make you sleepy and relaxed. You’ll get the sedative through your CVC, PICC line, implanted port, or IV line.
- A local anesthetic to numb the area where they’ll place the catheter. You’ll get the anesthetic as an injection (shot).
Once the local anesthetic and sedative are working, your IR doctor will make 2 small incisions (surgical cuts) on your abdomen. The incisions will be a few inches apart. The first incision will only go through your skin. The second incision will go through your skin and into your abdomen where the ascites is.
Your IR doctor will place the catheter through the first incision. They’ll tunnel it under your skin to the second incision, then put it into your abdomen. Tunneling the catheter under your skin helps keep it from moving and lowers your risk of infection.
Once your catheter is in place, your IR doctor will use it to drain the liquid from your abdomen. They’ll secure it in the exit site with a suture (stitch). They’ll close the first incision with Dermabond® (surgical glue) or put a small bandage (such as a Primapore®) over it. They’ll also put a dressing over your catheter exit site.
After you get your Tenckhoff catheter
A member of your care team will bring you to the Post-Anesthesia Care Unit (PACU) after your procedure. A nurse will check on you and take care of you while you wake up from the sedative. Most people stay in the PACU for about 1 hour.
You may have some discomfort at your catheter exit site. If you do, ask your nurse for medication to help ease your pain.
Before you leave the hospital, your care team will give you supplies to care for your catheter. They should give you enough supplies to last for 2 weeks. Read the “How To Order Your Tenckhoff Catheter Supplies” section for information about getting more supplies.
How to take care of your incisions
- You can take off the small dressing over your incision 24 hours (1 day) after your procedure. Keep the dressing over your catheter exit site in place.
-
The suture holding your catheter in place may come off by itself as the area heals. If it comes off before 2 weeks have passed, it must be replaced. Call your nurse in Interventional Radiology to schedule the appointment.
- If the suture is uncomfortable, your care team can take it out 2 weeks after your procedure. Ask your Interventional Radiology healthcare provider to take it out.
- If there’s Dermabond over your incision, it will fall off in 1 to 2 weeks. Do not scratch it or put any creams or lotions on it.
How to shower with a Tenckhoff catheter
You can shower 48 hours (2 days) after your procedure. Do not take a tub bath or swim while you have your catheter.
The dressing over your catheter can’t get wet. Every time you shower, cover your catheter with a one-time-use waterproof cover, such as AquaGuard®. You can buy waterproof covers online.
- Peel off the top and side strips.
- Place the top edge above your dressing. Do not let the tape on the waterproof cover touch your dressing. It can lift your dressing when you take off the waterproof cover after showering. Smooth the cover down over your dressing.
- Peel off the bottom strip. Make sure the bottom edge of the waterproof cover is below your dressing. Tuck your catheter into the waterproof cover so it’s fully covered.
- Smooth the bottom edge of the waterproof cover down.
Do not shower for longer than 15 minutes. Use warm water, not hot water. This will help keep the waterproof cover from coming off.
After your shower, dry the waterproof cover before you take it off. Make sure the dressing over your Tenckhoff catheter exit site is clean and dry. If it’s dirty or wet, call your healthcare provider to schedule an appointment to have it changed.
How to drain your ascites using your Tenckhoff catheter
Drain the liquid from your abdomen every day unless your healthcare provider gives you different instructions.
Your healthcare provider will recommend an amount for you to drain based on how comfortable you feel after draining. Follow their instructions. Never drain more than your healthcare provider told you without speaking with them first. Draining too much liquid can be unsafe and make you sick.
Always write down how much liquid you drain and how you feel after draining. Your healthcare provider will use this information to decide how much liquid you’ll need to drain.
Caregivers should follow these steps to drain liquid using the Tenckhoff catheter. You can also drain liquid from your own abdomen using these steps.
- Choose a work area with a clean, flat surface. Make sure there’s room for a chair and a small stool or other short, steady object. It should be short enough that the measuring pitcher is below the person’s abdomen when they’re sitting in the chair. Do not use a bathroom as your work area.
- Clean your work area and the low, flat surface. Then spread clean paper towels over the low surface.
-
Clean your hands with soap and warm water or an alcohol-based hand sanitizer.
- If you’re washing your hands with soap and water, wet your hands and apply soap. Rub your hands together for at least 20 seconds, then rinse. Dry your hands with a paper towel and use that same towel to turn off the faucet.
- If you’re using an alcohol-based hand sanitizer, be sure to cover your hands with it. Then, rub your hands together until they’re dry.
-
Set up your supplies in your work area. You’ll need:
- A new red sterile cap.
- 2 alcohol wipes.
- Hand sanitizer.
- Medical gloves.
- A plastic measuring pitcher.
- A drainage record chart.
- A trash can.
- Have the person sit on the chair. Place the measuring pitcher on the short table near them.
- Open the package with the new red sterile cap, but do not touch the cap yet. Leave it in the package for now.

- Open the alcohol wipes.
- If you want to use medical gloves, put them on.
- Hold the catheter in your non-dominant hand. This is the hand you don’t write with. You may need to take off the UC© strip or Primapore dressing holding the catheter in place. This depends on where the catheter is and how much you can move it.
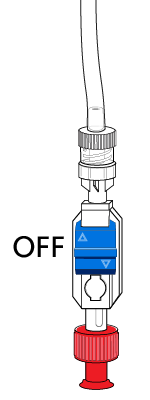
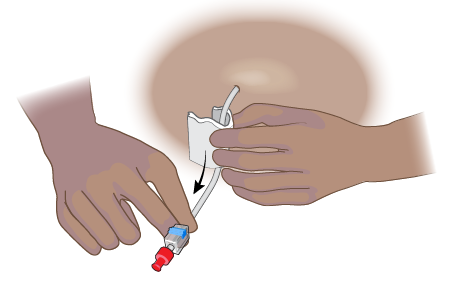
- Check that the flow switch is in the “Off” position, away from the red cap (see Figure 3).
- Using your dominant hand, gently twist the red sterile cap off the flow switch. Drop the cap in the trash can. Do not let go of the catheter.
- Scrub the exposed end of the flow switch with an alcohol wipe for 15 seconds. Then, let it dry for 15 seconds. Drop the alcohol wipe in the trash.
- Hold the end of the flow switch over the measuring pitcher. Do not let the end of the flow switch touch the sides of the pitcher.
-
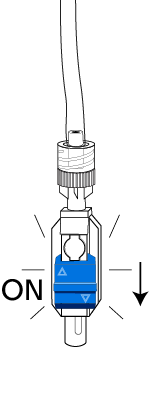
Slide the flow switch to the “On” position (see Figure 4). You will hear a click and liquid will start to flow into the measuring pitcher. It can take 5 to 10 minutes for the liquid to drain.If the liquid stops draining and you think there is still some left in your abdomen, shift your body from side to side.If no liquid comes out at all:
- Make sure you removed the cap from the end of the catheter.
- Make sure the flow switch is firmly clicked in the “On” position.
- Have the person change positions by shifting their body from side to side.
- Make sure the catheter is not bent.
- Once you have drained the amount your healthcare provider told you to, slide the flow switch back to the “Off” position.
- Scrub the end of the flow switch with the second alcohol wipe for 15 seconds. Let it dry for 15 seconds. Drop the wipe in the trash.
- Twist the new red sterile cap onto the end of the flow switch. Do not twist it on too tight. If you do, you may break it or not be able to take it off next time.
- Check how much liquid is in the measuring pitcher. Note what it looks like on the drainage record chart. Flush the drainage down the toilet.
- Clean the pitcher with antibacterial dish soap. Dry it with a clean paper towel.
- If you were wearing gloves, take them off and drop them in the trash. Clean your hands again.
-
In the drainage log, write down:
- The date and time.
- The amount of liquid you drained.
- What the liquid looked like.
- If the person felt any pain or discomfort.
- Wash the measuring pitcher with antibacterial dish soap. Let it air dry.
How to change your Tenckhoff catheter dressing
Change your dressing once a week. If it gets dirty or wet, change it right away.
If your dressing is getting wet from liquid leaking from your abdomen, call your main MSK doctor. They may want to change your drainage schedule.
Follow these steps to change the dressing over your Tenckhoff catheter exit site.
- Choose a flat worksurface. Do not change your dressing in your bathroom.
-
Clean your hands with soap and warm water or an alcohol-based hand sanitizer.
- If you’re washing your hands with soap and water, wet your hands and apply soap. Rub your hands together for at least 20 seconds, then rinse. Dry your hands with a paper towel and use that same towel to turn off the faucet.
- If you’re using an alcohol-based hand sanitizer, be sure to cover your hands with it. Then, rub your hands together until they’re dry.
-
Set up your supplies. You’ll need:
- Medical gloves.
- 5 gauze pads.
- 1 no-sting barrier film protective wipe.
- 1 Primapore® dressing.
- 1 UC strip (H dressing) catheter fastener, or another Primapore dressing.
- A trash can.
- A bowl with warm, soapy water.
- A bowl with fresh water (without soap).
- 2 adhesive tape remover pads, if you’re using them.
- Open the packaging for the Primapore dressing, UC strip, and no-sting barrier film. Also open the adhesive tape remover pads, if you’re using them.
- Put on the medical gloves.
- Gently take off the dressing. While you do this, hold the catheter near the exit site to keep from pulling it. Drop the dressing in the trash can.
- Take off the gloves and throw them in the trash can. Then clean your hands again.
- Put on a new pair of gloves.
- Dip a gauze pad in the soapy water, then squeeze out any extra water until it’s no longer dripping.
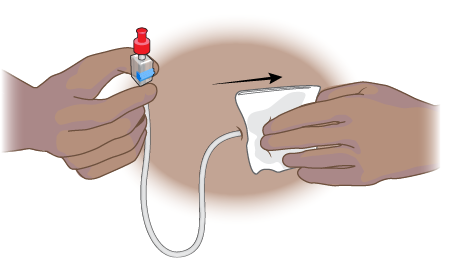
- Hold the catheter firmly in your other hand so you don’t pull it (see Figure 5). This is the hand you don’t write with. Clean the exit site and skin around it with the soapy gauze pad,. Use a circular motion, starting close to the exit site and moving outward. Then drop the gauze in the trash can.
- Dip a new gauze pad in the fresh water, then squeeze it so it isn’t dripping. Keep holding the catheter in your non-dominant hand. Rinse the exit site and skin around it with the wet gauze pad, then drop it in the trash can.
- Dip a new gauze pad in the soapy water, then squeeze out any extra. Wrap it around the catheter at the exit site. Keep holding the catheter with your other hand so you don’t pull it.
- Slide the gauze down the length of the catheter to clean it (see Figure 6). Then, drop the gauze pad in the trash can.
- Dip a new gauze pad in the fresh water, then squeeze it so it isn’t dripping. Wrap it around the catheter near the exit site. Keep holding the catheter with your other hand. Slide the gauze down the length of the catheter to rinse it. Then, drop the gauze pad in the trash can.
- Dry the catheter and skin with a dry gauze pad.
- Wipe the skin around the catheter exit site with the no-sting barrier film wipe.
-
Check the exit site for signs of infection, such as:
- Redness.
- Bad-smelling drainage.
- Leakage in the area.
- Place a Primapore dressing over the exit site so the exit site is in the center of the dressing (see Figure 7).
- Secure the catheter. If you’re using a UC strip to hold the catheter in place:
- Peel the paper backing off the center of the UC strip (see Figure 8).
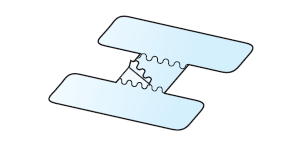
- Place the center part of the UC strip on the catheter. Pinch it so it wraps around the catheter (see Figure 9).
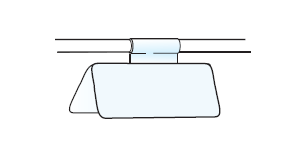
- Decide where on your abdomen you’ll put the UC strip. There should be a gentle curve in the catheter so it isn’t pulled, stretched tight, or bent.
- Peel the paper backing off one side of the UC strip. Smooth one side that side onto your abdomen. Repeat this with the other side.
If you’re using another Primapore dressing, place it about halfway down the tube so it isn’t pulled, stretched tight, or bent.
- Once the catheter is in place, take off your gloves and drop them in the trash can. Clean your hands again.
When to call your healthcare provider
Call your IR doctor if:
- You feel lightheaded or dizzy.
- You have a fever of 100.4 °F (38 °C) or higher.
- You have much less or much more drainage than usual.
- The drainage looks different than usual.
- The drainage is bloody, smells unusual, or is cloudy.
- You have any questions or concerns.
- The area around your catheter’s exit site is red.
- You have pain at your catheter’s exit site or in your abdomen.
- You think your catheter may have been pulled out of place.
How to order your Tenckhoff catheter supplies
- Adhesive remover (1 box)
- Alcohol wipes (1 box)
- UC Strip catheter fastener (1 box)
- Primapore dressing 1¾ x 2¾
- Disposable male/female sterile cap (red sterile cap)
- Non-sterile gloves (1 box)
- Plain gauze (1 package)
- Skin Prep (1 box)
- Plastic measuring pitcher
- AquaGuard (1 box)