This information describes how to give an insulin injection (shot) with an insulin pen. It also describes how to store and care for disposable insulin pens. A disposable insulin pen is an insulin pen you throw away when it’s empty or after using it for a certain number of days.
If you’re using an insulin pen:
- Make sure you know the exact name of the insulin medication you’re using. Always tell all your healthcare providers its exact name.
- Make sure you know if you’re using a concentrated insulin (medication with a lot of insulin in a small amount of liquid). You might be using a concentrated insulin if you need large doses (amounts) of insulin.
- Never use a syringe to take insulin out of an insulin pen, especially if the insulin is concentrated. Doing this could result in the wrong dose, which can be very dangerous.
- Never share an insulin pen with anyone. They’re meant to be used by 1 person only. Sharing insulin pens could cause an infection.
About insulin pens
An insulin pen is a device used to give an insulin injection. There are different types of insulin pens. All types have the same basic parts (see Figure 1) but with different medications in them.
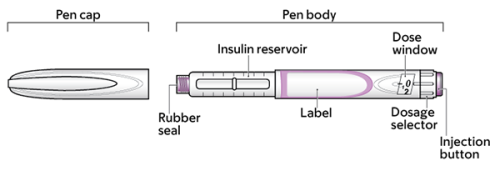
- A pen cap. This protects the insulin when you’re not using the pen.
- A rubber seal. This is where the pen needle connects to the body of the pen.
- An insulin reservoir. This holds the insulin. There’s a clear plastic area that lets you see the insulin inside the reservoir. You can use this to see about how much insulin is left in the pen.
- A label. This tells you the type of insulin in the pen and the expiration date.
- A dosage selector. This lets you dial to the right insulin dose.
- A dose window. This shows the number of units of insulin selected. There’s an arrow pointing to the number in the middle of the dose window. This is the number of insulin units that will be injected.
- An injection button. You press down on this to give the injection.
About insulin pen needles
Use a new insulin pen needle each time you give yourself an injection. Insulin pen needles have 4 main parts (see Figure 2).

- A protective tab. This helps keep the needle clean. You’ll need to remove this before attaching the needle to the insulin pen.
- An outer needle cap. This covers the needle before and after it’s used.
- An inner needle cap. This helps keep the needle clean before it’s used.
- A needle. This is how the injection is given into the skin.
How to store your insulin pens
Too much heat, cold, or sunlight can damage the insulin in your pens. Follow the instructions below to store your insulin pens.
- Keep your new, unused insulin pens in the refrigerator door. This keeps them from being pushed to the back of the refrigerator, where they can freeze.
- Keep the insulin pen you’re currently using at room temperature (below 86 °F, or 30 °C). Once you use an insulin pen the first time, never put it back in the refrigerator.
- Never freeze your insulin pens.
-
When you’re going out in hot weather, don’t let your insulin pen get too hot. Carry it in an insulated bag, or something similar, to keep it cool.
- If you’re going to be out for a few hours, put a cold bottle of water in the insulated bag with your insulin pen. This will keep it from getting too hot for several hours.
- If you’re going to be out for a longer time, you can put an ice pack in the insulated bag with your insulin pen. Wrap the ice pack or insulin pen in a towel to keep them from touching. If the pen touches the ice pack directly, the insulin can freeze.
- Always put the pen cap back on the insulin pen after using it. This protects the insulin from sunlight.
When to throw away your insulin pens
You’ll use the same insulin pen over and over for a certain number of days. The number of days depends on the type of insulin pen you’re using. The table below lists some common types of insulin pens and the number of days you can use each one. You can also read the instructions that come with your insulin pens.
| Insulin type | Insulin concentration | Insulin action | Number of days to use pen | Insulin color |
|---|---|---|---|---|
| NovoLog® FlexPen®: aspart | 100 units/mL | Rapid acting | 28 days | Clear |
| Humalog® KwikPen®: lispro | 100 units/mL | Rapid acting | 28 days | Clear |
| Lantus® SoloStar®: glargine | 100 units/mL | Long acting | 28 days | Clear |
| Levemir® FlexTouch®: detemir | 100 units/mL | Long acting | 42 days | Clear |
| Humulin®N KwikPen®: NPH | 100 units/mL | Intermediate acting | 14 days | Cloudy |
Whenever you start using a new insulin pen:
- Count ahead the number of days you can use the insulin pen. Start from the day you first put a pen needle on that new pen.
- Write that date on a piece of paper tape (such as masking tape) and put the tape on the pen. This will help you always easily see when you need to throw away the insulin pen and start using a new one. If you don’t have paper tape, write the date on a piece of paper and tape the paper to the pen.
- Once you get to the date written on the tape or paper, throw away the insulin pen, even if there’s still insulin left. Start using a new insulin pen.
For example, if you start using a Lantus SoloStar insulin pen on January 1st, count ahead 28 days to January 28th. Write “January 28” on a piece of paper tape and put the paper tape on the pen. Throw away the pen on January 28th, even if there’s still insulin in it.
You can keep unused insulin pens in the refrigerator until the expiration date listed on the pen label. Once an insulin pen reaches the expiration date listed on the pen label, throw it away.
When to give an insulin injection
-
If you’re using rapid-acting (mealtime) insulin, inject it within 15 minutes before your meal. It’s best to inject it just before you start eating. This helps prevent low blood sugar.
Most mealtime insulins work for 4 hours. Don’t inject mealtime insulin more often than every 4 hours unless your healthcare provider tells you to. For example, if you eat breakfast at 8 a.m., don’t inject your next dose of mealtime insulin until 12 p.m. (noon) or later. Injecting doses too close together can cause low blood sugar, which can be dangerous. - If you’re using long-acting insulin, inject it at the same time every day. Follow your healthcare provider’s instructions.
- It’s okay to use rapid-acting and long-acting insulin at the same time.
How to give an insulin injection (shot)
Always check your blood sugar before using your insulin pen. Remember to clean your hands with soap and warm water. To do this, wet your hands and apply soap. Rub your hands together well for 15 to 20 seconds, then rinse. Dry your hands with a paper towel and use that same towel to turn off the faucet.
Once you know your blood sugar level, you can figure out whether it’s safe for you to take insulin, and what dose you need. Your healthcare provider will teach you how to do these things. They’ll also tell you how long you can use the pen once you put a needle on it for the first time. Follow their instructions.
Check the label on the insulin pen to make sure you have the right insulin pen for the right time. For example, if you’re eating, make sure you have your rapid acting insulin pen.
Set up your supplies
Once you know which insulin and what dose to take, set up your supplies on a clean, flat surface.
You’ll need:
- The insulin pen.
- A new, unused pen needle.
- 2 alcohol wipes.
- A clean tissue.
- Your home sharps container, such as an empty laundry detergent bottle. For information about choosing a sharps container, read “How to Store and Dispose of Your Home Medical Sharps” at the end of this resource.
- A trash can.
Get the insulin pen ready
- Take the pen cap off the insulin pen (see Figure 3). Place the pen cap on the table.

-
Some types of insulin are meant to be clear. Others are meant to be cloudy.
Clear insulin: If your insulin is supposed to be clear, check to make sure it’s completely clear. If it’s discolored or cloudy, don’t use it. Throw it away and get a new insulin pen.Cloudy insulin: If your insulin is supposed to be cloudy, mix it by gently rolling the pen between your hands 10 times. Then tip the pen up and down 10 times. The insulin should look evenly white and cloudy with no lumps or pieces floating in it. If you see any, keep mixing it until you don’t. - Open an alcohol wipe and clean the rubber seal at the top of the insulin pen. Then throw the alcohol wipe away in the trash can.
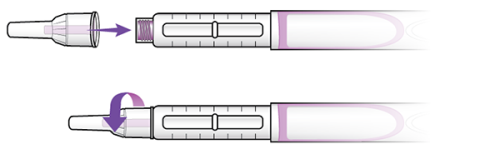
- Take the protective tab off the new pen needle (see Figure 4). Throw the tab away.
- Twist the pen needle onto the top of the insulin pen until it stops turning (see Figure 5). Make sure to keep the pen needle straight as you twist it on.
- Once the needle is on the pen, take off the outer needle cap (see Figure 6). Place it on the table to use later.

-
Take off the inner needle cap (see Figure 7). Throw it away.

Figure 7. Take off the inner needle cap.
Do a safety test (prime the pen)
Priming the insulin pen will help you make sure your pen and needle are working like they should. This will also help you make sure that the needle fills with insulin, so you get your full dose. It’s important to do a safety test before every insulin injection.
- Hold the insulin pen so you can read the name of the insulin. Look at the dose window. Turn the dose selector forward to dial it to 2 units (see Figure 8). The arrow in the dose window should line up exactly to the number you need. It’s ok to turn it back if you go too far. If you dial past 2 units, turn the dosage selector back until you’re at 2 units.

- Hold your insulin pen so the needle is pointing up.
- Firlmly press the injection button against the table or with your thumb. Look for drops of insulin coming out the tip of the needle.If no insulin comes out, dial to 2 units again. Press the injection button a second time.If insulin still doesn’t come out, dial the dose selector to 2 units again. Press the injection button a third time.If insulin still doesn’t come out, put the outer needle cap back on the needle. Twist the needle off the insulin pen and drop it into the sharps container. Put a new needle on the insulin pen and repeat the steps for priming the pen.
Set the insulin dose
After you prime the pen, the dose selector should go back to zero. If it doesn’t, turn the dose selector back until it does.
Dial the pen to your dose. Make sure the arrow is exactly lined up with the dose you’re injecting. If you can’t dial to the number of units you need, the insulin pen is probably almost empty. Throw it away and get a new one so you can inject the full dose at once. Never inject less than a full dose or split the dose into 2 injections.
Choose an injection site
Once your pen is ready, chosen an injection site. Don’t inject insulin into the same spot you used the last time, or near incisions, scars, or stretch marks.
Each injection should be at least 2 inches (5 centimeters) from the last site you used. This helps prevent soreness and scar tissues. Following a pattern can help you remember to rotate injection sites (see figure 9).
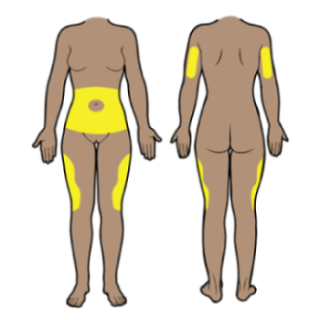
For example:
- You can inject rapid (short-acting) insulin into your belly, at least 2 inches away from your belly button.
- You can inject long-acting insulin into the upper outer part of your thigh. Avoid injecting insulin into the front of your leg, or your muscle.
- If you can’t use these areas, have someone give you the injection in the back part of your upper arm. Don’t try to inject into the back of your arm yourself. It’s too hard to reach the right area.
Using one of these areas will ensure the insulin goes into the tissue beneath your skin, not into your muscles.
Inject the insulin dose
Once you’ve chosen your injection site, gently clean the skin with an alcohol wipe. To inject the insulin:
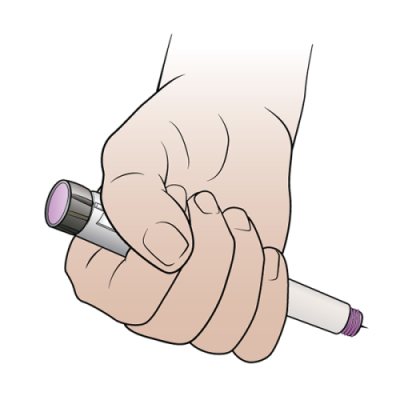
- Hold the insulin pen in your fist with your thumb on the injection button (see Figure 10). Be careful not to push down on the injection button before you push the needle into your skin.
- Gently pinch up your skin at the injection site. In one smooth, quick motion, push the whole needle into your skin. Make sure it’s at a 90-degree angle (straight up and down), not tilted. Apply gentle pressure so you see a small dimple in your skin around the tip of the pen.
- Move your thumb to the top of the insulin pen. Hold the pen stable and push the injection button down firmly. Be careful not to press the pen harder into your body.
- After you count to 10, pull the needle straight out of your skin. If you see a drop at the injection site, press the area lightly with your finger or a tissue. Never rub the injection site after the injection. This can make the insulin work too fast.
After the injection
Put the large outer needle cap back on the needle. Unscrew the needle from the insulin pen and drop it into your sharps container. Then, put the pen cap back on the insulin pen.
Store the insulin pen at room temperature (below 86° F, or 30° C). Keep it away from direct too much heat or cold, and direct sunlight.
How to store and get rid of your home medical sharps
Don’t throw your medical sharps (lancets and pen needles) directly into the trash or flush them down the toilet. Put them into a sharps container. You can use an empty, hard, opaque (not see-through) plastic container that has a screw-on cap, such as a laundry detergent bottle. Don’t store sharps in glass bottles, soda bottles, milk jugs, aluminum cans, coffee cans, or paper or plastic bags. For more information, read How To Store and Get Rid of Your Home Medical Sharps.
Stop using your sharps container when it’s a little more than half full. Wrap the lid or cap with strong tape to make a more secure seal and keep it from leaking. Label the bottle “Home Sharps: not for recycling.”
If you live in New York City, you can place the sealed container in with your regular trash for collection. Don’t put it with your recyclables. If you live in a different county of New York or another state, check with your local department of health. You can also use the resources below to find more information specific to your area.
Safe Needle Disposal
www.safeneedledisposal.org
800-643-1643
[email protected]
How to Get Rid of a Sharps Container
www.fda.gov/media/82396/download
Learn about our Health Information Policy.