This information will help you get ready for your lymph node transplant surgery to treat lymphedema. It also explains how to care for yourself after your lymph node transplant surgery.
Lymph node transplant surgery can be done to help treat lymphedema in your arm or leg. Lymphedema is swelling caused by a buildup of lymph fluid. Your arm or leg with lymphedema is called your affected limb.
About lymph node transplant surgery
The goal of lymph node transplant surgery is to create new pathways for lymph fluid to drain from your affected limb.
During your surgery, a piece of tissue with lymph nodes and lymphatic vessels and the small blood vessels that carry blood to the tissue are taken from one place in your body and moved to another place in your body. The piece of tissue is also called a flap or donor tissue.
The place where the tissue is taken from is called the donor site. The place where the tissue is moved to is called the recipient site. Your plastic surgeon will use a microscope to see and connect the blood vessels in the piece of tissue to the blood vessels at the recipient site.
After your surgery, lymphatic vessels from the piece of tissue should be able to grow into the recipient site. Lymph fluid can then move through the new lymphatic vessels, into the lymph nodes that were moved, and away from the area through the blood vessels. This should help decrease the swelling in your affected limb.
You may start to see changes in your affected limb as early as 6 weeks or as long as 2 years after your lymph node transplant surgery. It’s very hard to know how much change you may have. You may be able to see a change, your affected limb may feel different, or you may notice other small changes, such as your shoes or jewelry fitting better. Different people will have different results. Your plastic surgeon will talk with you about what to expect.
Consultation appointment
Before your surgery, you will have an appointment with your plastic surgeon. During this appointment, your plastic surgeon will talk with you, look at your affected limb, and do tests to help them plan your care. These things will help them know if lymph node transplant surgery can help treat your lymphedema.
If lymph node transplant surgery is a good treatment for your lymphedema, your plastic surgeon will talk with you to decide where your donor site will be. It may be your groin, armpit, or omentum. This is the fatty sheet of tissue that lies over the organs in your abdomen (belly).
Getting ready for your surgery
Your nurse will give you information about how to get ready for your surgery. Be sure to follow the instructions they give you, as well as the instructions in this section. Contact your plastic surgeon’s office if you have any questions.
See a lymphedema therapist
A lymphedema therapist is a physical therapist who specializes in treating lymphedema. Before your lymph node transplant surgery, you will need to have regular appointments with a certified lymphedema therapist. The lymphedema therapist will work with you to lower the swelling in your affected limb before your surgery. Having less swelling makes it easier for new lymphatic vessels to grow to the lymph nodes that are moved during surgery.
Learn how to use a walker, if needed
If your recipient site is in one of your legs, you will use a walker for the first 2 weeks after your surgery. You will need to learn how to use the walker before your surgery. You can do this with your MSK healthcare team or a physical therapist closer to where you live. Your plastic surgeon or nurse will give you more information.
Do a bowel preparation, if needed
If your donor site is in your omentum, you will need to do a bowel preparation before your surgery. This will help make sure your bowels are empty for your surgery. For the bowel preparation, you will follow a full liquid diet for 2 days before your surgery and drink magnesium citrate the day before your surgery. Magnesium citrate is an over-the-counter laxative (medication that helps you have a bowel movement (poop)). You can buy it at your local pharmacy without a prescription.
If your donor site isn’t in your omentum, you don’t need to do a bowel preparation before your surgery. Skip to the “What to Expect After Your Surgery” section below.
Follow a full liquid diet, if needed
If your donor site is in your omentum, start following a full liquid diet 2 days before your surgery. Examples of things you can drink and eat while following a full liquid diet are listed in the “Full liquid diet” table.
While you’re on this diet, try to drink at least 1 (8-ounce) glass of liquid every hour while you’re awake. Drink plenty of different kinds of liquids, not just water, coffee, and tea. You can drink liquids of any color.
If you have diabetes, ask the doctor who manages your diabetes what you should do while you’re following a full liquid diet.
| Full liquid diet | ||
|---|---|---|
| OK to have | Do not have | |
| Soups |
|
|
| Dairy |
|
|
| Grains |
|
|
| Nutritional supplements* |
|
|
| Other |
|
|
* You can buy nutritional supplements at your local pharmacy without a prescription.
Drink magnesium citrate, if needed
If your donor site is in your omentum, drink 1 (10-ounce) bottle of magnesium citrate the morning before your surgery. After you drink the magnesium citrate:
- You will start to have frequent bowel movements (poop often). Make sure to stay close to a toilet.
- Apply petroleum jelly (such as Vaseline®) or vitamin A&D ointment to the skin around your anus after every bowel movement. This will help keep the skin around your anus from getting irritated.
Keep drinking liquids all day until bedtime. Drink liquids at your usual meal times and between meals. Remember not to eat any solid foods.
What to expect after your surgery
When you wake up after your surgery, you will be in the Post-Anesthesia Care Unit (PACU).
You will stay in the PACU overnight so your nurses can make sure blood is flowing into the tissue that was moved during your surgery. After that, you will be moved to your hospital room. You will probably stay in the hospital for 3 days.
Tubes, drains, and medical devices
After your surgery, you will have a few different tubes, drains, and medical devices. You will have:
- Jackson-Pratt® (JP) drains at your surgical sites. These are small tubes that will drain the fluid that can build up under your skin around your incisions (surgical cuts). The fluid will be collected in small containers that are pinned to your clothes. You will still have the JP drains when you’re discharged (leave the hospital). They will be removed during one of your follow-up appointments, usually about 1 to 2 weeks after surgery.
- A urinary (Foley®) catheter in your bladder. This is a thin, flexible tube that will be placed through your urethra (the hole where urine (pee) leaves your body) into your bladder. It will be placed in the operating room during your surgery. It drains urine from your bladder. Your urinary catheter is usually removed the day after your surgery, once you’re able to get out of bed.
- An intravenous (IV) line in a vein in your arm. This is a thin, flexible tube attached to a needle in your vein. You will get fluids and pain medication through your IV line. Your IV line will be removed before you leave the hospital.
- Compression boots on your leg(s). These are boots that gently inflate and deflate to help blood flow in your legs and prevent blood clots. If your surgery was on one of your legs, that leg won’t have a boot on it.
Your nurse will teach you how to care for the drainage tubes at your surgical site before you leave the hospital.
Physical restrictions
It’s important to limit how much you use your recipient arm or leg (the arm or leg where the lymph nodes were moved) while it’s healing. While you’re in the hospital, your nurses and physical therapist will teach you about the specific movement restrictions you need to follow. Keep following these movement restrictions after you’re discharged.
Leg restrictions
Follow these instructions if your recipient site is in your leg.
For the first 2 weeks after your surgery:
- Don’t put any weight on your recipient leg. This means that you shouldn’t walk on your recipient leg at all. A member of your healthcare team will help you get out of bed without putting any weight on your recipient leg. They will also teach you how to do this on your own so you can do it after you’re discharged.
- Use a walker when you walk. Your nurse or physical therapist will show you how to use it before your surgery.
- Don’t put a lymphedema wrap or bandage over your incision. It’s okay to have a surgical bandage over your incision if your plastic surgeon tells you to.
- Don’t perform manual lymphatic drainage (MLD) on or near your incision.
-
Follow the movement restrictions (also called range of motion restrictions) below. If your healthcare team gives you more specific instructions, follow those instructions as well.
- If your recipient site is in your calf, keep your leg in a frogleg position as much as you can (see Figure 1). Your physical therapist will teach you how to do this.
- If your recipient site is in your groin, don’t flex your hip (bring your leg upward towards your torso) (see Figure 2). Your nurse or physical therapist will teach you how to do this before and after your surgery.
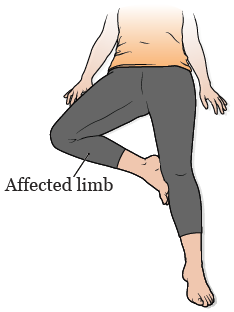
Figure 1. The frogleg position 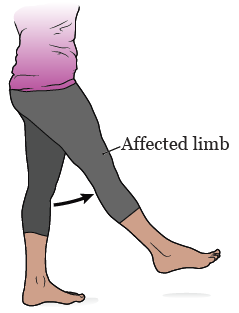
Figure 2. Flexing your hip
- Don’t visit your lymphedema therapist.
Starting 2 weeks after your surgery:
- Start visiting your lymphedema therapist again. It’s helpful to have lymphedema therapy as often as you can.
-
Start using a lymphedema wrap or bandage on your recipient leg below your incision. Don’t wrap over the incision.
- If your incision is on your upper thigh, the wrap or bandage can be put on your lower leg.
- If your incision is on your lower leg, you can wrap your toes if needed.
-
Slowly start putting more weight on your recipient leg. You can use a scale to see what this feels like. Your physical therapist will teach you how to do this while you’re in the hospital.
- Put about ¼ of your weight on your leg for 2 days.
- Put about ½ of your weight on your leg for the next 2 days.
- Put about ¾ of your weight on your leg for the next 2 days.
- Put all of your weight on your leg (walk without your walker).
Starting 4 weeks after your surgery:
- Start performing MLD over your incision.
- You can slowly start doing light exercise. Follow your plastic surgeon’s instructions.
- You may be able to start using a compression wrap or bandage over your incision. Talk with your plastic surgeon before you do this.
Starting 6 weeks after your surgery:
- You can go back to all of your usual movements and activities without any restrictions.
Arm restrictions
Follow these instructions if your recipient site is in your arm.
For the first 2 weeks after your surgery:
- Don’t put any weight on your recipient arm. This means that you shouldn’t push, pull, or lift anything.
-
Follow the movement restrictions (also called range of motion restrictions) below. If your healthcare team gives you more specific instructions, follow those instructions as well.
- Don’t rest your recipient arm close to your side. Keep some space between your arm and your side at all times (see Figure 3). It’s okay to bend and straighten your elbow as usual. The hospital staff will help you keep your arm in the right position.
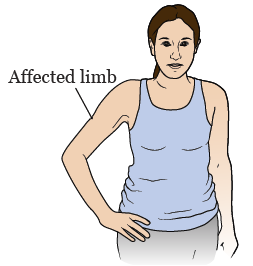
Figure 3. Space between your arm and side
- Don’t rest your recipient arm close to your side. Keep some space between your arm and your side at all times (see Figure 3). It’s okay to bend and straighten your elbow as usual. The hospital staff will help you keep your arm in the right position.
- Don’t put any pressure on your incision, including when you’re resting your arm.
- Don’t put a lymphedema wrap or bandage over your incision. It’s okay to have a surgical bandage over your incision if your plastic surgeon tells you to.
- Don’t perform manual lymphatic drainage (MLD) over your incision.
- Don’t visit your lymphedema therapist.
Starting 2 weeks after your surgery:
- Start visiting your lymphedema therapist again. It’s helpful to have lymphedema therapy as often as you can.
- Start using a lymphedema wrap or bandage on your recipient arm. It’s okay to wrap over your incision.
- Start performing MLD on your recipient arm, but don’t do it over your incision.
Starting 4 weeks after your surgery:
- Start performing MLD over your incision.
- You can slowly start light exercise. Follow your plastic surgeon’s instructions.
Starting 6 weeks after your surgery:
- You can go back to all of your usual movements and activities.
Follow-up appointments
Plastic surgeon
It’s important to schedule follow-up appointments with your plastic surgeon every week for 2 to 4 weeks after your surgery.
Lymphedema therapist
Don’t visit your lymphedema therapist during the first 2 weeks after your surgery. Starting 2 weeks after your surgery, it’s very helpful to visit your lymphedema therapist as often you can. Having regular lymphedema therapy appointments will help control lymphedema.
If your lymphedema therapist has any questions about what they should or shouldn’t do after your surgery, please ask them to call your surgeon’s office.
Learn about our Health Information Policy.