This information explains what your CADD-Solis VIP pump is, how to use it, and how to disconnect it from your CVC.
About your CADD-Solis VIP pump
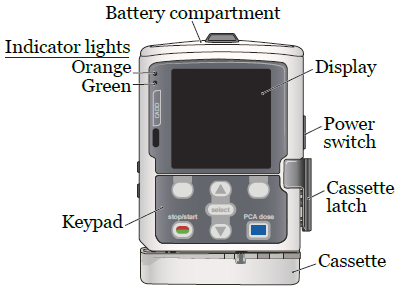
Your CADD-Solis VIP pump is a small, battery-operated pump. It’s used to send fluids, medicine, and chemotherapy through your veins (see Figure 1).
Your CADD-Solis VIP pump is connected to your central venous catheter (CVC). There are 3 main types of CVCs:
- Tunneled chest catheters.
- Peripherally inserted central catheters (PICCs).
- Implanted ports (such as Medi-Ports®).
If you’re not sure which type of CVC you have, ask your healthcare provider.
About your infusion
Your CADD Solis Pump sends medicine through an infusion. An infusion is when medicine is put into your bloodstream through a vein over a period of time.
During your infusion, place your pump at or above your heart level. When you’re sleeping, place your pump next to you on your bed. Do not place your pump on the floor. The pump works best when it is at or above your heart level.
Alarms on your CADD-Solis VIP pump
Your pump has different alarms that will alert you to any problems. The alarm will stop once the problem is fixed. If you have questions about your pump or its alarms, call 800-315-3287.
What to do after your infusion is finished
When your infusion is finished, you will need to disconnect your CADD-Solis VIP pump from your CVC line.
You will know your infusion is finished when your CADD-Solis VIP pump beeps. The display screen will show “reservoir volume 0.” Your pump will show “infusion complete.” Your treatment will be finished even if there is still fluid in your bag.
Follow your healthcare provider’s instructions for what to do when your infusion is finished. If your healthcare provider told you to disconnect and flush your CADD-Solis VIP pump after your infusion, follow the steps in this resource. We will explain how to disconnect your pump after non-chemotherapy infusions and after chemotherapy infusions.
How to disconnect your CADD-Solis VIP pump after your non-chemotherapy infusion
Follow these steps to disconnect your CADD-Solis VIP pump.
Get ready
- Clean an area to set up your supplies, such as your kitchen table. Do not disconnect your CADD-Solis VIP pump in the bathroom.
-
Gather your supplies. These supplies will be given to you or ordered by your healthcare provider. You will need:
-
A hard plastic container with a tight-fitting lid, such as a plastic coffee container. Write “Chemotherapy” or “Sharps” on the container.
- Make sure the container is hard enough that needles cannot poke through the sides.
- Do not use plastic or paper bags or a milk jug.
- 1 (10 mL) syringe prefilled with normal saline.
- 1 pair of medical gloves.
- 1 disinfection cap (such as a CurosCap®).
- 2 alcohol pads.
- 1 gauze pad.
-
A hard plastic container with a tight-fitting lid, such as a plastic coffee container. Write “Chemotherapy” or “Sharps” on the container.
- Press the “stop/start” button on the pump and then press “Yes.” Take out the 4 batteries from the pump by turning the lock on the battery door. The battery door is on the top of the pump.
Remove the tubing
- Next, remove the pump tubing from your CVC. The tubing is connected to a needleless connector (sometimes called a clave). This is the part of the IV tubing that is connected to your CVC.
-
Clean your hands well with soap and water or an alcohol-based hand sanitizer.
- If you’re washing your hands with soap and water, wet your hands and apply soap. Rub your hands together well for at least 20 seconds, then rinse. Dry your hands with a paper towel. Use that same towel to turn off the faucet.
- If you’re using an alcohol-based hand sanitizer, cover your hands with it. Rub them together until they’re dry.
- Put on the gloves.
-
Get your saline syringe ready. To do this:
- Pick up the saline syringe. Hold it with the tip facing up.
- Loosen the cap, but do not take it off.
- Push the plunger gently to push any air out of the syringe.
- Retighten the cap.
- Set the syringe down on a clean area.
- Follow the clear CADD-Solis VIP pump tubing to where it connects to the needleless connector on your CVC. Clamp your pump tubing.
- Open the gauze pad. Use it to twist the CADD-Solis VIP pump tubing counter-clockwise (to the left) to disconnect it from the needleless connector.
- Place the pump and tubing back in the backpack that your pump came in. Zip it closed.
- Clean the needleless connector with an alcohol pad for 15 seconds. Let it dry for 15 seconds.
- Take the cap off the saline syringe by turning it counter-clockwise.
- Push the syringe into the needleless connector and turn it clockwise (to the right).
Flush the catheter
- Flush the catheter with 10 mL of saline. Push 1 mL in at a time and take a quick pause in between pushing in each mL.
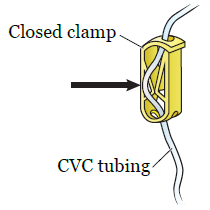
- Clamp your CVC (see Figure 2).
- Twist the empty syringe counter-clockwise to remove it from the needleless connector.
Clean up
- Open the disinfection cap. Put it on the needleless connector by firmly pressing it in and twisting it clockwise.
- Put all the used supplies into the plastic container and put on the lid. If you’re also de-accessing your implanted port now, read How to Take the Needle Out of Your Implanted Port. You can keep the same gloves on to flush.
Remember to bring all your supplies to your next visit. This includes your backpack, CADD-Solis VIP pump, and tubing.
Disconnecting your CADD-Solis VIP pump after your chemotherapy infusion
Follow these steps to disconnect your CADD-Solis VIP pump infusing chemotherapy.
Get ready
- Clean an area to set up your supplies, such as your kitchen table. Do not disconnect your CADD-Solis VIP pump in the bathroom.
-
Gather your supplies. These supplies will be given to you or ordered by your healthcare provider. You will need:
-
A hard plastic container with a tight-fitting lid, such as a plastic coffee container. Write “Chemotherapy” on the container.
- Make sure the container is hard enough that needles cannot poke through the sides.
- Do not use plastic or paper bags or a milk jug.
- 1 (10 mL) syringe prefilled with normal saline.
- 1 female connector Equashield closed-system device (if you’re a pediatric patient).
- 1 pair of medical gloves.
- 2 alcohol pads.
- 1 gauze pad.
-
A hard plastic container with a tight-fitting lid, such as a plastic coffee container. Write “Chemotherapy” on the container.
-
Clean your hands well with soap and water or an alcohol-based hand sanitizer.
- If you’re washing your hands with soap and water, wet your hands and apply soap. Rub your hands together well for at least 20 seconds, then rinse. Dry your hands with a paper towel. Use that same towel to turn off the faucet.
- If you’re using an alcohol-based hand sanitizer, cover your hands with it. Rub them together until they’re dry.
- Put on the gloves.
-
Get your saline syringe ready. To do this:
- Pick up the saline syringe. Hold it with the tip facing up.
- Loosen the cap, but do not take it off.
- Push the plunger gently to push any air out of the syringe.
- Retighten the cap.
- Set the syringe down on a clean area
-
If you’re not a pediatric patient, continue to step 7.
-
If you’re a pediatric patient, you will have a full Equashield closed-system with male and female connectors. Follow the steps here to get your saline syringe and Equashield connector ready. Then continue to step 7:
- Open the Equashield female connector but leave it in the package.
- Pick up the saline syringe. Hold it with the tip facing up.
- Loosen the cap, but do not take it off.
- Push the plunger gently to push any air out of the syringe.
- Take the cap off.
- Attach the saline syringe to the Equashield connector. To do this, place the tip into the luer-lock connection and turn it clockwise (to the right) until it’s tight.
- Set the syringe down on a clean area.
-
If you’re a pediatric patient, you will have a full Equashield closed-system with male and female connectors. Follow the steps here to get your saline syringe and Equashield connector ready. Then continue to step 7:
-
Follow the clear CADD-Solis VIP pump tubing to where it connects to the needleless connector on your CVC.
-
If you’re a pediatric patient, follow the steps here and then continue to step 8:
- Disconnect the female connector from the male connector by pushing the red and white tab in. Pull the 2 connectors away from each other.
- Connect the saline syringe (with the female connector attached) to the CVC. To do this, match the red stripes on the female connector to the red strips on the male connector (red and white tab). Push them together until you hear a click and you cannot pull them apart without pushing in the tab.
-
If you’re a pediatric patient, follow the steps here and then continue to step 8:
Flush the catheter
- Flush the catheter with 10 mL of saline. Push 1 mL in at time and take a quick pause in between pushing in each mL.
- Close the second clamp (the one closest to your body) so it’s pinching the clear tubing.
-
Twist the empty syringe counter-clockwise (to the left) to take it out of the needleless connector.
-
If you’re a pediatric patient, twist the Equashield closed-system devices counter-clockwise to take it out of the needleless connector.
- Your needleless connector will stay attached to your CVC. Remove the male connector, female connector, and syringe all together. When you’re done, continue to step 11.
-
If you’re a pediatric patient, twist the Equashield closed-system devices counter-clockwise to take it out of the needleless connector.
Clean up
- Open the disinfection cap. Put it on the needleless connector by firmly pressing it in and twisting it clockwise.
- Put all the used supplies into the plastic container and put on the lid. If you’re also de-accessing your implanted port now, read How to Take the Needle Out of Your Implanted Port. You can keep the same gloves on to flush.
Remember to bring all your supplies to your next visit. This includes your backpack, CADD-Solis VIP pump, and tubing.
Contact information
Pediatric Service: If you have any questions, contact a member of your care team directly. You can reach a staff member Monday through Friday from to After , during the weekend, and on holidays, call 212-639-2000. Ask for the pediatric doctor covering for your doctor. Call InfuSystem at 800-315-3287 with questions about your pump.
Adult Service: If you have any questions, contact a member of your care team directly. You can reach a staff member Monday through Friday from& to After , during the weekend, and on holidays, call 212-639-2000. Ask for the doctor covering for your doctor. Call InfuSystem at 800-315-3287 with questions about your pump.
Learn about our Health Information Policy.