This information will help you care for your tracheostomy.
About Your Trachea
Your trachea (windpipe) is part of your respiratory system. It’s about 4½ inches (11 centimeters) long and is at the front of your neck (see Figure 1). It runs from your larynx (voice box) to your lungs.
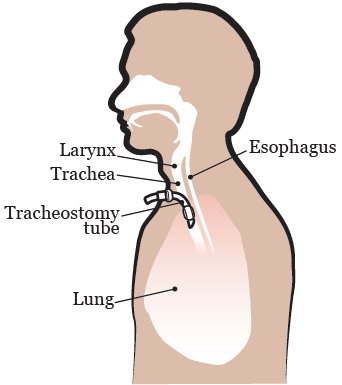
When you breathe, air travels from your nose or mouth into your larynx, through your trachea, and into your lungs. This path is called your airway.
About Your Tracheostomy
A tracheostomy is a surgical opening in your trachea. It makes breathing easier and protects your airway from being blocked. You may need a tracheostomy if:
- A tumor is blocking or narrowing your airway.
- Secretions (mucus) are blocking or narrowing your airway.
- You’re having a surgery that’s likely to cause swelling that blocks or narrows your airway.
Your tracheostomy may be temporary or permanent. Your doctor will talk with you about how long you’ll need it.
About your tracheostomy tube
A tracheostomy tube is a hollow tube that’s put in your tracheostomy to keep it from closing. Once you have a tracheostomy, you’ll need to wear a tracheostomy tube all the time.
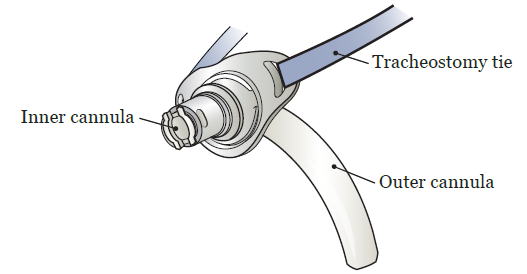
A tracheostomy tube has 3 parts (see Figure 2):
- An outer cannula that always stays in place. This keeps your tracheostomy from closing. Don’t remove the outer cannula. Only your doctor or nurse should remove it.
- An inner cannula that can slide in and out. You’ll change the inner cannula twice a day. This keeps secretions from building up inside and blocking your airway. Don’t leave the inner cannula out for more than a few minutes. Keep it in place except when you’re changing it.
- A tracheostomy tie that goes around your neck and connects to the outer cannula. This keeps your tracheostomy tube in place.
Communicating with a tracheostomy
While you have a tracheostomy, you won’t be able to speak like usual. Many people can speak by covering the opening in their tracheostomy tube with a finger. Your nurse will teach you how to do this. They’ll also give you a pen and paper to help you communicate.
Protect your airway at all times while you have a tracheostomy.
- Don’t submerge yourself under water (such as in a bathtub or pool).
- Don’t go swimming while your tracheostomy tube is in place. After the tube is removed, don’t go swimming until your tracheostomy is completely closed.
- Avoid having water spray or splash directly into your tracheostomy when you shower. Direct the water so it hits beneath your neck, face away from the water, or use the shower shield your nurse gives you.
It’s also important to use a humidifier while you have a tracheostomy, especially at night. This will help keep your secretions loose so they don’t clog your tracheostomy tube.
Caring for Your Tracheostomy
While you’re in the hospital, your nurse will teach you how to care for your tracheostomy. You’ll learn how to:
- Suction your tracheostomy tube. This clears the secretions from your airway so it’s easier to breathe.
- Clean the suction catheter. This helps prevent infection.
- Replace the inner cannula. This helps keep secretions from blocking it.
- Clean your skin around your tracheostomy. This helps keep it from getting irritated.
- Moisturize the air you breathe. This helps loosen your secretions so they’re easier to suction.
If you’re discharged from the hospital with your tracheostomy, you’ll care for it at home. You’ll get the supplies you need before you’re discharged from the hospital. You may also have a nurse visit you at home to help. Your healthcare team will plan these things with you.
You can use the following instructions to help you remember how to care for your tracheostomy.
How to suction your tracheostomy tube
Your nurse will tell you how often to do this.
-
Gather your supplies. You’ll need:
- A suction machine with plastic tubing
- A suction catheter
- A mirror
- A bowl or large cup filled with water
- 2 to 4 dry gauze pads
- A clean, dry cloth or paper towel
- Clean your hands well with soap and water or an alcohol-based hand sanitizer.
- Connect the suction catheter to the suction machine’s plastic tubing.
- Position the mirror so you can see the opening of your tracheostomy tube.
- Turn on the suction machine. (If you’re in the hospital, open the clamp on the suction tubing instead).
- Pinch the suction catheter between your thumb and pointer finger to block the suction.
- Cough deeply to bring up any secretions.
- Keep the suction catheter pinched. Put it about 3 to 5 inches (8 to 13 centimeters) into your tracheostomy tube.
- Un-pinch the suction catheter to start suctioning. Don’t keep the suction catheter in your trachea for longer than 10 seconds. Keeping it in too long can cause shortness of breath.
- Using a rotating motion, slowly pull the suction catheter out of your tracheostomy. Rotating the catheter helps it suck up secretions on all sides of your trachea and tracheostomy tube.
- Wipe the secretions from the outside of the suction catheter with dry gauze.
- Rinse the secretions from the inside of the suction catheter by suctioning the water through it.
Repeat these steps if you feel you have more secretions that need to be cleared out. If you need to repeat the suctioning more than 2 or 3 times, rest for a few minutes before starting again.
Once you’re done:
- Make sure the suction catheter and plastic tube are clean. Rinse and wipe the outside and suction water through the inside to clean them, if needed.
- Disconnect the suction catheter from the plastic tubing on the suction machine.
- Place the suction catheter on the dry cloth or paper towel.
- If you’re at home, empty the secretions from the inside of the suction machine into the toilet. Don’t empty them into the sink. They can clog the drain. In the hospital, a staff member will do this for you.
While you’re at home, change the suction catheter once a week or more often if it’s dirty or clogged. If you’re in the hospital, use a new one each time.
Clean the suction machine’s canister with soap and water as needed.
How to change the inner cannula and clean your skin around your tracheostomy
Remove and inspect your inner cannula regularly, at least 3 times a day. Change it 2 times per day: once in the morning and once at night. If you see secretions building up inside, change it sooner.
Try not to change your inner cannula more than 2 times per day. If you do, you might run out. If you regularly need to change your inner cannula more often than 2 times per day, call your healthcare team to tell them.
-
Gather your supplies. You’ll need:
- A new inner cannula
- 4 to 6 cotton swabs (or as many as needed)
- A mirror
- Clean your hands well with soap and water or an alcohol-based hand sanitizer.
- Stand or sit in front of the mirror.
- Hold the outer cannula in place with one hand. Unlock the inner cannula by gently squeezing the pinch tab with your other hand.
-
Slide out the inner cannula (see Figure 3) and throw it away. Don’t leave the inner cannula out of your tracheostomy tube for more than a few minutes.
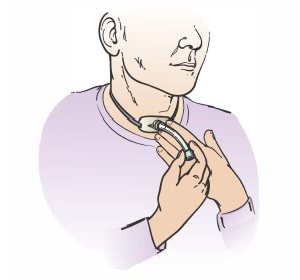
Figure 3. Sliding out the inner cannula - Pick up the new inner cannula. Gently squeeze the pinch tab and slide it into the outer cannula. Release the pinch tab connector when it securely locks onto both sides of the connector rim.
- Gently clean the skin around your tracheostomy tube with moistened cotton swabs.
If you’ll have your tracheostomy for a longer time, your healthcare provider will change your whole tracheostomy tube (inner cannula, outer cannula, and tracheostomy ties) during your office visits. Don’t remove your tracheostomy tube’s outer cannula on your own. You may not be able to put it back into your trachea. Don’t change your tracheostomy ties until your doctor tells you it’s safe to do so.
How to moisturize the air you breathe
Use a humidifier to moisten the air you breathe. If you want or need more moisture, you can place a moist piece of gauze in front of your tracheostomy tube. This will help filter, moisturize, and warm the air you breathe in.
-
Gather your supplies. You’ll need:
- 1 (4-inch x 4-inch) piece of gauze
- A string long enough to go around your neck
- Scissors
- Clean your hands with soap and water or use an alcohol-based hand sanitizer.
- Stand or sit in front of a sink with a mirror.
- Moisten the gauze with water. Cut a piece of string that’s long enough to fit comfortably around your neck.
-
Open the gauze and drape it over the string. Put the gauze in front of the tracheostomy tube opening (see Figure 4). Tie the string in a bow behind your neck to keep it in place.
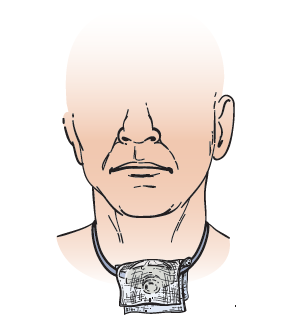
Figure 4. Moistened gauze placed over the tracheostomy tube opening - Keep the gauze in place until it dries out. Once it’s dry, throw it away. Repeat the steps above to replace it.
Removing Your Tracheostomy Tube
Your doctor will remove your tracheostomy tube when you no longer need it. You won’t feel any pain when it’s taken out. You won’t need to have surgery, and the opening will close on its own. You won’t need stitches.
Before your tracheostomy tube is removed, you’ll put a cap over your inner cannula. The cap will block your tracheostomy so you breathe normally. You’ll leave the cap in place for at least 24 hours. If you’re able to breathe normally with it in place, your doctor will remove your tracheostomy tube and put a dressing (bandage) over your tracheostomy site.
- Keep a dressing over your tracheostomy until it’s completely closed. Your healthcare provider will tell you when this happens. It usually takes about 1 to 2 weeks.
- Change the dressing twice a day or more often if it gets dirty. Clean your skin underneath with moistened pieces of gauze every time you change it.
- Put your finger over the dressing when you cough or speak. This will help your tracheostomy close.
Important Points
- Remove the inner cannula right away if you have trouble breathing. If it gets easier to breathe, the inner cannula was probably clogged. Inspect the inner cannula and replace it with a new one if needed. Call 911 or go to the nearest emergency room right away if your breathing doesn’t get better.
- If your whole tracheostomy tube is removed by accident, don’t panic. Your tracheostomy will stay open for hours to days. Call 911 or go to the nearest emergency room right away to have it put back in.
Learn about our Health Information Policy.