This information explains how to install blood pressure monitors as part of your care at MSK. They are the Withings BPM Connect, OMRON Silver BP5250, OMRON 5 Series BP7250, and the iHealth Track.
The blood pressure measurements you take at home will help your care team make decisions about your care. They can help them diagnose high blood pressure. They also can use your home blood pressure measurements to adjust your blood pressure medications, if needed.
This information will explain how to setup and use the Withing BPM Connect blood pressure machine.
How to set up the Withings BMP Connect blood pressure machine
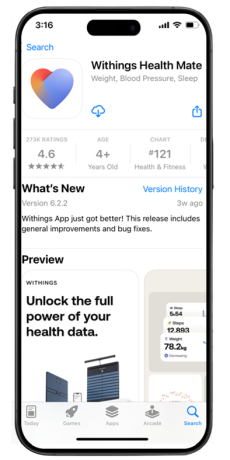
- Download the Withings Health Mate app from iOS or Google Play Store (see Figure 1).
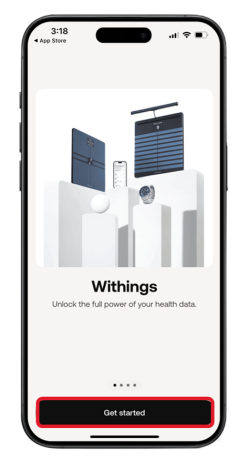
- Select “Get Started” (see Figure 2).
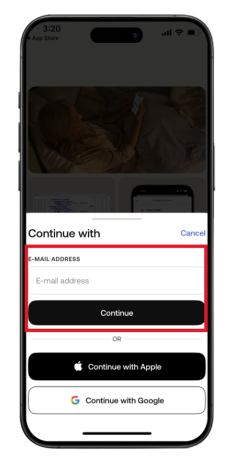
- Enter the email address you would like to login with and click “Continue” (see Figure 3).
- Check your email address for a Withings verification code. Enter the code into the Withings Health Mate App and click “Continue” (see Figure 4).

- From top right-hand corner of the Home screen, tap the Devices icon (see Figure 5).
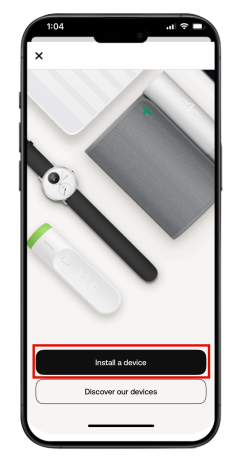
- Tap the “Install a device” (see Figure 6).
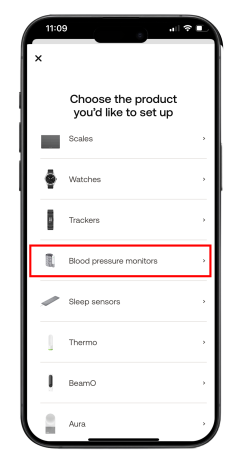
- Select “Blood pressure monitors” from list (see Figure 7).
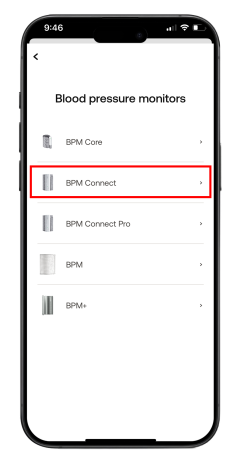
- Select the “BPM Connect” (see Figure 8).
- Select “Install” (see Figure 9).

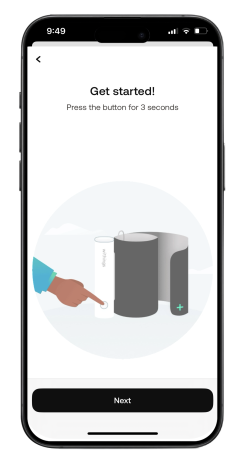
- Press and hold the button on your BPM Connect for three seconds. Tap “Next” to continue (see Figure 10).
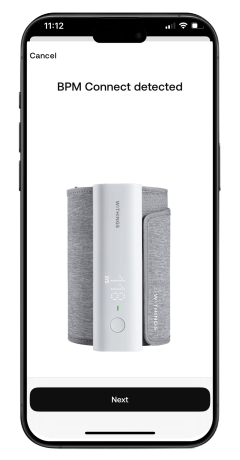
- Once the BPM Connect is detected tap “Next” (see Figure 11).
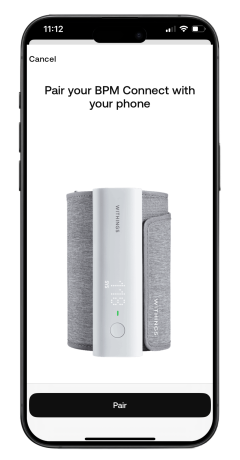
- Tap “Pair” to start pairing the BPM Connect to your mobile device (see Figure 12).
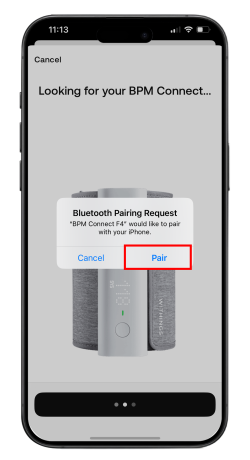
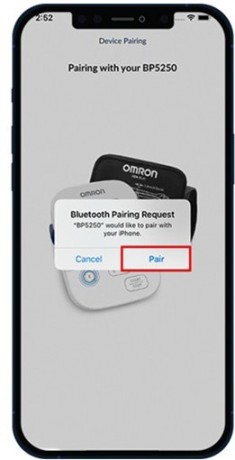
- Tap “Pair” when the Bluetooth Pairing Request appears (see Figure 13).
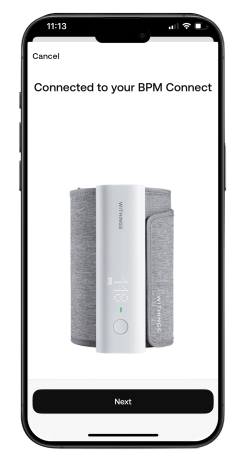
- Your BPM Connect has connected. Tap “Next” (see Figure 14).
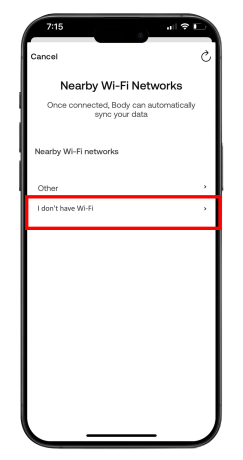
- Tap “I don’t have Wi-Fi”. The phone will be setup to connect to Bluetooth (see Figure 15).
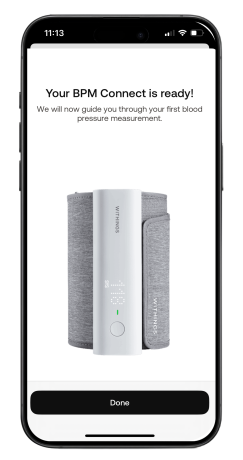
- The BPM Connect setup is complete. You can now take a blood pressure reading. Tap “Next” (see Figure 16).
How to take a blood pressure reading
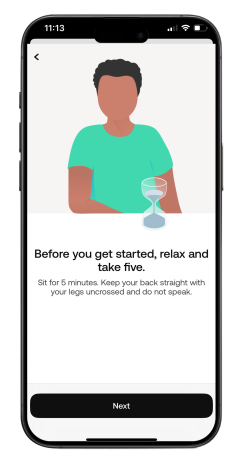
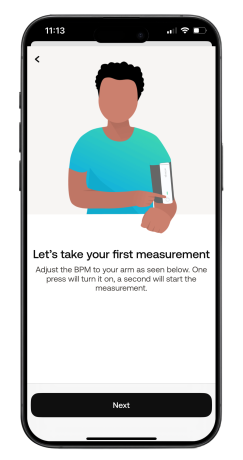
- Review the on-screen instructions to take your first reading. Sit with your back straight and legs uncrossed. Tap “Next” (see Figure 17).
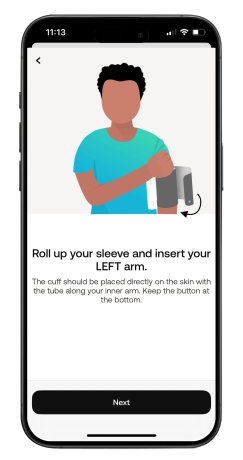
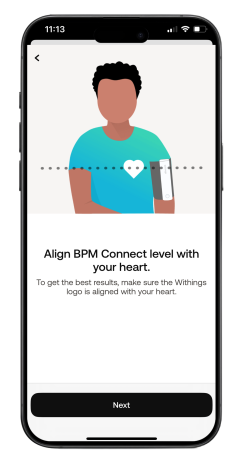
- Place the blood pressure cuff on your left arm at heart level (see Figures 18-19). Tap “Next”.
- Press the button to turn the BPM Connect on. Your reading will take place. When done tap “Next” (see Figure 20).
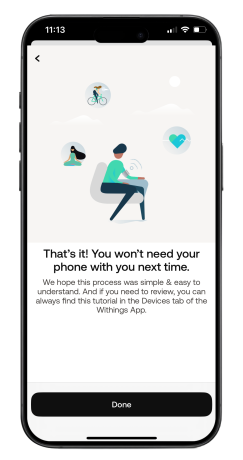
- You can review your blood pressure measurements in the Withings app. The reading may take a couple minutes to show up. The reading will automatically be sent to your care team at MSK. Tap “Done” to return to the homepage (see Figures 21 and 22).
This information will explain how to setup the OMRON Silver BP5250 blood pressure machine and connect it to the MSK Remote Monitoring app.
How to set up the OMRON Silver BP5250 blood pressure machine
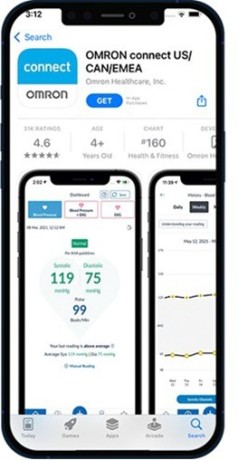
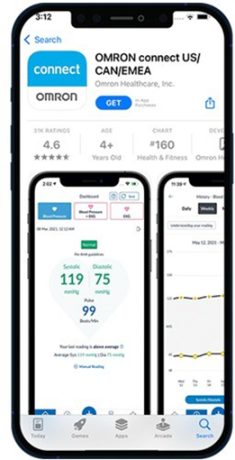
- Download the OMRON Connect app from the iOS or Google Play store (see Figure 1).
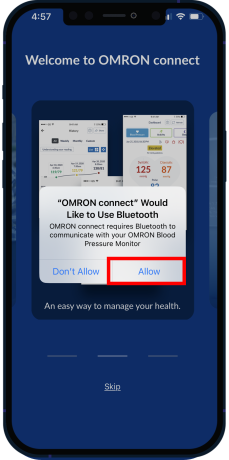
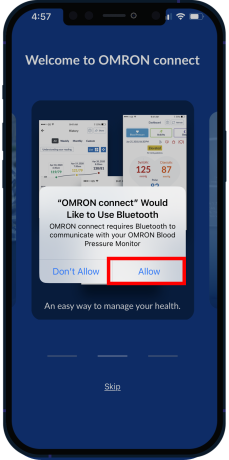
- Open the app and select “Allow” when prompted to connect to Bluetooth (see Figure 2).
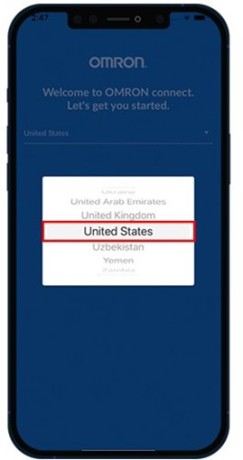
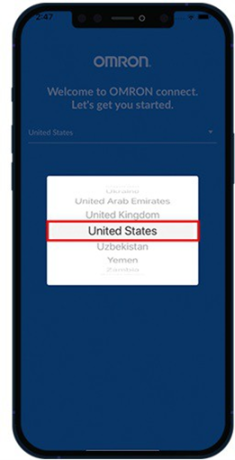
- Select “United States” (see Figure 3).
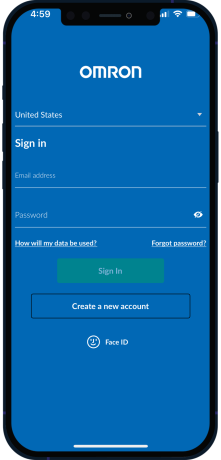
- Sign into your OMRON account or tap create new account to sign up if you do not have one (see Figure 4).

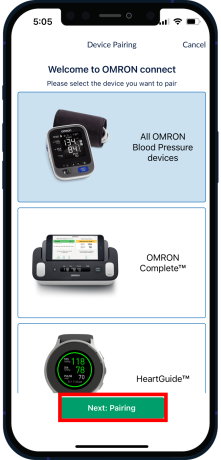
- Once you have created an Omron account. You can pair your device. Select “All OMRON Blood Pressure devices” then tap Next: Pairing (see Figure 5).
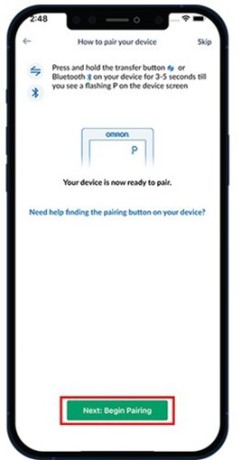
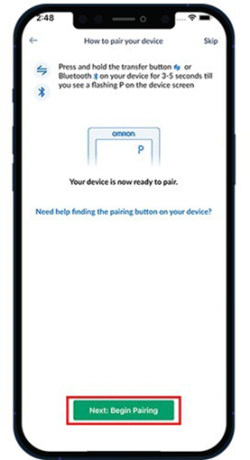
- Press and hold the Bluetooth button on your blood pressure machine for 3 to 5 seconds. The letter “P” will appear on your blood pressure machine screen. Select “Next: Begin Pairing” in the OMRON Connect app (see Figure 6).
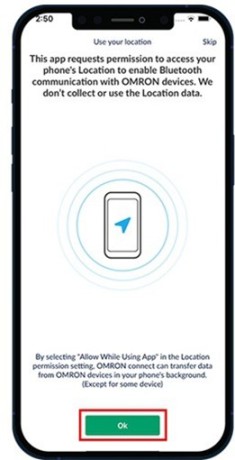
- Select “OK” (see Figure 7).
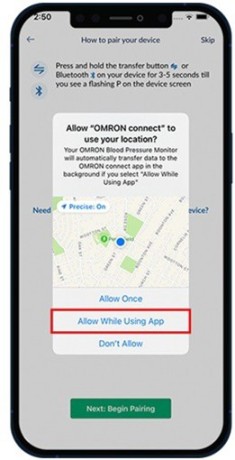
- Select “Allow While Using App” (see Figure 8).
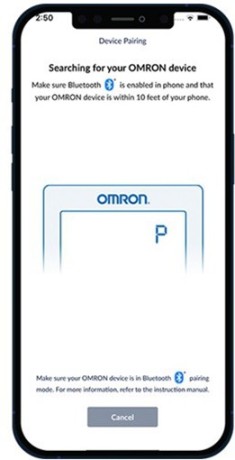
- The device will begin pairing your phone (see Figure 9).
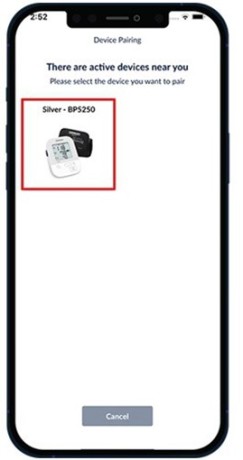
- Select “Silver – BP5250” (see Figure 10).
- Select “Pair” (see Figure 11).
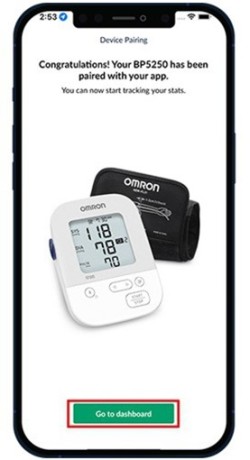
- Your OMRON Silver BP5250 has now been connected to your app. Select “Go to dashboard” to take your first reading (see Figure 12).
Connecting your OMRON account to MSK Remote Monitoring
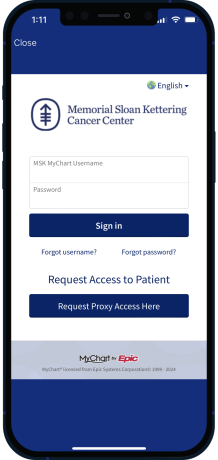
- Open the MSK Remote Monitoring mobile app and log in using your MSK MyChart credentials (Figure 13).
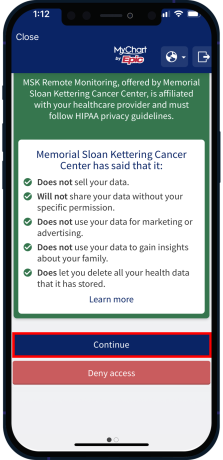
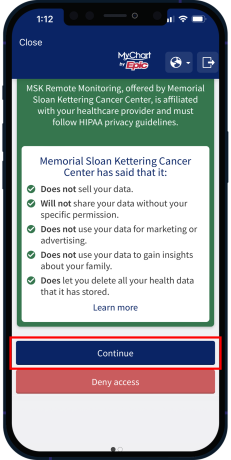
- Review the authorization screen and select “Continue” (see Figure 14).
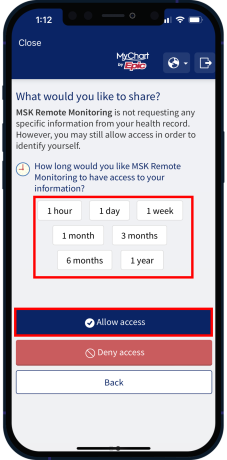
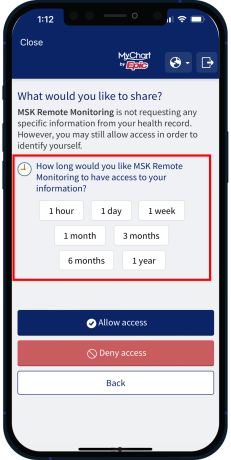
- Review the data authorization screen and select a time range, then tap “Allow access” (see Figure 15)
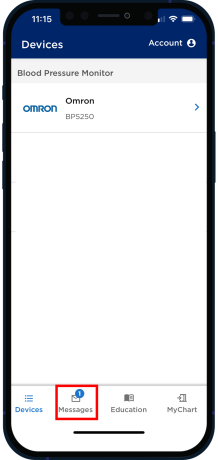
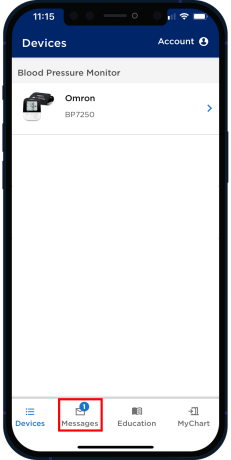
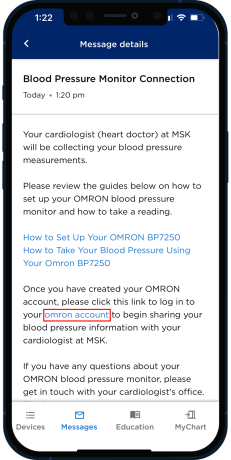
- At the bottom of the screen, select “Messages” (see Figure 16).
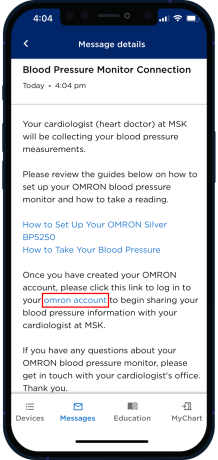
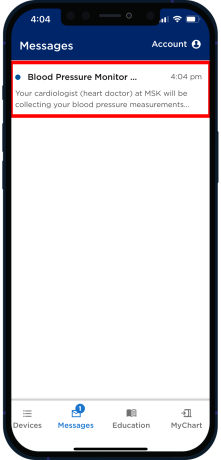
- Select the message “Blood Pressure Monitor Connection” (see Figure 17).

- Select the link for OMRON account (Figure 18).
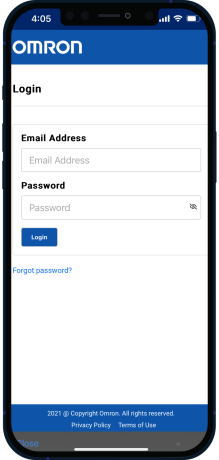
- Log in to your account (see Figure 19).

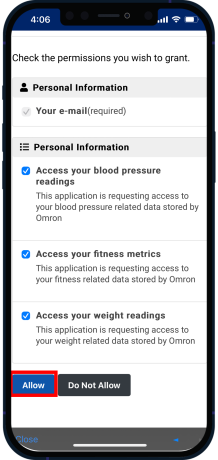
- Check the boxes and select “Allow” to connect to Validic (see Figure 20). Your OMRON account is now connected to MSK Remote Monitoring. Your blood pressure measurements will be sent to your MSK care team through Validic.

This information will explain how to set up the OMRON 5 Series BP7250 blood pressure machine and connect it to the MSK Remote Monitoring app.
How to set up the OMRON 5 Series BP7250 blood pressure machine
- Download the OMRON Connect app from the iOS or Google Play store (see Figure 1).
- Open the app and select “Allow” when prompted to connect to Bluetooth (see Figure 2).
- Select “United States” (see Figure 3).
- Sign into your OMRON account or tap create new account to sign up if you do not have one (see Figure 4).
- Once you have created an Omron account. You can pair your device. Select “All OMRON Blood Pressure devices” then tap Next: Pairing (see Figure 5).

- Press and hold the Bluetooth button on your blood pressure machine for 3 to 5 seconds. The letter “P” will appear on your blood pressure machine’s screen. Select “Next: Begin Pairing” in the OMRON Connect app (see Figure 6).
- The device will begin pairing your phone. Select “5 Series Upper Arm – BP7250” (see Figure 7).
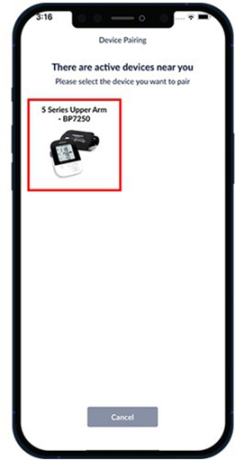
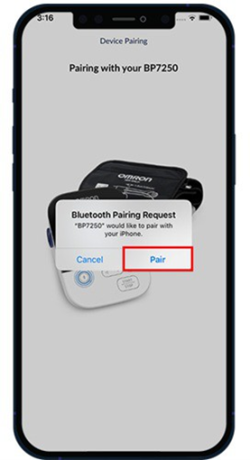
- Select “Pair” (see Figure 8).
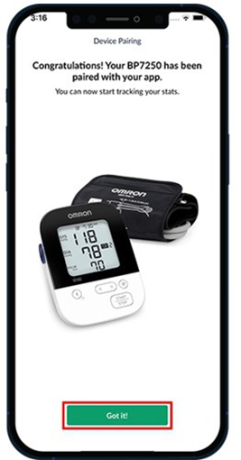
- Your OMRON Silver BP5250 has now been connected to your app. Select “Got it” to begin taking a reading (see Figure 9).
Connecting your OMRON account to MSK Remote Monitoring
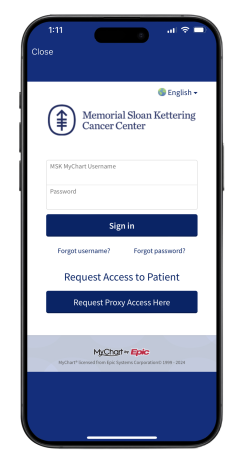
- Open the MSK Remote Monitoring mobile app and log in (Figure 10).
- Review the authorization screen and select “Continue” (see Figure 11).
- Review the data authorization screen and select a time range, then tap “Allow access” (see Figure 12).
- At the bottom of the screen, select “Messages” (see Figure 13).
- Select the message “Blood Pressure Monitor Connection” (see Figure 14).
- Select the link for OMRON account (Figure 15).
- Log in to your account (see Figure 16).
- Check the boxes and select “Allow” to connect to Validic (see Figure 17). Your OMRON account is now connected to MSK Remote Monitoring Your blood pressure measurements will be sent to your MSK care team through Validic.
This information explains how to install the iHealth Track so you can use it as part of your care at MSK.
- Download the iHealth MyVitals app from the iOS or Google Play store (see Figure 1).
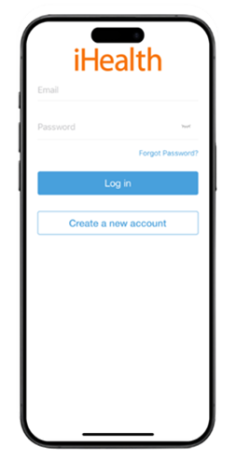
- Sign into your iHealth account or sign up if you do not have one (see Figure 2)
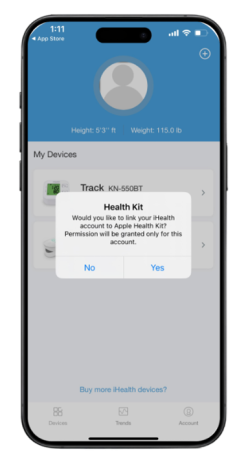
- Select your preference for sharing iHealth data with Apple Health by choosing “No” or “Yes” (see Figure 3). MSK will not be collecting data from Apple Health for this program.
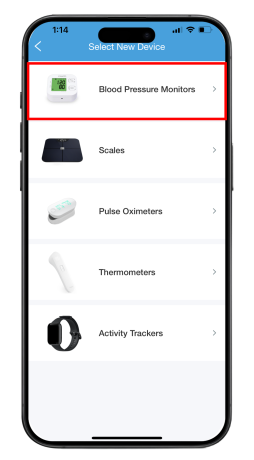
- To set up a new device, tap “Select New Device” (see Figure 4).

- Select “Blood Pressure Monitors” from list (see Figure 5).
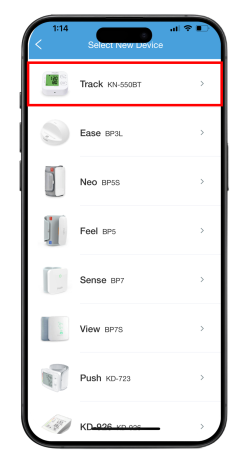
- Select “Track” device from list (see Figure 6).
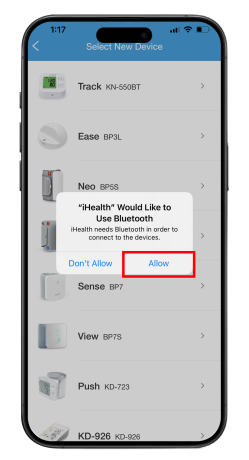
- When asked to let iHealth use Bluetooth tap “Allow” (see Figure 7).
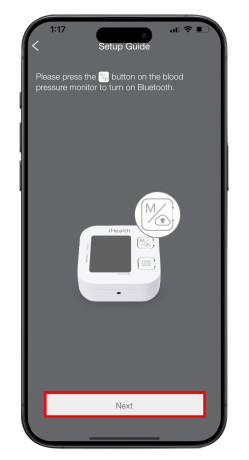
- Press the M/Cloud button on your blood pressure machine to turn on Bluetooth. Select “Next” (see Figure 8).
- Select your Track model when it appears on the screen (see Figure 9). The blood pressure machine and app will begin to pair.

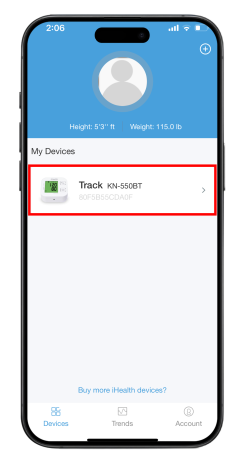
- Your device has been paired. Tap “OK” (see Figure 10). This will return you to the My Devices screen (see Figure 11).
- Open the MSK Remote Monitoring mobile app and log in (Figure 12).

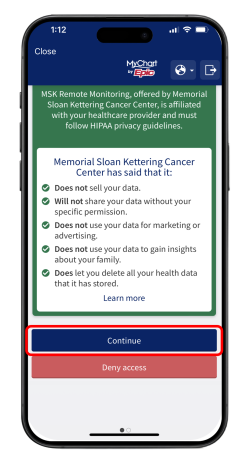
- Review the authorization screen and select “Continue”(see Figure 13).
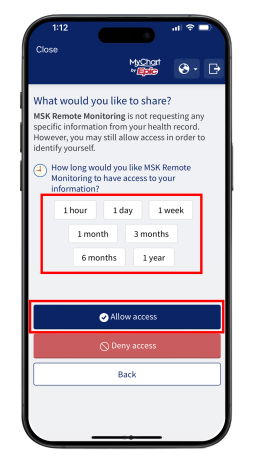
- Review the data authorization screen and select a time range, then tap “Allow access” (see Figure 14).
- At the bottom of the screen, select “Messages” (see Figure 15).
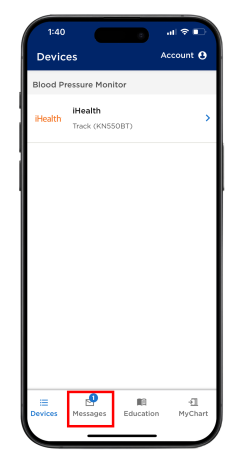
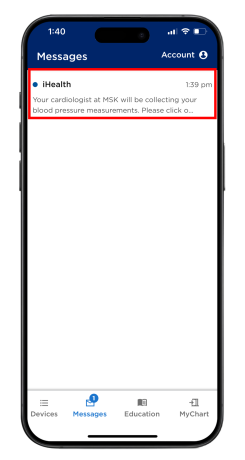
- Select the message “MSK Device Connection” (see Figure 16).
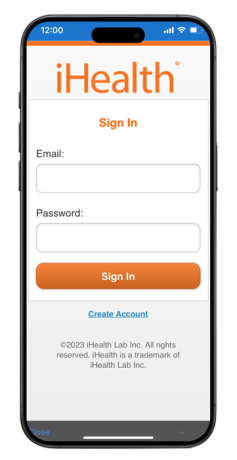
- Select the link for iHealth account (Figure 17).
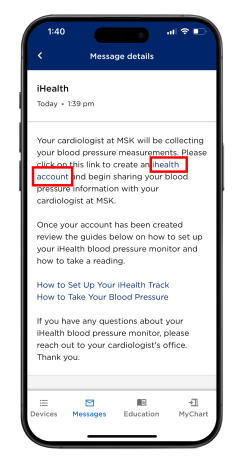
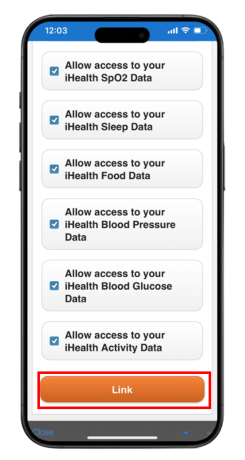
- Log in to your account (see Figure 18). Check all the boxes if not already checked and select “Link” to connect (see Figure 19). This will allow your blood pressure measurements to be sent to your MSK care team.
-
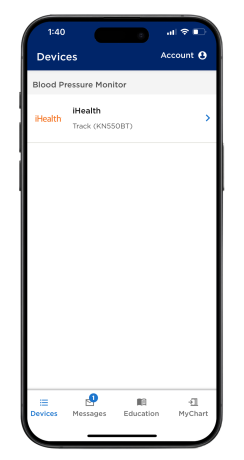
You will be brought back to the MSK Remote Monitoring app Devices screen. Your iHealth account is now connected to MSK Remote Monitoring. (see Figure 20).
Learn about our Health Information Policy.