This information explains how to care for your Jackson-Pratt drain when you leave the hospital. You may also find it helpful to watch the video below.
About your Jackson-Pratt drain

Your Jackson-Pratt drain has a soft plastic bulb with a stopper and a flexible tube attached (see Figure 1). The drainage end of the tubing (flat white part) goes into your surgical site through the insertion site. The insertion site is the small opening near your incision.
A suture (stitch) holds the drainage end in place. The rest of the tube extends outside your body and is attached to the bulb.
When the bulb is compressed (squeezed) with the stopper in place, this creates a constant gentle suction. The bulb should be compressed at all times, except when you’re emptying the drainage.
Everyone’s drainage is different. Some people drain a lot, some only a little. Write down the amount of drainage you have in the drainage log at the end of this resource. Bring your log to your follow-up appointments.
How long you’ll have your Jackson-Pratt drain depends on your surgery and the amount of drainage you have. Call your healthcare provider if your drainage is 30 milliliters (mL) or less in a 24-hour period. Your surgeon may remove your Jackson-Pratt drain or keep it in longer for certain procedures
How to care for your Jackson-Pratt drain
When you leave the hospital, care for your Jackson-Pratt drain by:
- Milking your tubing to help move clots.
- Emptying your drain 2 times a day. Do this once in the morning and once in the evening. Write down the amount of drainage on your Jackson-Pratt drainage log at the end of this resource. If you have more than 1 drain, measure and write down the drainage of each one separately. Do not add them together.
- Caring for your insertion site.
- Checking for problems.
Milk your tubing
These steps will help you move clots through your tubing and keep drainage flowing. Milk your tubing before you open the stopper to empty and measure your drainage. You should also do this if you see fluid leaking around the insertion site.
Before you start, gather your supplies. You’ll need:
- The measuring container your nurse gave you.
- An alcohol pad.
- Your Jackson-Pratt drainage log, and a pen or pencil.
-
Clean your hands.
- If you’re washing your hands with soap and water, wet your hands and put soap on them. Rub your hands together for 20 seconds, then rinse the soap off. Dry your hands with a disposable towel. Use the same towel to turn off the faucet.
- If you’re using an alcohol-based hand sanitizer, cover your hands with it. Then rub your hands together until they’re dry.
- Look in the mirror at the tubing. This will help you see where your hands need to be.
- Pinch the tubing close to where it goes into your skin using your thumb and forefinger. You may use alcohol wipes to help you slide your fingers down the tubing. Keep this hand in place while you milk your tubing. This will help make sure that you aren’t tugging on your skin, which can be painful.
- With the thumb and forefinger of your other hand, pinch the tubing right below your other fingers. Keeping your fingers pinched, slide them down the tubing. Push any clots down toward the bulb.
Repeat steps 3 and 4 as many times as you need to push clots from the tubing into the bulb. Call your healthcare provider if you cannot move a clot into the bulb and there’s little or no drainage in the bulb.
Empty your Jackson-Pratt drain
Once all the clots are in the bulb, get ready to empty it. Make sure you have a clean area to work on. You can do this in your bathroom or in an area with a dry, uncluttered surface.
If you’re wearing a surgical bra or wrap, remove the drainage bulb from it first if it is attached.
Follow these instructions to empty your Jackson-Pratt drain:
- Unplug the stopper on top of the bulb. This will make the bulb expand. Do not touch the inside of the stopper or the inner area of the opening on the bulb.
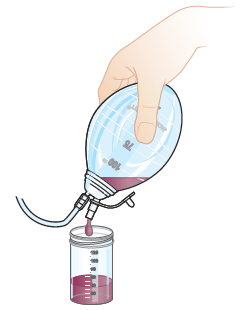
- Turn the bulb upside down and gently squeeze it. Pour the drainage into the measuring container (see Figure 2).
- Turn the bulb right side up. Squeeze the bulb until your fingers feel the palm of your hand. All the air should come out of the bulb.
- Keep squeezing the bulb while you re-plug the stopper. Check to see that the bulb stays fully compressed to ensure a constant gentle suction. The stopper must be closed for the drain to work.
- Attach the drainage bulb to your surgical bra or wrap, if you’re wearing one. Use the plastic loop or Velcro® straps at the bottom. Do not let the drain dangle. It may be helpful to hold your drain in a fanny pack or belt bag.
- Check the amount and color of drainage in the measuring container. The first couple of days after surgery, the fluid may be a dark red color. This is normal. As you continue to heal, it may look pink or pale yellow.
- Write down the amount (in mL) and color of your drainage on your Jackson-Pratt drainage log.
- Flush the drainage down the toilet and rinse the measuring container with water.
- At the end of each day, add the total amount of drainage you had for the day. Write the amount in the last column of the drainage log. If you have more than 1 drain, measure and record each one separately. Do not add them together.
How to care for your insertion site
Check for signs of infection
Once you empty your drainage, clean your hands again. Check the area around your insertion site for signs of infection, such as:
- Tenderness.
- Swelling.
- Pus.
- Warmth.
- More redness than usual. Sometimes the drain causes redness about the size of a dime at your insertion site. This is normal.
If you have any of these, or a fever of 101° F (38.3° C) or higher, call your healthcare provider. They may tell you to put a bandage over your insertion site.
Keep your insertion site clean
Keep your insertion site clean and dry by washing it with soap and water and then gently patting it dry.
Common problems with Jackson-Pratt drains
Problem
| Reason
What to do
|
Problem
| Reason
What to do
|
Problem
| Reason
What to do
|
Problem
| Reason
What to do
|
Your nurse will watch you the first time you empty your drainage to make sure you’re doing it correctly. Once you’re able to care for your Jackson-Pratt drain, you’ll do it on your own. You can always ask for help even after you start caring for it yourself. Call your healthcare provider if you have any problems caring for your Jackson-Pratt drain.
How to care for your skin after your drain is removed
Your healthcare provider will remove your drain. They will put a bandage over the insertion site. Keep your insertion site and the area around it clean and dry. This will help heal your skin and prevent infection and help.
If you had reconstructive surgery, caring for your skin after your drain is removed will be different.
Caring for your skin without reconstructive surgery
If you had surgery without reconstruction, follow these guidelines after your drain is removed:
- Take off the bandage after 24 hours.
- Keep your incision site above water until your incision is completely closed and there’s no drainage. You can take a shower after you take off the bandage, but do not soak in bathtub or swimming pool.
- Wash the site gently with soap. Rinse the area with warm water, then pat the area dry.
-
Check the site, using a mirror if necessary. It’s normal to have:
- Slight redness.
- Mild swelling.
- Tenderness.
- A small amount of clear or slightly bloody drainage on the gauze pad.
Caring for your skin with reconstructive surgery
If you had reconstructive surgery, follow these guidelines after your drain is removed.
- Change the bandage every 12 hours as needed.
-
Your surgeon will let you know how long to wait before showering after your drain is removed.
- Keep your incision site above water until 4 to 6 weeks after your reconstructive surgery. Do not take a bath or submerge the area in water, such as in a bathtub or swimming pool. Watch How To Care for Your Jackson-Pratt Drain for more information.
- Wash the site gently with soap and rinse the area with warm water. Pat the area dry.
-
Check the site, using a mirror if you need to. It’s normal to have:
- Slight redness.
- Mild swelling.
- Tenderness.
- A small amount of clear or slightly bloody drainage on the gauze pad.
When to call your healthcare provider
Call your healthcare provider right away if:
- You have bright red drainage.
- You have a fever of 101 °F (38.3 °C) or higher.
- You have increased redness, tenderness, swelling, pressure or pus at your insertion site.
- Your skin is hot to the touch around the surgical sites.
- You cannot move a clot into the bulb and there’s little or no drainage in the bulb.
Call your healthcare provider Monday to Friday between and if:
- The amount of drainage suddenly drops or has increased 100 mL over the past 24 hours.
- Your drainage is 30 milliliters (mL) or less in a 24 period.
- The tube falls out of your insertion site.
- You cannot compress the bulb.
- You have any problems caring for your Jackson-Pratt drain.
Learn about our Health Information Policy.
