This information describes your elastomeric pump (SMARTeZ® pump or Easypump®) and explains what to do during your continuous infusion with your pump. It also tells you how to disconnect your pump after your infusion.
Your pump will be connected to your central venous catheter (CVC). There are 3 main types of CVCs: tunneled chest catheters, peripherally inserted central catheters (PICCs), and implanted ports (such as Medi-Ports®). If you’re not sure which type of CVC you have, ask your healthcare provider.
About your elastomeric pump
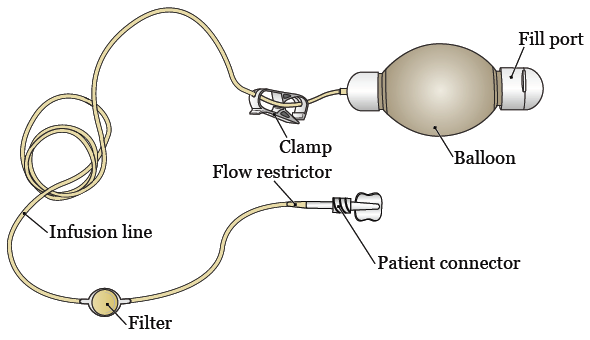
Your pump is a small, lightweight device that will put chemotherapy into your bloodstream at a steady rate. This is called a continuous infusion of chemotherapy. Your pump has many parts (see Figure 1).
- The balloon is where the chemotherapy is held. The balloon has 2 layers. An inner membrane holds the chemotherapy, and an outer cover protects the inner membrane.
- The fill port is where the chemotherapy is put into the balloon. The fill port has a cap to protect it.
- The infusion line carries chemotherapy from the balloon to your CVC tubing.
- The clamp is used to start and stop the flow of chemotherapy.
- The filter filters the chemotherapy before it’s infused into your body.
- The flow restrictor helps to control how quickly the chemotherapy is infused.
- The patient connector is where the infusion line connects to your CVC tubing. The patient connector has a cap that covers the connector when it’s not connected to your CVC tubing. It’s removed when the pump is connected to your CVC tubing.
During your continuous infusion, the chemotherapy flows from the balloon, through the infusion line, and through your CVC tubing into your bloodstream. As this happens, the balloon will deflate (get smaller) and wrinkles will form.
Starting your continuous infusion
Before your continuous infusion, your healthcare provider will give you information about the chemotherapy you’re getting and the side effects you may have. Be sure to read the information and talk with your healthcare provider about your questions.
Your healthcare provider will start your infusion by connecting your pump to your CVC. They’ll also tape the flow restrictor to your skin. It’s important that the flow restrictor is touching your skin at all times during your infusion.
Once your pump is connected, you can go home. Your continuous infusion will keep running the whole time your pump is connected. Follow the instructions in the “During Your Continuous Infusion” section while your pump is connected to your CVC.
Continuous infusion with a pump usually takes about 48 hours. After your continuous infusion is finished, your pump will need to be disconnected from your CVC. Read the section “After Your Continuous Infusion” for more information.
During your continuous infusion
Wearing your elastomeric pump
- Wear your pump in the area between your armpits and hips. Wearing it higher or lower can make the medication flow too fast or too slow.
- It’s best to keep your pump in the fanny pack your healthcare provider gives you.
- Do not keep your pump under a warm jacket or blanket. This can make the pump too warm and cause the medication to flow too fast.
- At bedtime, keep your pump next to your side and above your blankets. Do not hang it on your bedpost or put it on the floor.
- Do not sit or lie directly on your pump. This can cause it to burst.
If you have a pet, make sure to keep your pump and tubing out of its reach. You may want to keep pets out of your bedroom at night during your continuous infusion.
Activities and exercise
You can do most of your usual daily activities during your continuous infusion. You can do light exercise, such as walking. You can also engage in sexual activity. To learn more, read Sex and Your Cancer Treatment.
Avoid activities that can raise or lower your body temperature. This can make the chemotherapy flow too fast or too slowly.
- Do not put heating pads, electric blankets, or hot water bottles directly on your pump.
- Do not take hot or very cold showers or baths.
- Do not swim, go in a sauna, or use a hot tub.
- Do not expose yourself or your pump to direct sunlight or very cold weather.
- Do not do anything else that would raise or lower your body temperature, such as running, jogging, and other strenuous exercises or activities that make you sweat.
- Do not play contact sports during your continuous infusion.
Showering
| 
|
When you shower, use a handheld shower head (a movable shower head that you can hold). This will help you direct the water away from your access site or exit site and pump system. If you do not have a handheld shower head, use a wet sponge or washcloth to give yourself a sponge bath.
Before you shower or bathe, cover your implanted port access site or catheter exit site with a waterproof dressing (such as AquaGuard®). This will keep your access site or exit site from getting wet. One of your healthcare providers will give you a waterproof dressing. Watch the video Showering While You Have a Central Venous Catheter (CVC) for instructions on how to apply the waterproof dressing.
You should also put your pump and the filter in a plastic bag (such as a Zip-Loc® bag) when you shower or bathe. Try not to get the plastic bag wet.
Use a 4% chlorhexidine gluconate (CHG) solution antiseptic skin cleanser (such as Hibiclens®)
Wash with a 4% CHG solution antiseptic skin cleanser every day while there’s a needle in your implanted port access site or your tunneled chest catheter or PICC is in place
An antiseptic is something that kills bacteria and other germs. 4% CHG solution is an antiseptic that kills germs for up to 24 hours after you use it. Showering with a 4% CHG solution will help lower your risk of infection. You can buy a 4% CHG solution antiseptic skin cleanser from any local pharmacy or online.
Do not use 4% CHG solution if you’re allergic to chlorhexidine. If you have any irritation or an allergic reaction when you’re using 4% CHG solution, stop using it and tell your healthcare provider.
To use 4% CHG solution antiseptic skin cleanser:
- Wash your hair with your usual shampoo and conditioner. Rinse your head well.
- Wash your face and genital (groin) area with your usual soap. Rinse your body well with warm water.
- Open the 4% CHG solution bottle. Pour some into your hand or a clean washcloth. Do not dilute (mix) the CHG solution with water before doing this.
- Move away from the shower stream to avoid rinsing off the CHG solution too soon.
-
Rub the 4% CHG solution gently over your body from your neck to your feet. Do not put the CHG solution on:
- Your head or face (including your eyes, ears, and mouth).
- Your genital area.
- Wounds or scrapes that are deeper than the top layer of skin. If you have a wound and aren’t sure if you should use 4% CHG solution, ask your healthcare provider.
- Move back into the shower stream to rinse off the 4% CHG solution. Use warm water.
- Dry yourself off with a clean towel.
Watch the video Showering While You Have a Central Venous Catheter (CVC) for instructions on how to shower using 4% CHG solution.
Checking the flow of chemotherapy
As the chemotherapy flows out of your pump and into your bloodstream, the balloon will deflate and wrinkles will form (see Figures 2 and 3). The chemotherapy will flow very slowly. You probably will not start to see changes in the balloon until around 18 hours after your infusion is started.
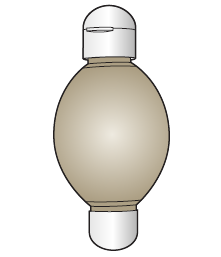
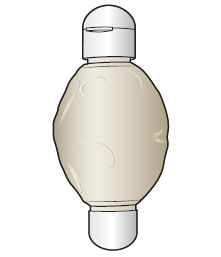
24 hours after your infusion is started, check your pump to make sure the balloon is slightly deflated and wrinkles have formed. This is a way to check that the chemotherapy is flowing correctly. Your healthcare provider will teach you how to do this.
If the balloon has not deflated and formed wrinkles:
- Check to see if your infusion line or CVC tubing is pinched in one of the clamps. If it is, open the clamp to release the tubing, then close the clamp so it’s not pinching the tubing (see Figure 4).
- Make sure there are no kinks in the infusion line. If there are, straighten the infusion line to remove the kinks.
- Call your healthcare provider to tell them.

Call your healthcare provider if:
- The balloon has not deflated and formed wrinkles in the past 24 hours.
- The balloon deflates faster than expected.
Checking your infusion line, CVC tubing, and implanted port access site or catheter exit site
- Check your pump infusion line, CVC tubing, and implanted port access site or catheter exit site every day. To do this:
- Make sure the pump flow restrictor is taped against your skin. If it comes off, keep the tubing under your clothes. Make sure it’s close to or right against your skin.
- Make sure your infusion line and CVC tubing are outside of the clamps and the clamps are closed. If any of the tubing is pinched in a clamp: Open the clamp, move the tubing out of the way, then close the clamp so it’s not pinching the tubing. Then, call your healthcare provider.
- Check for fluid on your skin around your implanted port access site or catheter exit site. If you see fluid, this could be a sign that the chemotherapy is leaking. Follow the instructions in the resource How to Safely Handle Chemotherapy and Biotherapy at Home that your healthcare provider gives you.
- Look for signs of infection, such as redness, pain, swelling, or drainage around your implanted port access site or catheter exit site. If you see any of these signs, call your healthcare provider.
- If you have an implanted port, make sure the needle is in place in the access site. To do this, press down on the needle gently with your index finger. You should feel it touch the back of your implanted port. If the needle seems like it’s out of place, call your healthcare provider.
- If your healthcare provider gave you other instructions, follow those.
Cleaning up leaks or spills
Your healthcare provider will give you the resource How to Safely Handle Chemotherapy and Biotherapy at Home. If your pump is leaking or your chemotherapy spills out of your pump, follow the instructions in that resource. Then call your healthcare provider.
After Your Continuous Infusion
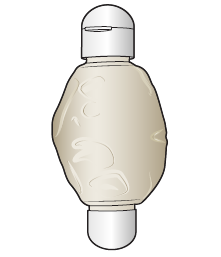
Your infusion is finished when the balloon is completely deflated (see Figure 5). Continuous infusion with a pump usually takes about 48 hours. Your infusion should finish close to the date and time written below.
It’s possible that your infusion will finish as early as 42 hours (6 hours before the time written) or as late as 50 hours (2 hours after the time written). This is normal.
- If your infusion finishes less than 42 hours after it was started, call your healthcare provider.
- If your infusion finishes 48 hours after it was started, it’s OK to disconnect your pump.
- If your infusion is not finished 48 hours after it was started, wait 2 hours, then check the balloon again. If it’s now completely deflated, it’s OK to disconnect your pump.
- If your infusion is not finished after 50 hours, call your healthcare provider.
Disconnecting your elastomeric pump
Once your infusion is finished, your pump needs to be disconnected from your CVC. You may disconnect your pump yourself, or you may have an appointment at MSK so your healthcare provider can disconnect it.
- If you have an appointment so your healthcare provider can disconnect your pump, try to arrive as close to your scheduled appointment time as possible. This is to make sure you get the full dose of chemotherapy.
- If you’re disconnecting your pump yourself and have an implanted port, follow the instructions in the next section.
- If you’re disconnecting your pump yourself and have a tunneled chest catheter or PICC: Your healthcare provider will give you instructions for disconnecting it.
Instructions for disconnecting your pump from your implanted port
Follow the instructions in this section to disconnect your pump from your implanted port and remove the needle from your port.
Get your supplies ready
- Prepare a clean area to set up your supplies, such as your kitchen table. Do not disconnect your pump in the bathroom.
-
Gather your supplies. You’ll need:
- 1 (10 mL) syringe prefilled with normal saline.
- 1 pair of non-sterile gloves.
- Alcohol pads.
- 1 gauze pad.
- A bandage (such as a Band-Aid®).
-
A hard plastic container with a lid (such as a Tupperware® container). Label it “Chemotherapy.”
- Make sure the container is strong enough that needles cannot poke through the sides.
- Do not use plastic or paper bags.
- Clean your hands well with soap and water or an alcohol-based hand sanitizer.
- Put on the non-sterile gloves.
- Open the gauze pad and take it out of its wrapper. Set it down on your clean workspace.
-
Get your normal saline syringe ready. To do this:
- Pick up the normal saline syringe. Hold it with the tip facing up.
- Loosen the cap, but do not take it off.
- Pull the plunger back slightly. Then, gently press it upward to push any air out of the syringe.
- Retighten the cap.
- Set the syringe down on your clean workspace.
Flush your implanted port
- Starting at your pump, follow the infusion line until you reach the flow restrictor that’s taped to your skin. Gently remove the tape and flow restrictor from your skin.
-
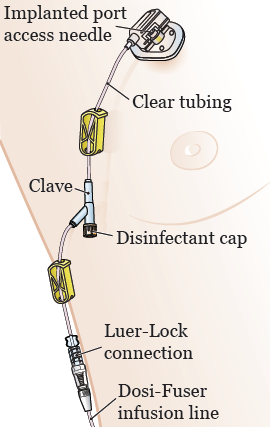
You’ll see 2 clamps on your CVC tubing (see Figure 6). Close the clamp closest to your pump. This is the clamp below the clave (needleless connector) with the green disinfectant cap.
- Make sure the clamp is closed so it’s pinching the clear tubing.
- Do not close the second clamp yet (the one above the clave, closest to your body).
- Take the green cap off the clave by unscrewing it counterclockwise (to the left). If the green cap fell off or is missing, clean the end of the clave with an alcohol pad for 15 seconds. Let it dry for 15 seconds.
- Take the cap off the normal saline syringe. Attach the saline syringe to the clave by pushing it into the clave and screwing it in clockwise (to the right).
- Once the saline syringe is attached to the clave, use the pulsatile method to flush the tubing with the saline. Inject 1 ml of the saline at a time. To do this:
- Push down on the plunger to quickly inject about 1 ml of the saline into the clave.
- Pause.
- Repeat 9 more times.
Leave the empty syringe attached to the clave.
- Close the second clamp (the one above the clave, closest to your body) so it’s pinching the CVC tubing.
Take the needle out of your implanted port
- Remove the dressing over your implanted port. Peel the tape off your skin.
-
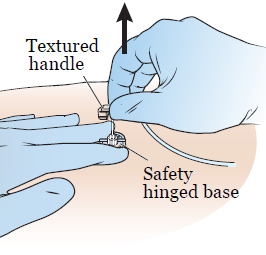
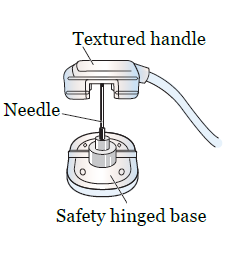
Take the needle out of your implanted port. To do this:
- Hold the safety hinged base against your skin with 2 fingers of your non-dominant hand (the hand you do not write with).
- Gently push the base down, against your port.
- Use your other hand to firmly pull the textured handle up until you feel a firm stop and the needle locks into the safety position (see Figures 7 and 8).
- You may have a patch around the needle that has medicine to prevent infection. If you do, gently pull the tabs of the patch and remove it from your skin.
- Hold a gauze pad over the area where the needle was and press down gently for 3 minutes. After 3 minutes, place a bandage over the area.
Your pump is now disconnected.
Clean up
- Put the needle with the pump still attached into the hard plastic container.
- Put all dirty supplies in the container with the needle and pump. This includes the empty syringe, dirty gloves, and used gauze and alcohol pads. Close the lid tightly.
- Bring the container to your healthcare provider at your next visit. Do not throw it in the trash.
When to call your healthcare provider
Call your healthcare provider if:
- You have any of the side effects listed on the information they gave you.
- The balloon deflates and forms wrinkles faster than it should.
- Your pump empties earlier than you were told it should.
- The balloon does not deflate or form wrinkles.
- Your pump does not seem to empty like it should.
- You see fluid on your skin around your implanted port access site or catheter exit site.
- You have redness, pain, swelling, or drainage near your implanted port access site or catheter exit site.
- There’s leakage from the pump.
Learn about our Health Information Policy.