These instructions explain how to use good posture and body mechanics during your daily tasks and activities.
- Posture is the way you position your body when you’re sitting, standing, and moving.
- Body mechanics is a general term that describes how you use your body to do activities.
Why are good posture and body mechanics important?
It’s very important for people who have an ostomy to use good posture and body mechanics. It’s a way to put less pressure and strain on your abdomen (belly). This helps protect your ostomy and surgical incisions (cuts). It also lowers your risk of a parastomal hernia.
A parastomal (pa-ra-STOH-mal) hernia is when part of your intestine pokes through a weak area in your abdominal (belly) muscles. It forms a bulge under your skin near your stoma. Your stoma is the place on your abdomen where gas and poop will leave your body. Strain and pressure inside your abdomen can raise your risk for getting a parastomal hernia.
What to do before following these instructions
Talk with your healthcare provider before you start following these instructions. You may need to avoid some of these positions and movements. Or, you may need to do them in another way. This depends on your cancer treatment plan and the exact surgery you had.
Your care team will talk with you about movements to avoid while your incisions are healing. Follow their instructions. Contact them if you have any questions.
In general:
- Do not lift or carry anything heavier than 10 pounds (4.5 kilograms) for 6 weeks after surgery. For example, a 6-week-old baby, a full laundry basket, or a large trash bag often weighs more than 10 pounds. After 6 weeks, you can slowly start lifting and carrying heavier objects. Talk with your care team if you have any questions.
- Avoid pushing or pulling moderate to heavy objects as much as you can for 6 weeks after surgery. A full grocery cart or large garbage pail with trash in it are examples of moderate to heavy items. After 6 weeks, you can slowly start pushing and pulling heavier objects. Talk with your care team if you have any questions.
- If you have a perineal incision, do not sit until your care team tells you it’s safe. Only sit for short lengths of time or for as long as it’s comfortable.
- If you had plastic surgery and colorectal surgery, your abdominal and perineal incisions need more time to heal. Your surgical team told you to limit sitting, lifting, and carrying. Talk with your surgeon and Wound, Ostomy, Continence (WOC) nurse before you start to sit, or lift or carry more weight.
General guidelines
- Your WOC nurse will talk with you about wearing an abdominal support garment (abdominal binder) while your stoma heals. In general, you should wear the binder when you’re doing all your daily activities. Follow your WOC nurse’s instructions for putting it on and wearing it.
- We encourage you to walk as you recover after your surgery. Walk at a comfortable pace. Be sure to wear non-skid footwear. Read How To Choose Safe Shoes to Prevent Falling to learn more.
- If you’re following these instructions and feel pain or discomfort that does not go away, stop. Contact your surgical team for guidance.
- Try to keep using good posture and body mechanics even after you start lifting, pushing, and pulling heavier objects. Good posture and body mechanics will help make it easier to move around. They will also help you avoid injuries.
How to stand up and sit down
If the chair or seat has arm rests, use them for extra stability.
Remember to breathe as you do these movements. Do not hold your breath.
Standing up
-
Shift your butt forward so you’re sitting towards the front edge of the chair or surface (see Figure 1).
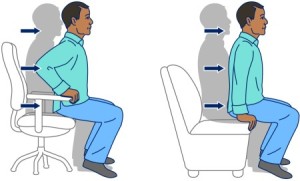
Figure 1. Shift your butt forward -
Move your feet so they’re flat on the ground, under your knees (see Figure 2). Your lower legs should be straight up and down, not at an angle.
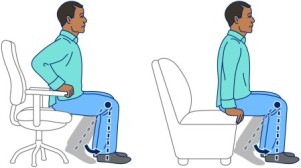
Figure 2. Move your feet so they’re flat and under your knees -
Lean forward to shift your weight over your knees (see Figure 3).
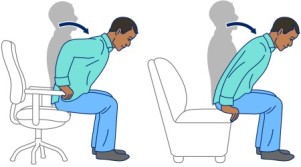
Figure 3. Lean forward to shift your weight over your knees -
Push down through your heels and straighten your knees until you’re standing. At the same time, use your hands to push down on the arm rests or surface for more support (see Figure 4).
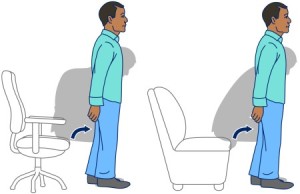
Figure 4. Push through your heels and straighten your knees
Sitting down
-
Stand in front of the chair or surface. Make sure the chair or surface is touching the back of your legs (see Figure 5).
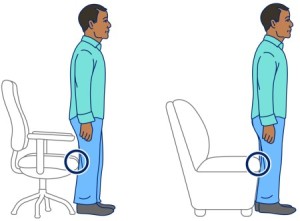
Figure 5. Stand with the chair or surface touching the back of your legs -
Slowly bend your knees and hips while leaning forward slightly. Reach behind you to place your hands on the armrests or sitting surface (see Figure 6).
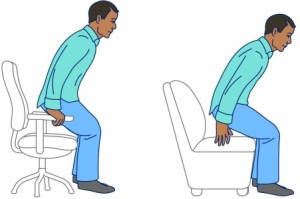
Figure 6. Bend at your knees and hips, lean forward slightly, and reach back to place your hands on the armrests or surface -
Control your movement as you lower your butt to the chair or surface (see Figure 7).
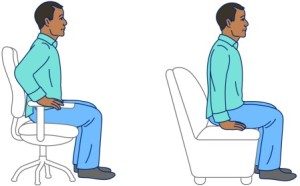
Figure 7. Carefully lower your butt to the chair or surface
How to get in and out of bed
Remember to breathe as you do these movements. Do not hold your breath.
Getting into bed
Follow the steps in the section “How to stand up and sit down” to safely sit on the edge of the bed.
Once you’re sitting:
-
Place your hands on the bed next to you, toward the side of your body where your head will be (see Figure 8).
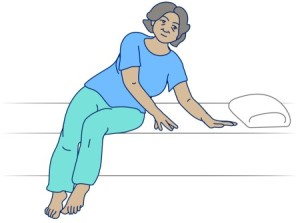
Figure 8. Place your hands on the bed near where your head will be -
Lower yourself to your side, using your hands and elbow to brace yourself and control your speed (see Figure 9). As you do, bring your legs up onto the bed (see Figure 10).
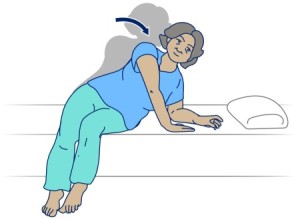
Figure 9. Lower yourself to your side using your hands and elbow to brace yourself 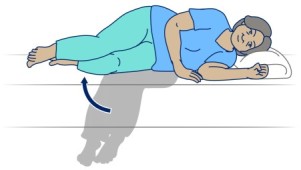
Figure 10. Bring your legs up to the bed - If you want to lie on your back, push your hands into the bed to roll yourself. Avoid twisting your spine.
Getting out of bed
If you’re lying on your back, roll onto your side. To do this:
-
Bend both your knees, placing your feet flat on the bed (see Figure 11).
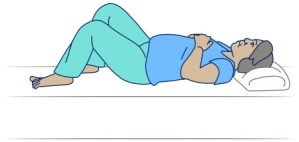
Figure 11. Bend your knees and place your feet flat on the bed - Gently push your feet into the bed and roll to your side. Avoid twisting your spine.
Once you’re on your side:
-
Bend the arm you’re lying on. Bring your other arm over your body (see Figure 12).
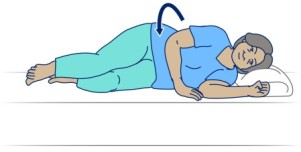
Figure 12. Bend the arm you’re lying on and bring your other arm over your body -
Push your elbow and hand into the bed to raise your upper body. As you do, slide your legs off the bed until you sit up (see Figure 13).
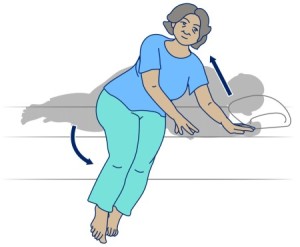
Figure 13. Raise your upper body and slide your legs off the bed - Follow the steps in the section “How to stand up and sit down” to safely stand up from bed.
How to have good standing and sitting posture
Repeat these steps to reset your posture throughout the day and while you’re doing your daily tasks. This will help you remember to have good posture. It will also help train your muscles to have good posture.
Standing posture
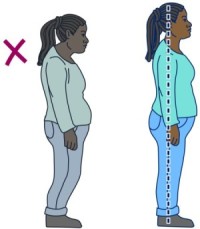
- Stand with your feet hip-width apart.
- As well as you can, stand up straight with your ears, shoulders, and hips in a straight line (see Figure 14).
- Straighten your spine to stand as tall as you comfortably can. Avoid arching your back too much.
- Tighten your abdominal (ab) muscles by pulling your belly button towards your spine.
Tips for good standing posture
- Use a mirror to check your standing posture the first few times. Over time, you will remember what good posture feels like.
-
You can also use a wall to check your standing posture. Stand with your back against the wall. With good posture, your heels, butt, shoulders, and head should touch the wall.
- Do not force any movements or positions that are not comfortable. It’s OK if you can’t make full contact with the wall. Keep practicing so your posture gets better over time.
Sitting posture
- Choose a chair or surface that’s comfortable and supports your back.
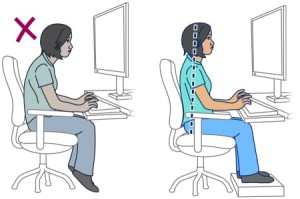
- Sit with your knees even with or slightly below your hips and your feet flat on the ground. If your feet don’t reach the ground, use a footrest to support them (see Figure 15).
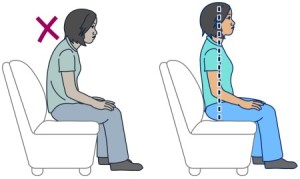
- As well as you can, sit up straight with your ears, shoulders, and hips in a straight line (see Figures 15 and 16).
- Straighten your spine to sit as tall as you comfortably can. Avoid arching your back too much.
Tips for good sitting posture
- Place a pillow or rolled up towel behind your lower back if it’s more comfortable.
How to bend over and lift an object
It may be helpful to use a nearby surface for support. If there isn’t a nearby surface, place a chair next to the object. You can lift the object and place it on the surface or chair as an in-between step.
Remember not to lift or carry anything heavier than 10 pounds (4.5 kilograms) for 6 weeks after surgery.
There’s more than one way to safely bend over and lift objects. Use the way that’s easier or more comfortable. If your care team tells you to follow certain steps, follow their instructions.
Squat lift
- Stand in front of the object with your feet hip-width apart, or wider if it’s more comfortable.
- Keeping your chest upright and back straight, pull your belly button to your spine to engage your abdominal muscles (abs). Do not hold your breath. Remember to breathe.
-
Bend your knees to lower your body to the object. Keep your chest upright and back straight (see Figure 17).
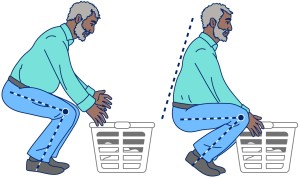
Figure 17. Bend your knees, keeping your chest upright and back straight -
If you’re picking up the object, grab it with both hands. Bring it as close to your chest and body as you can (see Figure 18). Use your arms for extra support as needed.
- If the object is small, you can hold it close to your chest in one hand. With your other hand, use a nearby surface or chair for balance and support.
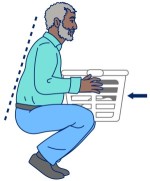
Figure 18. Bring the object close to your body -
To stand, push through both of your heels and legs until you’re standing. Remember to keep your back straight and avoid twisting your spine (see Figure 19). If you’re picking up the object, keep it close to your body.
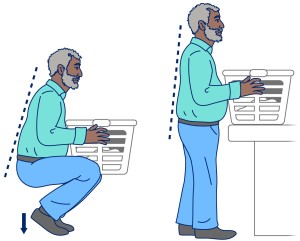
Figure 19. Push through your heels until you’re standing
½ kneel into stand
-
Stand in front of the object. Move one of your feet to the side of the object. Move your other foot to the side and behind you, if it’s comfortable (see Figure 20). Your feet should be about shoulder-width apart.
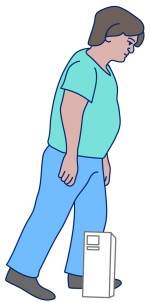
Figure 20. Move one foot beside the object and your other foot to the side and behind you - Keeping your chest upright and back straight, pull your belly button to your spine to engage your abs. Do not hold your breath. Remember to breathe.
-
Bend your knees to lower your body until your back knee gently touches the floor (see Figure 21). Keep your chest upright and back straight.
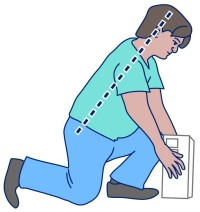
Figure 21. Lower your body until your back knee touches the floor -
If you’re picking up the object, grab it with both hands. Bring it as close to your chest and body as you can (see Figure 22). Use your arms for extra support as needed.
- If the object is small, you can hold it close to your chest in one hand. With your other hand, use a nearby surface or chair for balance and support.
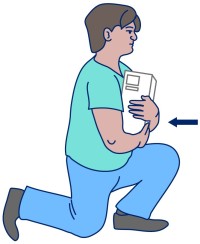
Figure 22. Bring the object close to your body -
To stand, push through your front foot and heel and the toes on your back foot until you’re standing. Remember to keep your back straight and avoid twisting your spine (see Figure 23). If you’re picking up the object, keep it close to your body.
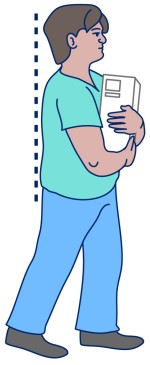
Figure 23. Push through your heel and toes to stand
How to carry objects
Remember not to lift or carry anything heavier than 10 pounds (4.5 kilograms) for 6 weeks after surgery.
- Keeping your chest upright and back straight, pull your belly button to your spine to engage your abs. Do not hold your breath. Remember to breathe.
-
If you’re carrying a single object, use both hands. Keep the object as close to your body as you can (see Figure 24). Avoid twisting your back and spine.
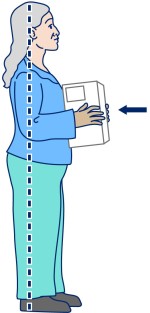
Figure 24. Keep the object close to your body -
If you’re carrying more than one object, balance the weight evenly between both shoulders, arms, and hands (see Figure 25).
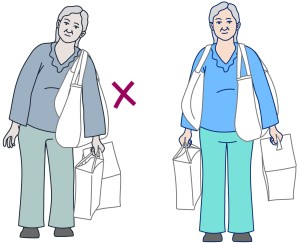
Figure 25. Balance the weight between both sides of your body - When you can, make more than one trip so there’s less strain on your body.
How to push an object
Before you start, make sure there’s a clear path in front of the object. Take breaks as needed and avoid injury.
To push an object:
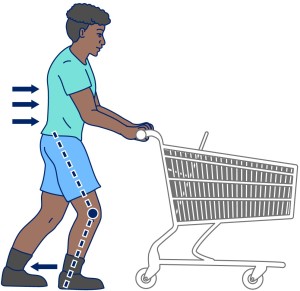
- Stand in front of the object with your feet hip-width apart. Step one of your feet forward so it’s a little bit in front of you.
- Keep your weight centered over your hips. Bend your front knee and place your hands securely on the object (see Figure 26).
- Keeping your chest upright and back straight, pull your belly button to your spine to engage your abs. Do not hold your breath. Remember to breathe.
- Lean your body weight into your hands on the object. At the same time, push with your back foot. Remember to keep breathing.
- When the object moves, step your back foot forward. Repeat the steps above.
How to pull an object
Before you start, make sure there’s a clear path behind you. Take breaks as needed and avoid injury.
To pull an object:
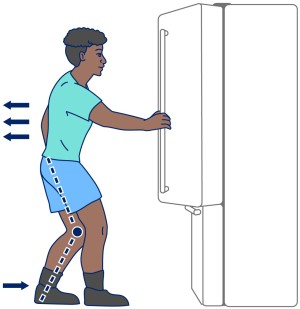
- Stand in front of the object with your feet hip-width apart. Step one of your feet backward so it’s a little bit behind you.
- Keeping your weight centered over your hips, bend your back knee and place your hands securely on the object (see Figure 27).
- Keeping your chest upright and back straight, pull your belly button to your spine to engage your abs. Do not hold your breath. Remember to breathe.
- Lean your body weight backwards, pulling the object with your hands. Remember to keep breathing.
- When the object moves, step your front foot backward. Repeat the steps above.
Learn about our Health Information Policy.