This information will help you get ready for your percutaneous urinary (per-kyoo-TAY-nee-us YOOR-ih-NAYR-ee) drainage catheter placement procedure at MSK. Percutaneous means through the skin. It also explains how to care for your catheter at home.
What is a percutaneous urinary drainage catheter?
A percutaneous urinary drainage catheter is a thin, flexible tube used to relieve a blockage in your urinary system. Percutaneous means the catheter will go through your skin. The catheter will go into your kidneys to let urine drain into a bag outside your body. In some cases, urine may also drain into your bladder.
An interventional (IN-ter-VEN-shun-al) radiologist will insert your catheter. An interventional radiologist is a doctor with special training in using image-guided procedures to diagnose and treat disease. They will explain the procedure and give you time to ask any questions before you sign a consent form. The procedure usually takes less than 1 hour.
About your urinary system
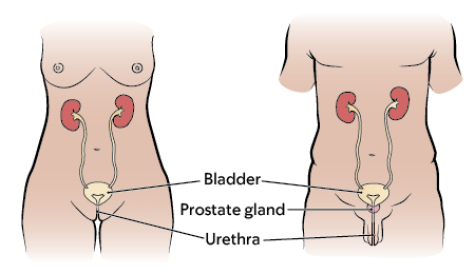
Your urinary system is made up of your kidneys, ureters, bladder, and urethra. Your kidneys produce urine that collects in the renal pelvis at the top of your ureters (see Figure 1). Your ureters carry urine from your kidneys to your bladder.
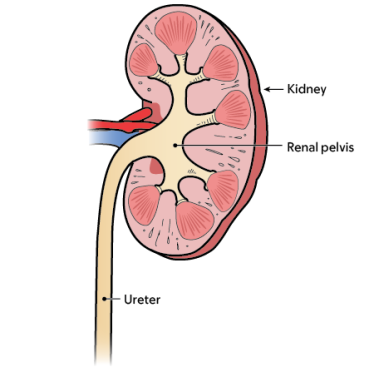
The urine collects in your bladder until you need to urinate (pee). The urine then passes out of your body through the urethra. In women, the urethra is a very short structure located in front of the vagina (see Figure 2). In men, the urethra is much longer and passes through the prostate gland and the penis (see Figure 3).
Types of percutaneous urinary drainage catheters
You can drain your urinary system with a catheter in 2 ways. Your doctor will go over this with you before your procedure.
Nephrostomy catheter
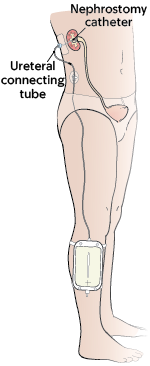
Your doctor will place a nephrostomy (neh-FROS-toh-mee) catheter if:
- They cannot bypass (go around) the blockage
- Your ureter has been injured.
A nephrostomy catheter passes through your skin and into your renal pelvis inside your body. One end of the catheter forms a loop in this area. The ureteral connecting tube (other end of the catheter) will extend outside your body. This tube will attach to an external leg bag strapped to your leg (see Figure 4).
Your care team will usually schedule you to come into the hospital for the procedure. If they do, follow the guidelines in this resource. If you are sick, your doctor may need to place a nephrostomy catheter right away.
Nephroureterostomy catheter
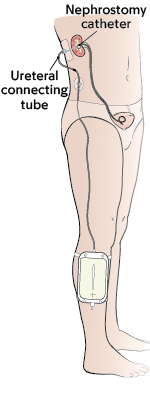
Your doctor will place a nephroureterostomy (neh-FRO-YER-eh-ter-OS-toh-mee) catheter if they can bypass the blockage in your urinary system.
A nephroureterostomy catheter passes through your skin and into the renal pelvis. One end of the catheter will go past the blocked area and into your bladder inside your body. The ureteral connecting tube (other end of the catheter) will extend outside your body. This tube will attach to an external leg bag strapped to your leg (see Figure 5).
How to get ready for your percutaneous urinary drainage catheter placement procedure
Ask about your medicines
You may need to stop taking some of your usual medicines before your procedure. Talk with your healthcare provider about which medicines are safe for you to stop taking.
We’ve included some common examples below, but there are others. Make sure your care team knows all the prescription and over-the-counter medicines you take. A prescription medicine is one you can only get with a prescription from a healthcare provider. An over-the-counter medicine is one you can buy without a prescription.
It is very important to take your medicines the right way in the days leading up to your procedure. If you don’t, we may need to reschedule your procedure.
Anticoagulants (blood thinners)
A blood thinner is a medicine that changes the way your blood clots. Blood thinners are often prescribed to help prevent a heart attack, stroke, or other problems caused by blood clots.
If you take a blood thinner, ask the healthcare provider doing your procedure what to do before your procedure. They may tell you to stop taking the medicine a certain number of days before your procedure. This will depend on the type of procedure you’re having and the reason you’re taking a blood thinner.
We’ve listed some examples of common blood thinners below. There are others, so be sure your care team knows all the medicines you take. Do not stop taking your blood thinner without talking with a member of your care team.
|
|
Other medicines and supplements can change how your blood clots. Examples include vitamin E, fish oil, and nonsteroidal anti-inflammatory drugs (NSAIDs). Ibuprofen (Advil®, Motrin®) and naproxen (Aleve®) are examples of NSAIDs, but there are many others.
Read How To Check if a Medicine or Supplement Has Aspirin, Other NSAIDs, Vitamin E, or Fish Oil. It will help you know which medicines and supplements you may need to avoid before your procedure.
Diabetes medicines
If you take insulin or other diabetes medicines, talk with the healthcare provider doing your procedure and the healthcare provider who prescribes it. Ask them what to do before your procedure. You may need to stop taking it or take a different dose (amount) than usual. You may also need to follow different eating and drinking instructions before your procedure. Follow your healthcare provider’s instructions.
Your care team will check your blood sugar levels during your procedure.
Weight loss medicines
If you take medicine for weight loss (such as a GLP-1 medicine), talk with the healthcare provider doing your procedure. Ask them what to do before your procedure. You may need to stop taking it, follow different eating and drinking instructions before your procedure, or both. Follow your healthcare provider’s instructions.
We’ve listed some examples of medicines that cause weight loss below. There are others, so be sure your care team knows all the medicines you take. Some of these are meant to be used to help manage diabetes but are sometimes prescribed just for weight loss.
|
|
Diuretics (water pills)
A diuretic is a medicine that helps control fluid buildup in your body. Diuretics are often prescribed to help treat hypertension (high blood pressure) or edema (swelling). They can also be prescribed to help treat certain heart or kidney problems.
If you take a diuretic, ask the healthcare provider doing your procedure what to do before your procedure. You may need to stop taking it the day of your procedure.
We’ve listed some examples of common diuretics below. There are others, so be sure your care team knows all the medicines you take.
|
|
You’ll be having a computer tomography (CT) scan with IV (intravenous) contrast. If you’ve had an allergic reaction to IV contrast in the past, tell your healthcare provider.
Take devices off your skin
You may wear certain devices on your skin. Before your scan or procedure, some device makers recommend you take off your:
- Continuous glucose monitor (CGM)
- Insulin pump
Talk with your healthcare provider about scheduling your appointment closer to the date you need to change your device. Make sure you have an extra device with you to put on after your scan or procedure.
You may not be sure how to manage your glucose while your device is off. If so, before your appointment, talk with the healthcare provider who manages your diabetes care.
Arrange for someone to take you home
You must have a responsible care partner take you home after your procedure. A responsible care partner is someone who can help you get home safely. They should be able to contact your care team if they have any concerns. Make sure to plan this before the day of your procedure.
If you don’t have a responsible care partner to take you home, call one of the agencies below. They’ll send someone to go home with you. There’s a charge for this service, and you’ll need to provide transportation. It’s OK to use a taxi or car service, but you still need a responsible care partner with you.
| Agencies in New York | Agencies in New Jersey |
| VNS Health: 888-735-8913 | Caring People: 877-227-4649 |
| Caring People: 877-227-4649 |
Tell us if you’re sick
If you get sick (including having a fever, cold, sore throat, or flu) before your procedure, call your IR doctor. You can reach them Monday through Friday from to
After , during the weekend, and on holidays, call 212-639-2000. Ask for the Interventional Radiology fellow on call.
Note the time of your appointment
A staff member will call you 2 business days before your procedure. If your procedure is scheduled for a Monday, they’ll call you on the Thursday before. They’ll tell you what time to get to the hospital for your procedure. They will also remind you where to go.
If you don’t get a call by noon (12 p.m.) on the business day before your procedure, call 646-677-7001. If you need to cancel your procedure for any reason, call the healthcare provider who scheduled it for you.
What to do the day before your percutaneous urinary drainage catheter placement procedure
Instructions for eating
Stop eating at midnight (12 a.m.) the night before your surgery. This includes hard candy and gum.
Your healthcare provider may have given you different instructions for when to stop eating. If so, follow their instructions. Some people need to fast (not eat) for longer before their surgery.
What to do the day of your percutaneous urinary drainage catheter placement procedure
Instructions for drinking
Between midnight (12 a.m.) and 2 hours before your arrival time, only drink the liquids on the list below. Do not eat or drink anything else. Stop drinking 2 hours before your arrival time.
- Water.
- Clear apple juice, clear grape juice, or clear cranberry juice.
- Gatorade or Powerade.
-
Black coffee or plain tea. It’s OK to add sugar. Do not add anything else.
- Do not add any amount of any type of milk or creamer. This includes plant-based milks and creamers.
- Do not add honey.
- Do not add flavored syrup.
If you have diabetes, pay attention to the amount of sugar in your drinks. It will be easier to control your blood sugar levels if you include sugar-free, low-sugar, or no added sugar versions of these drinks.
It’s helpful to stay hydrated before surgery, so drink if you are thirsty. Do not drink more than you need. You will get intravenous (IV) fluids during your surgery.
Stop drinking 2 hours before your arrival time. This includes water.
Your healthcare provider may have given you different instructions for when to stop drinking. If so, follow their instructions.
Things to remember
- Take only the medications your doctor told you to take the morning of your procedure. Take them with a few sips of water.
- Do not apply cream or petroleum jelly (Vaseline®). You can use deodorant and light moisturizers. Do not wear eye makeup.
- Remove any jewelry, including body piercings.
- Leave all valuables, such as credit cards and jewelry, at home.
- If you wear contact lenses, wear your glasses instead, if possible. If you don’t have glasses, please bring a case for your contacts.
What to bring with you
- Medications for breathing problems, such as inhalers, medications for chest pain, or both.
- A case for your glasses or contacts.
- Your Health Care Proxy form, if you have completed one.
What to expect when you arrive
Many staff members will ask you to say and spell your name and birth date. This is for your safety. People with the same or similar names may be having a procedure on the same day.
Your nurse will put in an intravenous (IV) line in your hand or arm. A member of your care team will bring you into the procedure room. They will review your medical history with you to prepare you for sedation (seh-DAY-shun). Sedation is when you’re calm, relaxed, or sleepy from medicine you will get before your procedure.
They will also:
- Ask you if you’ve had any problems with sedation in the past. This includes nausea (feeling like you’re going to throw up), pain, or an allergic reaction.
- Talk with you about your comfort and safety during your procedure.
- Talk with you about the kind of sedation you’ll get.
- Answer questions you have about sedation.
Inside the procedure room
A member of your care team will give you an injection (shot) of local anesthesia. This is medicine to numb the area where they will place the catheter into your skin. They will also give you sedation.
Once the areas are numb, your doctor will make small incisions (surgical cuts). They will use fluoroscopy (real time X-rays), a CT scan, or ultrasound to guide the catheter through the incision. You may need to get contrast the day of your procedure. Contrast is a special dye that helps your doctor see your urinary system.
After they place your catheter, your doctor will place a silicone disk around the catheter (see Figure 7). This disk helps secure the catheter to your skin using an adhesive dressing. You may also have a suture (stitch) to help hold the catheter in place.
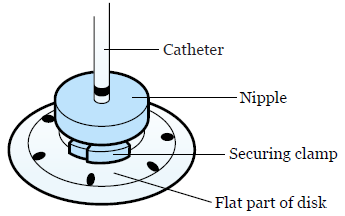
There will be a black mark on the catheter above the disk. Your nurse will show it to you. It should always be the same distance from the top of the disk. This will help you know if your catheter has moved.
What to do after your procedure
After your procedure, your care team will bring you to the recovery room. You will need to stay in bed until the sedation has worn off. You will then go back to your hospital room or go home with your caregiver.
You may have bleeding, discomfort, drainage, or pain at your catheter exit site. It can last for up to 3 days after your catheter is placed. Talk with your healthcare provider about what pain medicine is safe to take.
If you have any bleeding from your exit site, apply pressure and a cold compress to the area. Tell your nurse if you have:
- Bleeding. Your care team may need to change your dressing.
- Pain or discomfort that gets worse.
- Any nausea (feeling like you’re going to throw up).
- Any symptoms that concern you.
Your nurse will teach you how to care for the catheter at home. Use this resource at home to remind you of what you learned. A visiting nurse can come help you at home until you or your caregiver feel confident caring for the catheter. Ask your healthcare provider for more information about how to arrange for a visiting nurse.
Use a single-use waterproof cover over your dressing, such as Aquaguard®, to shower while your catheter is in place.
How to care for your percutaneous urinary drainage catheter
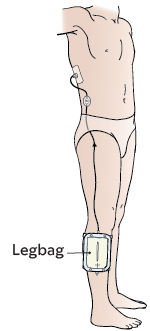
The end of the catheter outside of your body will be attached to a leg drainage bag (see Figure 8). This is also called a leg bag.
Urine will start to flow into the bag right after your procedure. The urine may appear bloody at first. Your nurse will check the drainage to make sure this improves.
You’ll have a device, such as CathGrip®, to keep your catheter in your body if you pull on it. Keep the leg bag strapped to your leg to prevent the catheter from accidentally pulling out. The leg bag can fill up with urine and become heavy. If the leg bag falls, it can pull the catheter out. If you see a problem, call your healthcare provider.
Check your percutaneous urinary drainage catheter
Check your catheter at least once a day. You can use a hand-held or a full-length mirror to do this.
- Find the black mark to make sure it is in the correct position. It should always be the same distance from the top of the disk. If the distance changes, this means that the catheter has moved.Call Interventional Radiology and ask for someone to check the catheter.
- Check the dressing to make sure that it is secure. Change it if it is wet, dirty, or has come loose or started to pull away from the skin.
- Check the skin around the catheter when changing the dressing to see that it is in good condition.Call your healthcare provider if you notice any of these:
- Redness.
- Areas of broken skin.
- Rash.
- Urine leaking around the catheter.
- Check the leg bag to make sure urine is flowing freely into the bag. Your urine should be the same color and consistency. Call your healthcare provider if you notice any of these:
- Your urine is a different color.
- Your urine is a different consistency.
- A large decrease in the amount of urine in the bag.
- Check the catheter and the leg bag for kinks (bends) in the tubing. If it’s bent, straighten the tubing. Call your healthcare provider if you cannot straighten it.
Empty the urine from the bag
Check the urine in the leg bag often. Urine should be flowing freely into the leg bag. Empty the leg bag into the toilet or a container when it’s half-full. That can be every 2 to 3 hours during the day for some people.
To empty the leg bag:
- Clean your hands with warm water and soap for at least 20 seconds or use an alcohol-based hand sanitizer.
- Put one foot on the toilet bowl, if you can. If you can’t put your foot on the toilet, remove the straps from your leg. Then, lift the bag to the toilet or container with your hands.
- Aim the tubing at the bottom of the leg bag into the toilet or container.
- Open the outlet valve at the bottom of the leg bag.
- Empty the leg bag completely into the toilet or container. If you’re using a container, pour the urine into the toilet when you’re finished, then flush the urine.
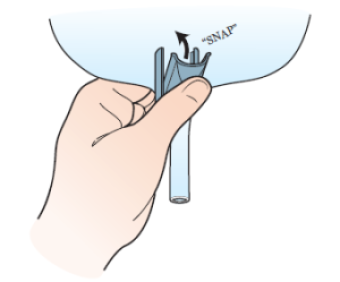
- Close the valve of the leg bag. You should hear a snap when it closes.
- Dry the end of the tubing with toilet paper.
- Clean your hands with warm water and soap for at least 20 seconds or use an alcohol-based hand sanitizer.
Call your healthcare provider if your urine is bloody, foul-smelling, or cloudy.
Change the Uresil dressing
The Uresil dressing system helps keep your catheter from moving out of your kidney. The disk is attached to your catheter. The dressing covers the disk and keeps the catheter in place.
Change the dressing, ureteral connecting tube, and leg bag once a week. You may need to change them more often if they get wet, dirty, loose, or pull away from the skin. A wet dressing can irritate your skin and make it sore. This makes skin breakdown more likely.
You can put the equipment together yourself or ask for help. You will need help changing the dressing and drainage equipment. Watch How to Change Your Uresil Dressing to learn more.
To change your Uresil dressing:
- Gather your supplies. You’ll need:
-
Clean your hands with soap and warm water or an alcohol-based hand sanitizer.
- If you’re washing your hands with soap and water, wet your hands and apply soap. Rub your hands together for at least 20 seconds, then rinse. Dry your hands with a paper towel and use that same towel to turn off the faucet.
- If you’re using an alcohol-based hand sanitizer, be sure to cover your hands with it. Then, rub your hands together until they’re dry.
- Clean your scissors with an alcohol wipe. If your Telfa is bigger than 2 inches by 2 inches, you will need to cut it to that size. Cut a slit in that piece (see Figure 9) and set it to the side.
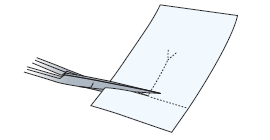
- Sit or lie comfortably. At this point, you will need someone to help you. Have the person doing the dressing change follow the instructions below.
- Clean your hands and put on nonsterile gloves.
- Release the catheter from the straps on the CathGrip. Make sure the leg bag is somewhere that it can’t fall. If you’re changing the CathGrip, use an adhesive remover wipe to loosen it from the skin, then throw it away.
- Hold the silicone disk in place using 2 fingers to prevent tension or pulling on the catheter. Locate the slit in the Uresil dressing. From this spot, slowly and gently peel the adhesive away from the skin while holding the disk (see Figure 10). If the skin around the catheter is sensitive, wipe adhesive remover around the edge of the dressing to reduce discomfort. Then throw out the old Uresil dressing.
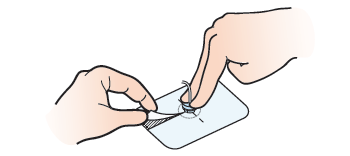
- Use a gauze pad moistened with soap and water to clean the skin around and under the silicone disk. Using the same gauze, clean the top and bottom sides of the silicone disk itself. Always hold one side of the disk firmly on the skin while cleaning under the other side.
- Rinse and dry the skin and the silicone disk with fresh gauze.
- Wipe the top side of the silicone disk with an alcohol wipe. This removes any soap residue.
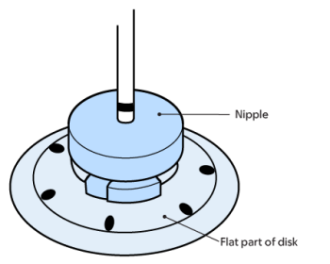
- Look at the disk nipple (see Figure 11). The black ink mark should be just above the disk nipple. If it moved, finish changing the dressing, and then call your doctor’s office.
-
Check the insertion site under the silicone disk. The insertion site is where the catheter goes into your skin. Always hold one side of the disk firmly on the skin while tilting up the other side.If you see any of the following, finish changing the dressing and call your doctor’s office:
- Redness.
- Swelling.
- Foul-smelling drainage.
- Leakage of fluid.
- New tissue growing around the insertion site. This is harmless, but it can be removed by your doctor if it is painful.
- Put 3MTM No Sting Barrier Film on the skin around and under the silicone disk. Then put more to the top of the disk where the dressing will go. This protects your skin and helps the adhesive stick better.
- Slide the Telfa under the disk, around the catheter (see Figure 12). The slit should point towards the person’s feet. The Telfa will prevent moisture from building up under the disk.
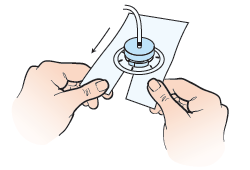
- Pick up the Uresil dressing. Open the slit and place it around the catheter. Line up the slit in the dressing with the slit in the Telfa. Make sure the adhesive side of the dressing is facing down, shiny side up.Place the dressing over the flat part of the disk, but under the nipple and securing clamp of the disk. The slit in the dressing should point towards the person’s feet.
-
The Uresil dressing has 3 pieces of backing. Start at the corner of the biggest piece and slowly peel the backing away. As you peel away the paper, press the adhesive to the skin and smooth out any wrinkles. This will get easier with practice.
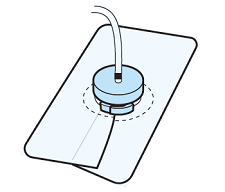
If the dressing does not stick properly, take off the Uresil dressing and Telfa and restart at step 15. - Peel away the other 2 pieces of backing paper 1 at a time. Press the adhesive to the skin. Overlap the slit edges of the dressing to make the dressing more secure (see Figure 13).
-
If you are only changing the dressing, reattach the catheter to the CathGrip.
- To do this, place your catheter on the device straps.
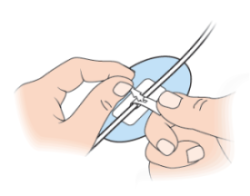
- There are 2 straps, one with holes and one with jagged edges. The strap with the holes has 2 openings. Insert the strap with the jagged edges end into the lower opening of the other strap.
- Pull to secure (see Figure 14).
If you’re changing the leg bag, read the “Change the leg bag and ureteral connecting tube” section of this resource.
If you’re changing the CathGrip, read the “Chage the CathGrip” section of this resource.
- Take off your gloves and throw them away. Then, clean your hands. .
Change the leg bag and ureteral connecting tube
Change your leg bag and ureteral connecting tube once a week.
-
Gather your supplies:
- Leg bag with Velcro straps
- Ureteral connecting tube
- Micropore® Paper tape (2 inches wide)
- Scissors to cut tape and bag
- Alcohol wipes
- Non-sterile gloves
- Clean your hands with warm water and soap for at least 20 seconds or use an alcohol-based hand sanitizer.
- Cut a 4-inch piece of Micropore paper tape and fold down the short sides a half an inch. Set aside (see Figure 15).

- Open the packages containing the ureteral connecting tube and the leg bag. Close the outlet valve at the bottom of the leg bag. You will hear a snap (see Figure 16).
- Clean the scissors with an alcohol wipe.
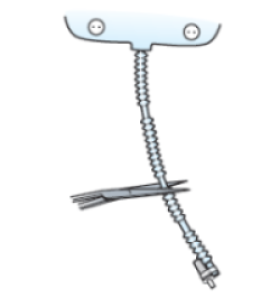
- Pick up the leg bag by the corrugated tubing, but do not touch the connector. The connector is attached to the bottom of the tubing. Notice the smooth areas between the ripples in the tubing.Count 2 to 4 smooth areas up from the bag. Then, cut the tubing at the smooth outer edge farthest from the bag (see Figure 17). Hold both the tubing and the bag as you cut the tubing.
- Attach the connector to the tubing on the leg bag (see Figure 18).
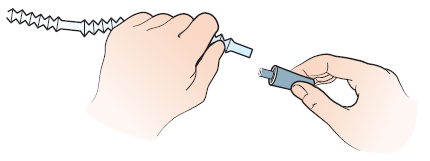
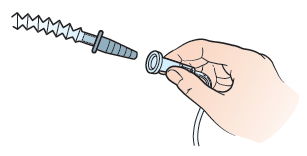
- Take off the cap on the connector. Put the connector into the ureteral connecting tube’s wide end (see Figure 19). Wrap the area with the cut piece of tape to prevent disconnecting.
- Take the Velcro straps off the packaging. Place the wider strap through the top buttonholes. Place the narrow strap through the bottom buttonholes. Cut the straps to fit your leg snugly, but they should not be tight (Figure 20).
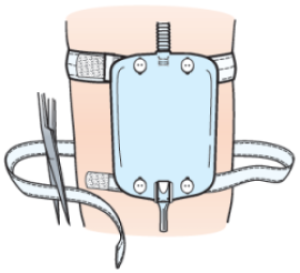
- Disconnect the leg bag from your leg and empty it into the toilet.
- Clean your hands with warm water and soap for at least 20 seconds or use an alcohol-based hand sanitizer.
- Put on a pair of non-sterile gloves.
- Put a towel or gauze under the point of connection between the ureteral connecting tube and the catheter.
- Pick up the new ureteral connecting tube attached to the bag. Twist off the small cap (see Figure 21).
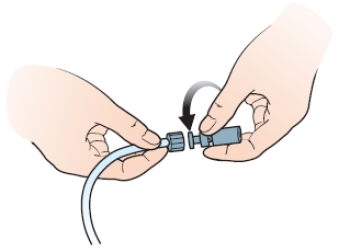
- While holding the new bag set in your hand, untwist the catheter from the old ureteral connecting tubing. Quickly attach the new bag with a twisting motion to minimize leaking. Throw away the old bag.
- If you aren’t changing your CathGrip, secure the new tubing to the side of your abdomen with the CathGrip. Place your catheter on the device strap of the CathGrip and pull.
If you are changing your CathGrip, read the “Changing your CathGrip” section of this resource.
- Attach the leg bag to either the calf or the thigh. Check to make sure all connections are tight and the leg bag is closed.
- When you have finished, take off your gloves and throw them away. Then, clean your hands.
Change your CathGrip
The CathGrip will prevent pulling, tension, or kinking of the drainage catheter and tubing. You will need your CathGrip kit for this part.
To change the CathGrip:
- Choose a position for the CathGrip. The CathGrip and leg bag tubing should be lower than the catheter insertion site. This will help it drain. Make sure it’s lower both when you are standing and laying down.
When the catheter is attached, there should be no pull or tension on the catheter. There should be a gentle bowing of the catheter.
- Rest the tubing on the side of your abdomen on the site you chose.
- Check the site where you’ll place the CathGrip. Make sure you choose an area that’s not red or irritated. Trim any long hairs at the site with scissors or hair trimmer. Avoid using a razor.
- Open CathGrip package.
- Clean the site with the alcohol wipe from the kit. This will remove oils and products, such as lotion or soap, from your skin. Allow alcohol to dry completely.
- Wipe the site with the BioPlus+ Skin Prep, which is included in the kit.
- Allow area to dry to touch. This takes about 15 seconds.
- Peel off the paper on the back of the CathGrip one side at a time (see Figure 22). Apply to skin in the desired location. Repeat with the other side.
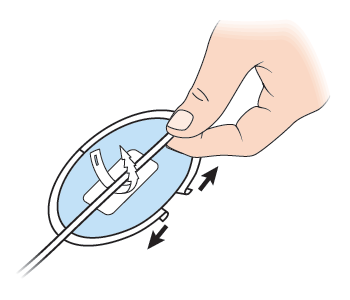
- Gently press the CathGrip to the skin for 5 seconds to seal it to the skin.
- Place your catheter on the device straps. There are 2 straps, one with holes and one with jagged edges. The strap with the holes has 2 openings. Insert the strap with the jagged edges end into the lower opening of the other strap. Pull to secure (see Figure 15).
- Make sure that there is no pull or tension on the catheter. If you notice any tension or pull, change the position of the catheter in the CathGrip.
Connect to a night bag
Your nurse will show you how to connect your leg bag to a night bag. The night bag holds a large volume so you will not have to empty your bag while you sleep.
-
Gather your supplies:
- Night bag
- Alcohol wipes
- Paper tape
- Clean your hands with warm water and soap for at least 20 seconds or use an alcohol-based hand sanitizer.
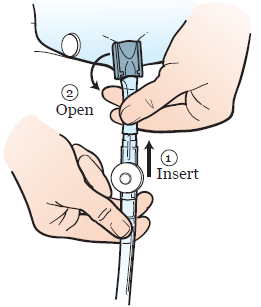
- Clean the drainage end of the leg bag thoroughly with alcohol wipes on the outside. Clean the inside as much as possible with the wipes. Hold the bag and let the alcohol to dry for 2 minutes.Pick up the night bag with your other hand. Remove the cap from the end of the tubing. Insert the night bag tubing into the leg bag (see Figure 23).Open the outlet valve to allow urine to flow from the leg bag into the night bag. For extra safety, secure the connection between the 2 bags with paper tape.
Never connect the night bag to the ureteral connecting tubing. The weight of the leg bag can pull the catheter out of your body if it falls.
Clean the night drainage bag
You may reuse the night drainage bag, also called night bag, after cleaning it properly.
- Clean your hands with warm water and soap for at least 20 seconds or use an alcohol-based hand sanitizer.
-
Gather the following supplies:
- Non-sterile gloves.
- Cold water and dish detergent.
- White vinegar.
- A large basin or container for soaking items.
- Put on the gloves.
- Empty the urine from the night bag.
- Rinse the bag with cool running water. Never use hot water because it can damage the bag.
- Wash the bag with mild detergent.
- Rinse the bag with cool water until no signs of the detergent remain.
- In the basin-sized container, make a solution of 1 part white vinegar and 3 parts water.
- Soak the bag for 15 minutes in the solution.
- Let the night bag air dry.
Physical activity after your placement procedure
You can go to work and exercise with your catheter in place. Avoid movements that involve stretching from side to side or continual bending. These could dislodge the catheter.
Do not swim, take a bath, or submerge your catheter in water. Talk to your IR doctor if you have a vacation planned. They will help you make a plan to care for your catheter while you’re away.
Always keep the tubing secured to your body with a CathGrip. When you are getting dressed, be sure not to tug on the catheter. Do not let the tubing become kinked by clothing such as a belt. Kinking can cause your catheter to leak.
Try not to lie on your catheter when you sleep. This will prevent kinking of the catheter.
When to call your healthcare provider
Call your healthcare provider if you have any of the following:
- The location of the black dot on the catheter has changed.
- The clamp around disk is loose or opened. If your catheter is sutured in place, call Interventional Radiology if the suture is broken.
- There is a kink in the catheter that you cannot straighten.
- The catheter has dislodged or pulled completely out.
- You have pain, tenderness, swelling, redness, broken skin, or rash at the catheter site.
- You have lower back pain on the same side your catheter is on.
- There is urine leaking around the catheter.
- There is no drainage from the catheter or if the amount of drainage is much less than usual.
- The drainage in your leg bag is bloody, cloudy, or foul-smelling.
- You have a temperature of 100.4º F (38º C) or higher.
-
You have symptoms of blockage. These include:
- Decreased amount or no urine.
- Leakage of urine around the insertion site.
- Fever, chills, or both.
- You have any concerns about your catheter.
Ordering supplies
Your healthcare provider will give you enough supplies to last for 2 weeks. You can order more supplies through your visiting nurse service, or your doctor’s office can help you get them. The items and their supply numbers are listed below:
| Item | Supply number |
|---|---|
| Adhesive remover (1 box) | 31705 |
| Alcohol wipes (1 box) | 33305 |
| Drainage Discharge Kit (1 kit, 4 weeks of supplies) | 3121 |
| CathGrip (each) | 2675 |
| Micropore paper tape (1 box) | 43267 |
| Non-sterile gloves (1 box) | 48606 |
| Plain gauze (1 package) | 34245 |
| Skin Prep (1 box) | 33321 |
| Telfa (each) | 33271 |
| Uresil adhesive dressing (1 box) | 32265 |
| Ureteral connecting tubing (1 box) | 28743 |
| Leg bags (each) | 33559 |
| Night bag (each) | 29907 |
