This information explains what a tunneled catheter is and how it’s placed. It also has general guidelines for caring for your tunneled catheter at home. A tunneled catheter is a type of central venous catheter (CVC).
About tunneled catheters
A tunneled catheter is a flexible catheter (thin tube) that goes into a vein in your chest. There are many different types of tunneled catheters. Your doctor will decide which type is best for you.
All tunneled catheters are tunneled under your skin and into a large vein near your heart (see Figure 1).
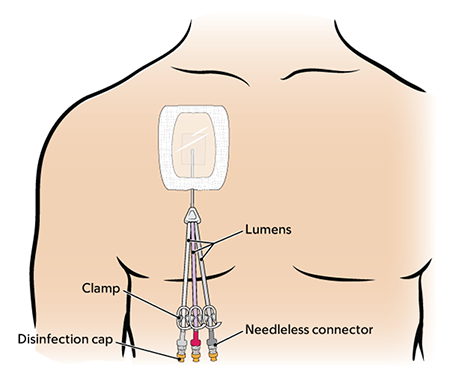
The catheter splits into 1, 2, or 3 lumens (smaller tubes) outside of your body. Each lumen has:
- A clamp.
- A needleless connector (also called a clave).
- A disinfection cap on the end.
Having a tunneled catheter can help you need fewer needle sticks. It can be used to:
- Take blood samples.
- Give fluids.
- Give chemotherapy and other cancer treatments, such as CAR-T and bone marrow transplant.
- Give intravenous (IV) medications and nutrition.
- Give blood transfusions.
A tunneled catheter can stay in your body for weeks, months, or even years. Your doctor will remove it when you do not need it anymore.
You will have a procedure to place your tunneled catheter. Your nurse will tell you how to get ready for your procedure. They will also teach you how to care for your tunneled catheter after your procedure. It can be helpful to have a caregiver, family member, or friend learn with you.
Most people can do normal activities with a tunneled catheter, such as work, school, sexual activity, showering, and mild exercise. Talk with your doctor or nurse about which activities are safe to do before you start them.
Avoid contact sports, such as football and soccer. Avoid submerging your catheter in water, such as swimming in a pool or ocean, while your catheter is in place.
What to do before your procedure
Ask about your medicines
You may need to stop taking some of your usual medicines before your procedure. Or, you may need to take a different dose (amount) than usual. Talk with your healthcare provider about how to take your medicines before your procedure. Do not change how you take your medicines without talking with a healthcare provider.
This section lists some examples of medicines, but there are many others. Make sure your care team knows all the prescription medicines, over-the-counter medicines, and dietary supplements you take. A prescription medicine is one you can only get with a prescription from a healthcare provider. An over-the-counter medicine is one you can buy without a prescription.
It’s very important to take your medicines and supplements the right way in the days before your procedure. If you don’t, we may need to reschedule your procedure.
Anticoagulants (blood thinners)
A blood thinner is a medicine that changes how your blood clots. Blood thinners are often prescribed to help prevent a heart attack, stroke, or other problems caused by blood clots.
If you take a blood thinner, ask your healthcare provider what to do before your procedure. They may tell you to stop taking it a certain number of days before your procedure. This will depend on the type of procedure you’re having and the reason you’re taking a blood thinner.
Here are some examples of blood thinners. There are others, so be sure your care team knows all the medicines you take. Do not stop taking your blood thinner without talking with a member of your care team.
|
|
Other medicines and supplements can change how your blood clots. Examples include vitamin E, fish oil, and nonsteroidal anti-inflammatory drugs (NSAIDs). Read How To Check if a Medicine or Supplement Has Aspirin, Other NSAIDs, Vitamin E, or Fish Oil. It will help you know which medicines and supplements you may need to avoid before your procedure.
Diabetes medicines
You may be taking insulin or other diabetes medicines. If so, talk with your MSK healthcare provider and the healthcare provider who prescribes it. Ask them what to do before your surgery or procedure. You may need to stop taking the medicine or take a different dose (amount) than usual. You may also need to follow different eating and drinking instructions before your surgery or procedure. Follow your healthcare provider’s instructions.
Your care team will check your blood sugar levels during your surgery or procedure.
GLP-1 medicines for weight loss
You may be taking a GLP-1 medicine. If so, it’s important to tell your healthcare provider. You will need to follow special eating and drinking instructions before your surgery or procedure. It is very important to follow these instructions. If you do not follow them, your surgery or procedure may be delayed or canceled.
- Follow a clear liquid diet the day before your surgery or procedure. Do not eat any solid food. Read Clear Liquid Diet to learn more.
- Stop drinking 8 hours before your arrival time. Do not eat or drink anything after this time, including clear liquids. You can have small sips of water with your medicines.
To learn more, read Eating and Drinking Before Your Surgery or Procedure When Taking GLP-1 Medicines.
Here are some examples of GLP-1 medicines. There are others, so be sure your care team knows all the medicines you take. Sometimes, these are prescribed to help manage diabetes or other conditions. Other times, they’re prescribed for weight loss.
|
|
Diuretics (water pills)
A diuretic is a medicine that helps control fluid buildup in your body. Diuretics are often prescribed to help treat hypertension (high blood pressure) or edema (swelling). They can also be prescribed to help treat certain heart or kidney problems.
You may be taking a diuretic. If so, ask the healthcare provider doing your procedure what to do before your procedure. You may need to stop taking it the day of your procedure.
Here are some examples of diuretics. There are others, so be sure your care team knows all the medicines you take.
|
|
Take devices off your skin
You may wear certain devices on your skin. Before your procedure, surgery, or scan, some device makers recommend you take off your:
- Continuous glucose monitor (CGM)
- Insulin pump
Talk with your healthcare provider about scheduling your appointment closer to the date you need to change your device. Make sure to bring an extra device with you to put on after your procedure, surgery, or scan.
You may not be sure how to manage your glucose (blood sugar) while your device is off. If so, before your appointment, talk with the healthcare provider who manages your diabetes care.
Arrange for someone to take you home
You must have a responsible care partner take you home after your procedure. A responsible care partner is someone who can help you get home safely. They should be able to contact your care team if they have any concerns. Make sure to plan this before the day of your procedure.
If you don’t have a responsible care partner to take you home, call one of the agencies below. They’ll send someone to go home with you. There’s a charge for this service, and you’ll need to provide transportation. It’s OK to use a taxi or car service, but you still need a responsible care partner with you.
| Agencies in New York | Agencies in New Jersey |
| VNS Health: 888-735-8913 | Caring People: 877-227-4649 |
| Caring People: 877-227-4649 |
Tell us if you’re sick
If you get sick (including having a fever, cold, sore throat, or flu) before your procedure, call your IR doctor. You can reach them Monday through Friday from to
After , during the weekend, and on holidays, call 212-639-2000. Ask for the Interventional Radiology fellow on call.
Note the time of your appointment
A staff member will call you 2 business days before your procedure. If your procedure is scheduled for a Monday, they’ll call you on the Thursday before. They’ll tell you what time to get to the hospital for your procedure. They will also remind you where to go.
If you don’t get a call by noon (12 p.m.) on the business day before your procedure, call 646-677-7001. If you need to cancel your procedure for any reason, call the healthcare provider who scheduled it for you.
What to do the day before your procedure
Instructions for eating
Stop eating at midnight (12 a.m.) the night before your surgery or procedure. This includes hard candy and gum.
Your healthcare provider may have given you different instructions for when to stop eating. If so, follow their instructions. Some people need to fast (not eat) for longer before their surgery or procedure.
What to do the day of your procedure
Instructions for drinking
Between midnight (12 a.m.) and 2 hours before your arrival time, only drink the liquids on the list below. Do not eat or drink anything else. Stop drinking 2 hours before your arrival time.
- Water.
- Clear apple juice, clear grape juice, or clear cranberry juice.
- Gatorade or Powerade.
-
Black coffee or plain tea. It’s OK to add sugar. Do not add anything else.
- Do not add any amount of any type of milk or creamer. This includes plant-based milks and creamers.
- Do not add flavored syrup.
If you have diabetes, pay attention to the amount of sugar in your drinks. It’s easier to control your blood sugar levels if you include sugar-free, low-sugar, or no added sugar versions of these drinks.
It’s helpful to stay hydrated before surgeries and procedures, so drink if you’re thirsty. Do not drink more than you need. You’ll get intravenous (IV) fluids during your surgery or procedure.
Stop drinking 2 hours before your arrival time. This includes water.
Your healthcare provider may have given you different instructions for when to stop drinking. If so, follow their instructions.
Things to remember
- Take only the medications your doctor told you to take the morning of your procedure. Take them with a few sips of water.
- Do not put cream (thick moisturizers) or petroleum jelly (Vaseline®) anywhere on your chest.
- Do not wear eye makeup.
- Remove any jewelry, including body piercings.
- Leave all valuables at home if you do not need them.
- If you wear contact lenses, wear your glasses instead, if you can. If you do not have glasses, bring a case for your contacts.
What to bring with you
- Medications for breathing problems, such as inhalers, if you take any.
- Medications for chest pain, if you take any.
- A case for your glasses or contacts.
- Your Health Care Proxy form and other advance directives, if you have completed them.
- Your CPAP or BiPAP machine if you use one. If you cannot bring yours with you, we will give you one to use while you’re in the hospital.
What to expect when you arrive
Many staff members will ask you to say and spell your name and date of birth. This is for your safety. People with the same or similar names may be having procedures on the same day.
Meet with a nurse
You’ll meet with a nurse before your procedure. Tell them the dose of any medicines you took after midnight (12 a.m.) and the time you took them. Make sure to include prescription and over-the-counter medicine, patches, and creams.
Your nurse may place an intravenous (IV) line in one of your veins, usually in your arm or hand. If your nurse does not place the IV, your anesthesiologist will do it in the procedure room.
A member of your care team will review your medical history with you to prepare you for sedation (seh-DAY-shun). Sedation is when you’re calm, relaxed, or sleepy from medicine you will get before your procedure. They will:
- Ask you if you’ve had any problems with sedation in the past. This includes nausea (feeling like you’re going to throw up) or pain.
- Talk with you about your comfort and safety during your procedure.
- Talk with you about the kind of sedation you’ll get.
- Answer questions you have about sedation.
Inside the procedure room
A member of your care team will give you an injection (shot) of local anesthesia. This is medicine to numb the area where they will place the catheter into your skin.
Once the areas are numb, your doctor will make small incisions (surgical cuts). They will place the catheter through the incision on your chest and tunnel it under your skin to the incision at the base of your neck. Then, they will thread the catheter into your vein (see Figure 2).
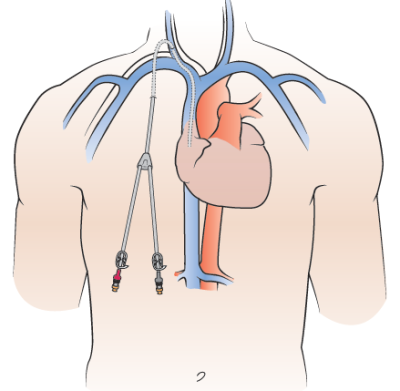
Your doctor will use fluoroscopy (real time X-rays) or ultrasound to help place the catheter. They may also give you an injection of IV contrast. The contrast makes it easier for your doctor to see the area.
Your doctor will use sutures (stitches) to close the incision at the base of your neck. They will put Steri-Strips™ (surgical tape) over the sutures. Then, they will stitch your catheter to your skin at the place where it leaves your body (the exit site). This will keep the catheter in place.
At the end of your procedure, your doctor will put a gauze dressing (bandage) over the incision on your neck. They’ll also put a Tegaderm™ dressing over your catheter exit site.
What to do after your procedure
After your procedure, your care team will bring you to the recovery room. You will need to stay in bed until the sedation has worn off. You will then go back to your hospital room or go home with your caregiver.
You may have bleeding, discomfort, or pain at your catheter exit site. It can last for up to 3 days after your catheter is placed. Talk with your healthcare provider about what pain medicine is safe to take.
If you have any bleeding from your exit site, apply pressure and a cold compress to the area. Tell your nurse if you have:
- Bleeding. Your care team may need to change your dressing.
- Pain or discomfort that gets worse.
- Any nausea (feeling like you’re going to throw up).
- Any symptoms that concern you.
Do not shower for 24 hours after your procedure.
Your central line discharge kit
Your nurse will give you a discharge kit before your procedure or before you leave the hospital. They will explain how to use the kit.
The discharge kit has:
- 1 toothless clamp
- 1 cannula clamp
- 2 Curos JetTM strips
- 3 needleless connectors
- 1 package of (10-inch x 12-inch) water guards, such as AquaGuard
- 2 (4-inch x 6 1/8-inch) Tegaderm dressings without CHG
- 2 Nitrile exam gloves
- 10 alcohol Pads
- 1 (4-ounce) package of CHG 4% cleansing soap
- Disinfection caps
- Your doctor’s office and emergency telephone numbers
Keep your discharge kit with you at all times. You’ll need it if your catheter is leaking, or if your Tegaderm dressing or needleless connector is damaged or comes off.
How to care for your catheter exit site
Always have a Tegaderm dressing over your exit site while your tunneled catheter is in place. The Tegaderm dressing helps prevent infection. Call your healthcare provider if your Tegaderm dressing gets dirty, wet, or peels off. They may need to change your Tegaderm dressing.
Have a nurse change your dressing
Have a nurse change your dressing:
- Within 24 hours (1 day) if you’re staying in the hospital after your procedure.
- Within 48 hours (2 days) if you’re going home after your procedure and your dressing is gauze and tape. They will replace it with a CHG or non-CHG transparent (clear) dressing.
-
Within 7 days if both of these are true:
- You have a CHG or non-CHG transparent dressing.
- You can see your insertion site (where the catheter goes into your body).
During these dressing change appointments, the nurse will change your needleless connectors, disinfection caps and flush your catheter. If you cannot come to an MSK site, your nurse will help you make other plans. Call your healthcare provider if you have any questions.
How to care for your neck incision
Two days after your procedure, remove the gauze bandage over the small incision on your neck. You do not need to put a new bandage over the incision.
How to care for your tunneled catheter at home
Keep the lumens clamped when you are not using your catheter. Keep your catheter secure at all times to keep from pulling it.
Talk with your nurse about the best way to secure your catheter. You can tape the lumens to your skin or tuck them into your bra. Or, you can wrap them in medical tape and pin the tape to your clothing. Take off the pin when changing your clothes to prevent tugging on the catheter.
Do not put tape over the connection site. The connection site is where the needleless connector connects to the lumens.
Check your exit site every day for redness, tenderness or pain, leakage or drainage, swelling, or bleeding. Call your healthcare provider right away if you have any of these signs or symptoms. These are signs you may have an infection.
What to do if your catheter is leaking
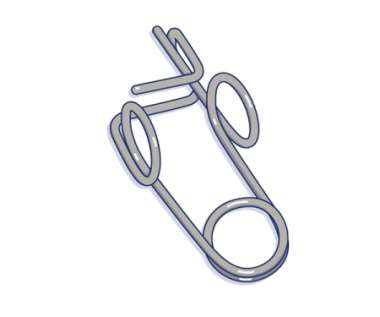
- Clamp your catheter above the leak. Move the white clamp on the catheter so it’s above the leak, if you can. If you cannot use the white clamp, use the toothless clamp in your discharge kit (see figure 3).
- Wipe the area that’s leaking with an alcohol pad.
- Call your doctor’s office right away.
What to do if your Tegaderm dressing is damaged, loose, or dirty
Call your doctor’s office right away. Do not take off the damaged, loose, or dirty dressing. Put a new Tegaderm dressing from the discharge kit over it.
What to do if your Tegaderm dressing is wet
Call your doctor’s office right away. Do not take off the wet Tegaderm dressing or put another dressing over it.
What to do if your disinfection cap falls off
Throw the disinfection cap that fell off in the trash. Do not put it back on the lumen.
- Clean your hands with soap and water or an alcohol-based hand sanitizer.
- Get a new disinfection cap from your discharge kit. Remove the cap from the strip.
- Hold the needleless connector in one hand. With your other hand, gently push and twist the new disinfection cap onto the end of the needleless connector.
What to do if your needleless connector falls off
Throw the needleless connector that fell off into the trash. Do not put it back on the lumen.
To put on a new needleless connector:
-
Gather your supplies. You will need:
- 1 pair of nonsterile gloves
- 2 alcohol pads
- 1 new needleless connector
- 1 new disinfection cap
- Clean your hands with soap and water or an alcohol-based hand sanitizer. Put the gloves on.
-
Get your supplies ready.
- Open 1 of the alcohol pad packets, but leave the alcohol pad inside.
- Open the needleless connector packet, but leave the needleless connector inside.
- Pull the tab to take the cover off the disinfection cap, but leave the disinfection cap inside its plastic holder.
- Open the other alcohol pad packet. Using the alcohol pad inside, pick up the lumen with your nondominant hand (the hand you do not write with). Hold it close to the end (see Figure 3).
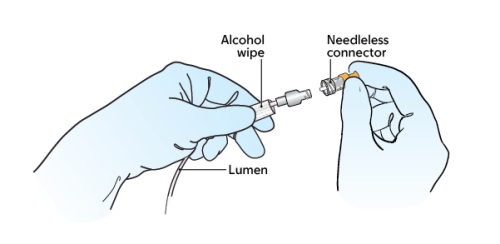
- Pick up the other, open alcohol pad with your dominant hand (the hand you write with). Scrub the open end of the lumen with the alcohol pad for 15 seconds. Then throw the alcohol pad in the trash. Let the lumen dry for 15 seconds. Keep holding it with the alcohol pad in your nondominant hand.
- Pick up the new needleless connector with your free hand. If it has a cover, take the cover off. You can do this using the knuckles of your other hand. Then, twist the new needleless connector onto the end of the lumen (see Figure 4). Keep holding the lumen with the alcohol pad in your nondominant hand.
- Pick up the plastic holder with the disinfection cap with your free hand. Gently push and twist the disinfection cap onto the end of the needleless connector. Once it’s attached, pull off the plastic holder and throw it away.
- Take your gloves off. Clean your hands.
Call your doctor or nurse after you change the needleless connector.
Guidelines for showering with a tunneled catheter
Keep your skin clean to lower your risk of infection while your tunneled catheter is in place.
Use a waterproof cover
Use a single-use waterproof cover over your dressing, such as Aquaguard®, to shower while your catheter is in place. Your discharge kit will have waterproof covers. You can also buy them online.
Each time you shower, cover your Tegaderm dressing completely with a new waterproof cover to keep it from getting wet. To put on the waterproof cover:
- Peel off the top and side strips.
- Place the top edge above your dressing. Do not let the tape on the waterproof cover touch your Tegaderm dressing. It can lift your dressing when you remove the waterproof cover after showering. Smooth the cover down over your dressing.
- Peel off the bottom strip. Make sure the bottom edge of the waterproof cover is below your dressing. Make sure the lumens of your catheter are tucked into the waterproof cover and completely covered. Smooth the bottom edge down.
Do not shower for longer than 15 minutes. Use warm water, not hot water. This will help keep the waterproof cover from coming off.
Dry the waterproof cover before you take it off. After your shower, fully dry the connection sites.
Use an antiseptic skin cleanser, such as Hibiclens
Wash with an antiseptic skin cleanser, such as Hibiclens, every day while your tunneled catheter is in place. An antiseptic kills germs and bacteria.
Hibiclens comes in liquid form or as wipes. You can buy Hibiclens from any local pharmacy or online. Your care team will send you home with a small bottle when you leave the hospital.
Read How to Shower Using 4% Chlorhexidine Gluconate (CHG) Solution Antiseptic Skin Cleanser to learn more.
Do not submerge your catheter in water, such as in a bathtub, swimming pool or ocean. Watch Showering While You Have a Central Venous Catheter (CVC) to learn more about showering with a tunneled catheter.
Use Hibiclens® skin cleanser
While your tunneled catheter is in place, keep your skin clean to lower your risk of infection. Wash with Hibiclens every day while your tunneled catheter is in place.
Hibiclens is a skin cleanser that kills germs for up to 24 hours after you use it. It has a strong antiseptic (liquid used to kill germs and bacteria) called chlorhexidine gluconate (CHG). Showering with Hibiclens will help lower your risk of infection. Hibiclens comes in liquid form or as wipes. Wash with Hibiclens every day while your tunneled catheter is in place.
You can buy Hibiclens from any local pharmacy or online. You will be sent home with a small bottle when you’re discharged from the hospital.
- Use your normal shampoo to wash your hair. Rinse your head well.
- Use your normal soap to wash your face and genital area. Rinse your body well with warm water.
- Open the Hibiclens bottle. Pour some solution into your hand or a clean washcloth.
- Move away from the shower stream to avoid rinsing off the Hibiclens too soon.
- Rub the Hibiclens gently over your body from your neck to your feet. Don’t put the Hibiclens on your face or genital area.
- Move back into the shower stream to rinse off the Hibiclens with warm water.
- Dry yourself off with a clean towel after your shower.
- Do not put on any lotion, cream, deodorant, makeup, powder, or perfume after your shower.
Things to remember when using Hibiclens
- Do not use regular soap, lotion, cream, powder, or deodorant without talking with your nurse first. If you’re in the hospital, your nurse might give you a lotion that you can use after using Hibiclens.
- Do not use Hibiclens on your head, face, ears, eyes, mouth, genital area, or on deep wounds. If you have a wound and are not sure if you should use Hibiclens on it, ask your doctor or nurse.
- Do not use Hibiclens if you’re allergic to chlorhexidine.
- If your skin gets irritated or you have an allergic reaction when using Hibiclens, stop using it. Call your doctor.
When to call your healthcare provider
Call your healthcare provider right away if:
- You have a fever of 100.4 °F (38 °C) or higher or chills.
- You have bleeding at your exit site. Your care team may need to change your dressing.
- You have pain or discomfort that gets worse.
- Your catheter breaks or leaks. Your care team may need to change your dressing and check your catheter site.
- Your Tegaderm dressing gets damaged, loose, dirty, or wet. Your care team will need to change your dressing and check your catheter site.
- You have redness, tenderness or pain, leakage or drainage, swelling, or bleeding around your catheter exit site.
- Your needleless connector falls off.
- You have any questions or concerns about your catheter.
Learn about our Health Information Policy.