This information will help you change your 2-piece disposable urostomy pouching (bag) system while you’re in the hospital. A urostomy pouching system is sometimes called a urostomy appliance.
To learn more about your urostomy and caring for your urostomy pouching system, read About Your Urostomy. You can also watch How to Change Your Urostomy Pouching System in the Hospital.
Changing your pouching (bag) system
You will need to change your pouching (bag) system in the hospital. If it’s leaking urine, change it right away. It’s best to change your pouching system in the morning before you drink any liquids. There’s often less urine (pee) coming out of your stoma in the morning.
You will be sitting in your hospital bed the first time you change your pouching system. Your nurse will help you. Once you’re comfortable standing for 15 to 20 minutes, you can change your pouching system wherever you’re most comfortable. Most people like to change it in the bathroom in front of the mirror.
Supplies
Gather your supplies before you start. You will need:
- Adhesive remover spray (if you cannot get the spray, use adhesive remover pads)
- 4x4 gauze pads
- Warm water
- Lubricant
- Measuring guide
- Pen or marker
- Scissors (if you’re using a cut-to-fit wafer)
- New wafer
- New pouch (bag)
- Mirror (for a better view of your movements)
You should also gather any extra supplies you’re using, such as:
- Ostomy powder (optional)
- Skin prep wipes (optional)
- Barrier ring or protective seal (optional)
- Elastic barrier strips (optional)
- Ostomy belt (optional)
Instructions
-
Clean your hands.
- If you’re using soap and water, wet your hands and apply soap. Rub your hands together for at least 20 seconds, then rinse. Dry your hands with a paper towel. Use that same towel to turn off the faucet.
- If you’re using an alcohol-based hand sanitizer, be sure to cover all parts of your hands with it. Rub your hands together until they are dry.
-
Disconnect your pouch (bag) from the night bag.
- Detach the night bag adaptor. Follow your nurse’s instructions.
- Close the spout or valve at the bottom of your pouch. This will keep urine from running out of the pouch while you’re taking it off.
- Clean your hands. Follow the instructions in step 1.
-
Take your pouching system off. Remove the wafer and pouch together.
- Spray adhesive remover spray over the wafer.
- Press down on your skin with 1 hand. With your other hand, gently lift an edge of the wafer and roll it away from your skin. Do not pull the wafer straight away from your skin. The skin around your stoma is sensitive, so it’s important to be gentle. Spray more adhesive remover spray under the wafer as you go, until you roll it all the way down.
- Once you have removed the pouching system, throw it in the trash.
- Hold a dry piece of gauze over your stoma opening. This will keep urine from leaking out. Change the gauze if it gets soaked with urine.
-
Clean and dry the skin around your stoma.
- Wet a piece of gauze with warm water. Use it to gently clean the skin around your stoma. Do not use any soap.
- Use a dry piece of gauze to dry the skin around your stoma. Make sure the area is fully dry. Your skin should not be sticky.
-
Measure your stoma size.
- If your stoma is round, use the measuring guide to measure your stoma. Compare the holes in the measuring guide to the size of your stoma. Choose the hole that fits comfortably around your stoma.
- If your stoma is not round, measure the vertical side first, then the horizontal side.
-
Get the new pouching system ready.
- Place the measuring guide over the back of the wafer. The back is the side that will go against your skin. Trace the correct size onto the back of the wafer.
-
Cut or mold the wafer to just outside of the outline. This will give your stoma extra room in case it swells a little. Check the wafer against your stoma to make sure it’s the right size.
- If you’re using a moldable wafer, turn the wafer over so you’re looking at the front. The front is the side that will face away from your skin. Gently roll back the opening and press down for a few seconds. This will keep it from rolling back too much.
- If you’re using a cut-to-fit wafer, remember to start cutting at the center hole (see Figure 1). After you cut the wafer, smooth out any rough edges with your finger.
- Break the inner lining on the pouch to make room for the tubes in your stoma. You will not need to do this once the tubes are removed.
-
Put a small amount of water or lubricant around the rim of the flange on the pouch and wafer. This will help seal them together securely. Then, snap the wafer and pouch together (see Figure 2). Give it a small tug to make sure it’s secure.
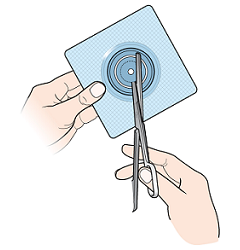
Figure 1. Cutting the wafer 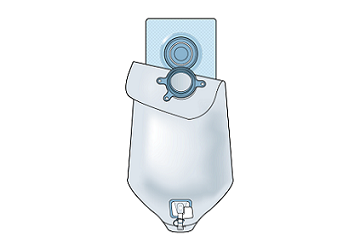
Figure 2. Attaching the pouch to the wafer - Check the spout or valve at the bottom to make sure the pouch is closed.
-
If you’re using a cut-to-fit wafer, peel the smaller backing from the center of the wafer. Leave the backing around the edges in place (see Figure 3).
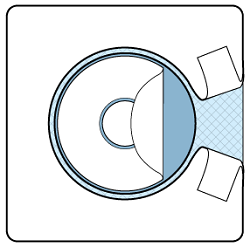
Figure 3. Peeling the backing from the center - If you’re using a moldable wafer, peel the large backing from the wafer. Leave the smaller backing around the edges in place.
- Set the pouching system aside with the sticky side up. Do not take off the backing around the edges yet. If you want, you can make tabs on the backing to make it easier to remove (see Figure 3).
-
Get the skin around your stoma ready.
- If any urine leaked out of your stoma while you were getting the pouching system ready, clean the area. Follow the instructions in step 5.
- If the skin around your stoma is irritated or very red, put a small amount of ostomy powder onto the irritated skin. Spread the powder with your fingers. Then, dab the powder with a skin prep wipe. This will seal the powder over your skin. Let the powder dry for at least 1 minute. Gently fan the area with your hand to help it dry. To learn more, read How To Manage Skin Irritation Around Your Urostomy Stoma.
-
If you’re using a barrier ring or protective seal, peel the backing from both sides. Then, you can put it on 1 of these ways:
- Stretch the barrier ring or protective seal so it matches the size of the opening in your wafer. Press it onto the back of the wafer.
- Stretch the barrier ring or protective seal to fit over your stoma. Gently press it onto your skin. It should be right against your stoma, without any gaps.
-
Put on the pouching system.
- Place the pouching system over your stoma without removing the backing around the edges. It may help to use the mirror. Make sure the wafer is against your skin at the base of your stoma.
- Place your hand over the wafer for 5 to 10 minutes. The warmth of your hand will help it stick to your skin. After 5 to 10 minutes, peel off the backing and press the wafer against your skin.
- Attach the night bag to the pouch. Follow your nurse’s instructions.
-
Put on any accessory products you’re using.
- If you’re using elastic barrier strips, peel the backing from the strips. Then place them over the wafer, close to the center. It’s OK if a small part is on your skin. But try not to have too much on your skin, as this can cause irritation.
- If you’re using an ostomy belt, attach it to the tabs on the pouching system. Hook the belt to one side of the pouching system. Then wrap it around your waist and hook it to the other side. Adjust it so it fits snugly.
- Clean your hands. Follow the instructions in step 1.
The skin around your stoma
While you’re changing your pouching (bag) system, look at the color of your stoma and the skin around it. Your stoma should be red or pinkish-red, like the color inside your mouth. If it’s any other color, like brown, gray, or black, finish changing your pouching system. Then, tell your doctor or nurse.
The skin around your stoma may be slightly pink (if you have lighter skin). Or, it may be gray-brown (if you have darker skin). This is from the pressure of the wafer and does not mean your skin is irritated. Your skin should go back to its normal color if you leave it uncovered for 15 to 30 minutes.
Caring for irritated skin
Irritated skin will look bright red, not pink. You may also feel burning, itching, or pain in the area. If you notice that the skin around your stoma is irritated, tell your doctor or nurse.
Learn about our Health Information Policy.