Time to Read:
About 2 minutes
This information describes Level 2 of an exercise program. This program will help you before and after your stem cell transplant, and during your recovery.
These exercises use the major muscle groups that you use for everyday activities. It will help prevent you from feeling stiff and decrease the effects of bed rest and not being able to move. Your physical and occupational therapists will help guide you through the program.
Exercise tips
- Dress comfortably. You should wear clothing that won’t limit your movements. You can wear a hospital gown, pajamas, or athletic clothing.
- Don’t hold your breath while doing any of these exercises. Count out loud during the exercises to keep your breaths evenly paced.
- Stop any exercise that causes you pain or discomfort and tell your physical or occupational therapist. You can continue to do the other exercises.
Exercises
Standing side kicks
- Hold on to the backrest of a stable chair, a locked and raised bedrail, or a countertop for balance. Stand up straight. Don’t lean forward or to the side.
- Keeping your toes pointed forward, lift your right leg out to the side (see Figure 1).
- Lower your leg back to the floor.
- Repeat 10 times.
- Repeat the exercise with your left leg.

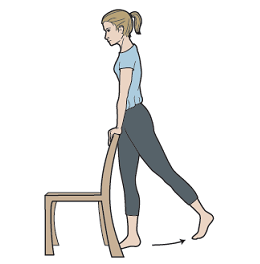
Standing backward kicks
- Hold on to the backrest of a stable chair, a locked and raised bed rail, or a counter top for balance. Stand up straight.
- Keeping your knee straight, extend your right leg behind you (see Figure 2). Don’t lean forward.
- Lower your leg slowly back to the floor.
- Repeat 10 times.
- Repeat the exercise with your left leg.
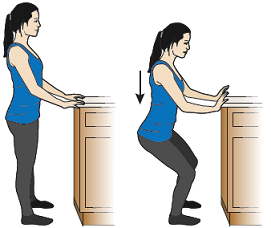
Mini squats
- Stand next to a locked bed rail or counter top. Hold onto it with both hands.
- Place your feet 6 to 12 inches away from the bed or counter. Stand with your feet shoulder width apart. Keep your back straight.
- Slowly bend your hips and knees until your knees are at a 45-degree angle (see Figure 3).
- Then, slowly straighten your hips and knees until you’re standing upright.
- Repeat 10 times.
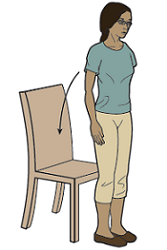
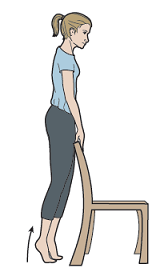
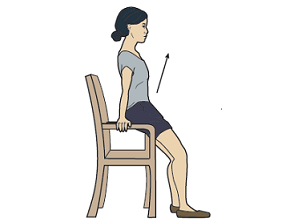
Sit to stand
- Sit in a stable chair.
- Using your arms to help you, slowly stand up (see Figure 4).
- Pause briefly in the standing position (see Figure 5).
- Once you’re ready, slowly lower yourself back down to a seated position.
- Repeat 5 times.
- To make this exercise harder, place your hands on your knees or across your chest as you stand up.
Heel raises
- Hold on to the backrest of a stable chair, a locked and raised bedrail, or a countertop for balance. Stand up straight with your feet about 6 inches apart (hip-width apart).
- Slowly push up onto your toes, and lift your heels off of the floor (see Figure 6).
- Slowly return to the starting position and place your feet flat on the floor.
- Repeat 10 times.
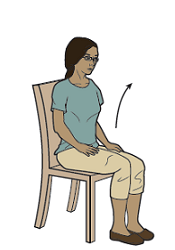
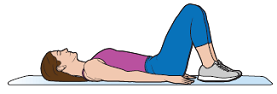
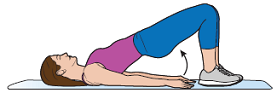
Bridging
- Lie on your back with both knees bent and your feet on the bed. Keep your arms at your sides (see Figure 7).
- Tighten the muscles in your abdomen (belly) and buttocks.
- Push through your feet and lift your buttocks 3 to 4 inches off the bed (see Figure 8).
- Hold the position for 5 seconds.
- Then, slowly lower your buttocks back onto the bed.
- Repeat 10 times.
Seated push-ups
- Sit comfortably in a chair with armrests. Keep your back straight, shoulders back, and head facing forward.
- Place your hands on the armrests of the chair. Place your feet shoulder width apart.
- Position yourself as if you were going to stand up (see Figure 9).
- Straighten your elbows and lift your buttocks off the seat until your elbows are straight. Lift your buttocks as high as you can, even if you can’t get off the chair completely (see Figure 10).
- Slowly lower yourself back onto the seat of your chair as you bend your elbows.
- Repeat 10 times.
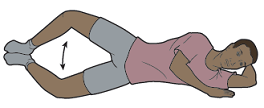
Clamshells
- Lie on your side, with your legs bent and your knees and ankles together.
- Keeping your ankles together, slowly raise your top knee (see Figure 11).
- Hold the position for 5 seconds.
- Slowly close your legs and return to the starting position.
- Repeat 10 times.
- Turn over to your other side and repeat the exercise.
Last Updated
June 12, 2026
Learn about our Health Information Policy.